Windows Azure: Staging Publishing Support for Web Sites, Monitoring Improvements, Hyper-V Recovery Manager GA, and PCI Compliance
This morning we released another great set of enhancements to Windows Azure. Today’s new capabilities and announcements include:
- Web Sites: Staged Publishing Support and Always On Support
- Monitoring Improvements: Web Sites + SQL Database Alerts
- Hyper-V Recovery Manager: General Availability Release
- Mobile Services: Support for SenchaTouch
- PCI Compliance: Windows Azure Now Validated for PCI DSS Compliance
All of these improvements are now available to use immediately (note that some features are still in preview). Below are more details about them:
Web Sites: Staged Publishing Support
With today’s release, you can now enable staged publishing to your Windows Azure Web Sites. This new feature is really powerful, and enables you to deploy updates of your web apps/sites to a staging version of the site that can be accessed via a URL that is different from your main site. You can use this staged site to test your site/app deployment and then, when ready, instantaneously swap the content and configuration between the live site and the staging version.
This new features enables you to deploy changes with more confidence. And it ensures that your site is never in an inconsistent state (where some files have been updated and others not) - now you can immediately swap all changes to all of the files in one shot.
Enabling Staged Publishing Support
To setup staged publishing go to the DASHBOARD tab of a web site and click Enable staged publishing from the quick glance section:

Clicking this link will cause Azure to create a new staging version of the web-site and link it to the existing site. This linkage is represented in the navigation of the Windows Azure Management Portal – the staging site will show up as a sub-node of the primary site:

If you look closely at the name of the staging site, you’ll notice that its URL by default is sitename-staging (e.g. if the primary site name was “scottgu”, the staging site would be “scottgu-staging”):

You can optionally map any custom DNS name you want to the staging site (using either a C-Name or A-Record) – just like you would a normal site. So your staging domain doesn’t have to have an azurewebsites.net extension. In the scenario above I could remap the staging domain to be staging.scottgu.com, or scottgu-staging.com, or even foobar.scottgu.com if I wanted to.
The staging URL doesn’t change between deployments of a site – so you can configure a custom DNS once, and then you can use it across all subsequent deployments. You can also optionally enable SSL on the staging site and upload a SSL certificate to use with the staging domain (ensuring you can fully test/validate your SSL scenarios before swapping live).
Configuring the Staging Site
You can click on the staging site to manage it just like any other site:

The SCALE tab and the LINKED RESOURCES tabs are disabled for staging sites, but all other tabs work as expected. You can use the CONFIGURE tab to set configuration settings like database and application connection-strings (if you set these at the site level they override anything you might have in a web.config file).
One thing you’ll also notice when you open the staging site is that there is a new SWAP button in the bottom command-bar of it – we’ll talk about how to use that in a little bit.
Deploying to the Staging Site
Deploying a new instance of your web-app/site to the staging site is really easy. Simply deploy to it just like you would any normal site. You can use FTP, the built-in “Publish” dialog inside Visual Studio, Web Deploy or Git, TFS, VS Online, GitHub, BitBucket, DropBox or any of the other deployment mechanism we already support. You configure these just like you would a normal site.
Below I’m going to use the built-in VS publish wizard to publish a new version of the site to the staging site:

Once this new version of the app is deployed to the staging site we can access a page in it using the staging domain (in this case http://scottgu-staging):

Note that the new version of the site we deployed is only in the staging site. This means that if we hit the primary site domain (in this case http://scottgu) we wouldn’t see this new “V2” update - it would instead show any older version that had been previously deployed:

This allows us to do final testing and validation of the staging version without impacting users visiting the live production site.
Swapping Deployments
At some point we’ll be ready to roll our staged version to be the live production site version. Doing this is easy – all we need to do is push the SWAP button within the command-bar of either our live site or staging site using the Windows Azure Portal (you can also automate this from the command-line or via a REST call):

When we push the SWAP button we’ll be prompted with a confirmation dialog explaining what is about to happen:

If we confirm we want to proceed with the swap, Azure will immediately swap the content of the live site (in this case http://scottgu) with the newer content in the staging site (in this case http://scottgu-staging). This will take place immediately – and ensure that all of the files are swapped in a single shot (so that you never have mix-matched files).
Some settings from the staged version will automatically copy to the production version – including things like connection string overrides, handler mappings, and other settings you might have configured. Other settings like the DNS endpoints, SSL bindings, etc will not change (ensuring that you don’t need to worry about SSL certs used for the staging domain overriding the production URL cert, etc).
Once the swap is complete (the command takes only a few seconds to execute), you’ll find that the content that was previously in the staging site is now in the live production site:

And the content that had been in the older live version of the site is now in the staging site. Having the older content available in the staging site is useful – as it allows you to quickly swap it back to the previous site if you discover an issue with the version that you just deployed (just click the SWAP button again to do this). Once you are sure the new version is fine you can just overwrite the staging site again with V3 of your app and repeat the process again.
Deployment with Confidence
We think you’ll find that the new staged publishing feature is both easy to use and very powerful, and enables you to handle deployments of your sites with an industrial strength workflow.
Web Sites: Always On Support
One of the other useful Web Site features that we are introducing today is a feature we call “Always On”. When Always On is enabled on a site, Windows Azure will automatically ping your Web Site regularly to ensure that the Web Site is always active and in a warm/running state. This is useful to ensure that a site is always responsive (and that the app domain or worker process has not paged out due to lack of external HTTP requests).
It also useful as a way to keep a Web Site active for scenarios where you want to run background code within it irrespective of whether it is actively processing external HTTP customer requests. We have another new feature we are enabling this week called “Web Jobs” that makes it really easy to now write this background code and run it within a Web Site. I’ll blog more about this feature and how to use it in the next few days.
You can enable Always On support for Web Sites running in Standard mode by navigating to the CONFIGURE tab within the portal, and then toggling the Always On button that is now within it:

Monitoring Improvements: Web Sites + SQL Database Alerts
With almost every release we make improvements to our monitoring functionality of Azure services. Today’s update brings two nice new improvements:
- Metrics updated every minute for Windows Azure Web Sites
- Alerting for more metrics from Windows Azure Websites and Windows Azure SQL Databases
Monitoring Data Every Minute
With today’s release we are now updating statistics on the monitoring dashboard of a Web Site every minute, so you can get much more fresh information on exactly how your website is being used (prior to today the granularity was not as fine grained):

Viewing data at this higher granularity can make it easier to observe changes to your website as they happen. No additional configuration is required to get data every minute – it is now automatically enabled for all Azure Websites.
Expanding Alerting
When you create alerts you can now choose between six different services:
- Cloud Service
- Mobile Service
- SQL Database (New Today!)
- Storage
- Virtual Machine
- Web Site (More Metrics Today!)
To get started with Alerting, click on the Management Services extension on the left navigation tab of the the Windows Azure Management Portal:

Then, click the Add Rule button in the command bar at the bottom of the screen. This will open a wizard for creating an alert rule. You can see all of the services that now support alerts:

New Web Site Alert Metrics
With today’s release we are adding the ability to alert on any metric that you see for a Web Site in the portal (previously we only supported alerts on Uptime and Response Time metrics). Today’s new metrics include support for setting threshold alerts for errors as well as CPU time and total requests:

The CPU time and Data Out metric alerts are particularly useful for Free or Shared websites – you can now use these alerts to email you if you’re getting close to exceeding your quotas for a free or shared website (and need to scale up instances).
New SQL Alert Metrics
With today’s release you can also now define alerts for your SQL Databases. For Web and Business tier databases you can setup alert metrics for the Storage for the database. There are also now additional metrics and alerts for SQL Database Premium (which is currently in preview) such as CPU Cores and IOPS.
Once you’ve set up these new alerts, they behave just like alerts for other services. You’ll be informed when they cross the thresholds you establish, and you can see the recent alert history in the dashboard:

Windows Azure Hyper-V Recovery Manager: General Availability Release
I’m excited to announce the General Availability of Windows Azure Hyper-V Recovery Manager (HRM). This release is now live in production, backed by an enterprise SLA, supported by Microsoft Support, and is ready to use for production scenarios.
Windows Azure Hyper-V Recovery Manager helps protect your on premise applications and services by orchestrating the protection and recovery of Virtual Machines running in a System Center Virtual Machine Manager 2012 R2 and System Center Virtual Machine Manager 2012 SP1 private cloud to a secondary location. With simplified configuration, automated protection, continuous health monitoring and orchestrated recovery, Hyper-V Recovery Manager service can help you implement Disaster Recovery and recover applications accurately, consistently, and with minimal downtime.
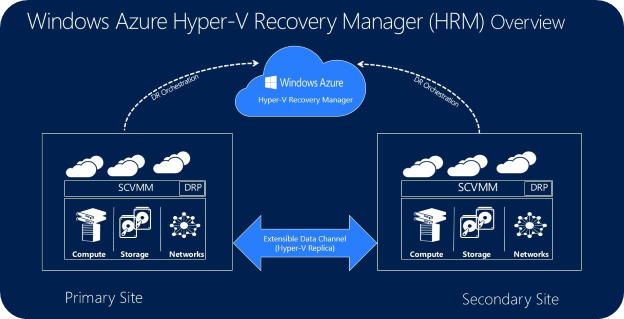
The service leverages Hyper-V Replica technology available in Windows Server 2012 and Windows Server 2012 R2 to orchestrate the protection and recovery of Hyper-V Virtual Machines from one on-premise site to another on-premise site. Application data always travels on your on premise replication channel. Only metadata that is needed (such as names of logical clouds, virtual machines, networks etc.) for orchestration is sent to Azure. All traffic sent to/from Azure is encrypted.
Getting Started
To get started, use the Windows Azure Management Portal to create a Hyper-V Recovery Manager Vault. Browse to Data Services > Recovery Services and click New to create a New Hyper-V Recovery Manager Vault. You can name the vault and specify a region where you would like the vault to be created.

Once the Hyper-V recovery Manager vault is created, you’ll be presented with a simple tutorial that will help guide you on how to register your SCVMM Servers and configure protection and recovery of Virtual Machines.

To learn more about setting up Hyper-V Recovery Manager in your deployment follow our detailed step-by-step guide.
Key Benefits of Hyper-V Recovery Manager
Hyper-V Recovery Manager offers the following key benefits that differentiate it from other disaster recovery solutions:
- Simple Setup and Configuration: HRM dramatically simplifies configuration and management operations across large number of Hyper-V hosts, Virtual Machines and data-centers.
- Automated Protection: HRM leverages the capabilities of Windows Server and System Center to provide on-going replication of VMs and ensures protection throughout the lifecycle of a VM.
- Remote Monitoring: HRM leverages the power and reach of Azure to provide a remote monitoring and DR management service that can be accessed from anywhere.
- Orchestrated Recovery: Recovery Plans enables automated DR orchestration by sequencing failover of different application tiers and customization with scripts and manual actions.
New Improvements
The Hyper-V Recovery Manager service has been enhanced since the initial October Preview with several nice improvements:
- Improved Failback Support: The Failback support has been improved in scenarios where the primary host cluster has been rebuilt after an outage.
- Support for Kerberos based Authentication: Cloud configuration now allows selecting Kerberos based authentication for Hyper-V Replica. This is useful in scenarios where customers want to use 3rd party WAN optimization and compression and have AD trust available between primary and secondary sites.
- Support for Upgrade from VMM 2012 SP1 to VMM 2012 R2: HRM service now supports upgrades from VMM 2012 SP1 to VMM 2012 R2.
- Improved Scale: The UI and service has been enhanced for better scale support.
Please visit Windows Azure web site for more information on Hyper-V Recovery Manager. You can also refer to additional product documentation. You can visit the HRM forum on MSDN for additional information and engage with other customers.
Mobile Services: Support for SenchaTouch
I’m excited to announce that in partnership with our friends at Sencha, we are today adding support for SenchaTouch to Windows Azure Mobile Services. SenchaTouch is a well know HTML/JavaScript-based development framework for building cross-platform mobile apps and web sites. With today’s addition, you can easily use Mobile Services with your SenchaTouch app.
You can download Windows Azure extension for Sencha here, configure Sencha loader with the location of the azure extension, and add Azure package to your app.json file:
{ name : "Basic", requires : [ "touch-azure"]}
Once you have the Azure extension added to your Sencha project, you can connect your Sencha app to your Mobile Service simply by adding the following initialization code:
Ext.application({
name: 'Basic',
requires: ['Ext.azure.Azure'],
azure: {
appKey: 'myazureservice-access-key',
appUrl: 'myazure-service.azure-mobile.net'
},
launch: function () {
// Call Azure initialization
Ext.Azure.init(this.config.azure);
}
});
From here on you can data bind your data model to Azure Mobile Services, authenticate users and use push notifications. Follow this detailed Getting Started tutorial to get started with SenchaTouch and Mobile Services. Read more detailed documentation at Mobile Services Sencha extension resources page.
Windows Azure Now Validated for PCI DSS Compliance
We are very excited to announce that Windows Azure has been validated for compliance with the Payment Card Industry (PCI) Data Security Standards (DSS) by an independent Qualified Security Assessor (QSA).
The PCI DSS is the global standard that any organization of any size must adhere to in order to accept payment cards, and to store, process, and/or transmit cardholder data. By providing PCI DSS validated infrastructure and platform services, Windows Azure delivers a compliant platform for you to run your own secure and compliant applications. You can now achieve PCI DSS certification for those applications using Windows Azure.
To assist customers in achieving PCI DSS certification, Microsoft is making the Windows Azure PCI Attestation of Compliance and Windows Azure Customer PCI Guide available for immediate download.
Visit the Trust Center for a full list of in scope features or for more information on Windows Azure security and compliance.
Summary
Today’s release includes a bunch of great features that enable you to build even better cloud solutions. If you don’t already have a Windows Azure account, you can sign-up for a free trial and start using all of the above features today. Then visit the Windows Azure Documentation Center to learn more about how to build apps with it.
Hope this helps,
Scott
P.S. In addition to blogging, I am also now using Twitter for quick updates and to share links. Follow me at: twitter.com/scottgu