Developing and Deploying Node.js Express Web App on Windows Azure
In my last post Beginner’s Guide to Node.js on Windows Azure, I have introduced Node.js and Windows Azure Tools for Node.js. In this post, I will demonstrate how to develop and deploy a Node.js web app using Windows Azure PowerShell for Node.js. In this demo web app, I will be using Node module Express as the web app framework and Jade as the view engine for the HTML view templates. We are using Windows Azure PowerShell for Node.js for developing and deploying the app on Windows Azure. If you want to deploy Node.js apps on Windows Azure using Cloud9 IDE, check out my blog post from here.
This blog post and demo app will demonstrate the following:
- How to develop and test Node.js apps on Windows Azure using Windows Azure PowerShell for Node.js
- How to install Node modules using npm with Windows PowerShell cmdlets
- How to use Express module for developing web apps
- How to use Jade view engine with Express web app
- How to deploy Node.js web app on Windows Azure
The Windows Azure PowerShell for Node.js is a command-line tool that allows the Node developers to build and deploy Node.js apps in Windows Azure using Windows PowerShell cmdlets. Using Windows Azure PowerShell for Node.js, you can develop, test, deploy and manage Node based hosted service in Windows Azure. For more reference on Windows Azure PowerShell for Node.js, check out my blog post Windows Azure PowerShell for Node.js.
Create Hosted Service and Web Role using PowerShell for Node.js,
For getting the Windows Azure PowerShell for Node.js, click All Programs, Windows Azure SDK for Node.js and run Windows Azure PowerShell for Node.js, as Administrator.
The Windows PowerShell cmdlet will create a hosted service named ExpressNode
The above new Azure service will create the files ServiceConfiguration.Cloud.cscfg, ServiceConfiguration.Local.cscfg ServiceDefinition.csdef and deploymentSettings.json in the ExpressNode folder
The following command will add a new Web Role with name ExpressWebApp
This will create the following files in the web role ExpressWebApp as shown in the below picture
Install Express and Jade Modules
The demo Node web app will be developed by using the Express framework. Express is an MVC framework for Node, which can be use for developing web apps and REST based web services. Let’s install express module onto the web role project. We can install the Express module using the node package manager npm which will be working with Windows Azure PowerShell for Node.js. To install the Express, navigate to the web role project folder and execute the command npm install express as shown in the below picture:
The express framework provides a scaffolding tool which can use for generating the basic MVC app with default structure. Let’s execute the Express scaffolding tool to generate the app
The scaffolding tool generate the files as shown in the above picture. By default, Express is using Jade view engine and will create few Jade files with extension .jade. We need to install the node modules having dependency with application generated by Express scaffolding tool. To install the all dependent node packages, just execute the command npm install.This command will install the all dependent node modules. In our web app, it will install the dependent module Jade. All dependencies will be identified from the file package.json.
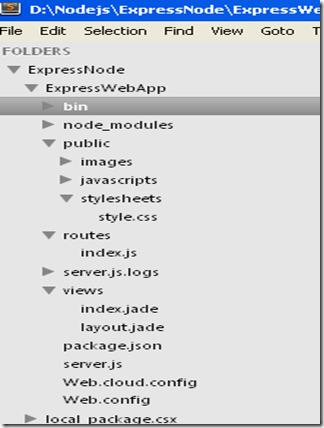
Let’s modify the generated application by Express scaffolding tool. I have just renamed the generated app.js with server.js and added few code for our demo purpose. This below picture shown the folder structure of the modified app.
Node.js Web App with Express and Jade
The demo web app is a very simple app in which the home page will show the few blog list in a html table and the uri ‘/api’ expose a API method which returns all blog data as JSON format. The screen shots of the completed application is shown below
Let’s create the HTTP server with Express and configure the basic configurations for the Express web app
1: var express = require('express');
2: var app = module.exports = express.createServer();
3: var port = process.env.port || 1337;
4:
5: // Configuration
6: app.configure(function(){
7: app.set('views', __dirname + '/views');
8: app.set('view engine', 'jade');
9: app.use(express.static(__dirname + '/public'));
10: })
We can import the Node modules using require(‘module_name’). Here we have imported the Express module and created an HTTP server using its createServer() method. In the configurations we have specified the folder name of the View files and set Jade as the View Engine.
View Model Data for the Web App
Let’s create some dummy data for passing to our view model object from the Express routes methods.
1: function Blog(author,url,technology) {
2: this.author = author;
3: this.url=url;
4: this.technology=technology;
5: }
6:
7: // Blogs
8: var blogs = [
9: new Blog('Shiju Varghese',
10: 'http://weblogs.asp.net/shijuvarghese/',
11: 'Windows Azure')
12: , new Blog('Glenn Block',
13: 'http://codebetter.com/glennblock/',
14: 'Node on Azure')
15: , new Blog('Steve Marx',
16: 'http://blog.smarx.com/',
17: 'Windows Azure')
18: , new Blog('Scott Guthrie',
19: 'http://weblogs.asp.net/scottgu/',
20: 'ASP.NET & Azure')
21: , new Blog('Rinat Abdullin',
22: 'http://abdullin.com/',
23: 'CQRS')
24: ];
Web App Routes
Our web app has two routes. The request for ‘/’ will pass the blog data to view template which will render the blog data in html table. The request ‘/api’ is exposing as API method and will return the blog data as JSON string.
1: app.get('/', function(req, res){
2: res.render('index', {title:'home',blogs: blogs });
3: });
4: app.get('/api', function(req, res){
5: res.json(blogs);
6: });
The HTTP Get request for ‘/’ will render the view file index.jade where we are passing view model data for title and blogs. Since we have specified the view engine as Jade, we don’t have to specify the .jade extension when specifying the view name. The application will look the view index.jade on the Views folder and will take layout.jade as the layout page if that jade files is exists.
Let’s add the Jade template syntax for the index.jade for displaying the blogs data in html table
1: html
2: head
3: title Index
4: body
5: h1 Favourite Blogs
6: form
7: table(border="1")
8: tr
9: th Author
10: th Url
11: th Technology
12:
13: each item in blogs
14: tr
15: td #{item.author}
16: td
17: a(href ='#{item.url}') #{item.url}
18: td #{item.technology}
19:
Let’s add a layout.jade which can use as layout page for the our web app
1: html
2: head
3: title= title
4: link(rel='stylesheet',
5: href='/stylesheets/style.css')
6: body!= body
Running the Web App in Windows Azure Emulator
The Windows PowerShell cmdlet Start-AzureEmulator –lauch will create the local package and you can run the app from the Windows Azure development emulator
Download and Import Windows Azure Publish Settings
We need to import the publish settings files in order to upload publish our apps on Windows Azure. Let’s download the Windows Azure publish settings file from Windows Azure Management portal. The PowerShell cmdlet Get-AzurePublishSettings will redirect to publish settings download page in the Windows Azure Management portal. Let’s download the publish settings file.
To import the publish settings file to our web role app, execute the PowerShell cmdlet Import-AzurePublishSettings with the location of the publish settings file we have downloaded in previous step. Please note that this is one time activity for your web role app. In later deployments, you can directory publish the app without import the publish settings file.
Publishing Node Web App on Windows Azure
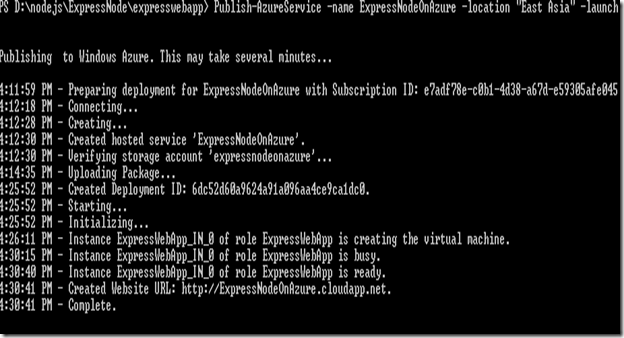
Let’s publish our Node web app on Windows Azure by using Windows PowerShell cmdlet Publish-AzureService with name as ExpressNodeOnAzure and location as East Asia.
The following screen shot shows the Node web app running from the Windows Azure.
Source Code
The source code of the Node.js app can download from GitHub at https://github.com/shijuvar/NodeOnAzure. I have been using this source code repository for putting Node.js samples for Windows Azure and will add more samples on later time.
Summary
Windows Azure is great and easy platform for building Node.js apps. Windows Azure is providing very rich support for building and deploying Node.js web apps on Windows Azure.The Windows Azure PowerShell for Node.js allows the Node developers to build, test and deploy Node.js apps on Windows Azure using Windows PowerShell cmdlets. Using Windows Azure PowerShell for Node.js, you can develop, test, deploy and manage Node based hosted service in Windows Azure


