ASP.NET MVC 3 Custom Validation using Data Annotations
ASP.NET MVC 3 System.ComponentModel.DataAnnotations package provides a vast range of Data Annotations attribute, but there are certain scenarios where we need something which is very specific to our business requirements and we need to implement our own Validation Attributes. ASP.NET being an extensible framework which makes it possible for the developer to add user defined custom business validations using custom data annotations.
In this article I am going to demonstrate Custom Validation using ASP.NET Data Annotations.
First let us take a scenario where I need to create a form where I have to Draw a graph based on Date Range. In this form I have a graph control and From and To Date. Using the ‘Required’ DataAnnotation I can check if the Date is entered or not, Date Format can be validated using the RegularExpression Validator, but to validate some of the specific case like Comparing the From Date and To Date, Minimum date should not less than 2005, etc we need to create our Custom Validation Classes.
To start with this example lets first…
- Create a Telerik MVC 3 Web Application(Razor) from New Project. This is optional you can also use normal ASP.NET MVC 3 Web Project too.
- In the model folder create a Class ‘DateValidationAttribute.cs’ here we have to suffix the class with Attribute as this is a standard which is recognized by our ASP.NET MVC Application for any class to be used for DataAnnotation. Here the ‘Attribute’ suffix is suppressed and only the first part ‘DateValidation’ is used in the View Model Class as Data Annotation.
- Add a reference to System.ComponentModel.DataAnnotations.dll to our Project.
- Add a namespace reference of System.ComponentModel.DataAnnotation class in our DateValidationAttribute.cs class.
- In our DateValidationAttribute class implement ValidationAttribute base class, ValidationAttribute Class is the base class for all the System defined and user defined Custom Validation attribute classes.
With the steps given above our initial class will look something similar to the one below.
1: public class DateValidationAttribute: ValidationAttribute
2: {
3: public DateValidationAttribute()
4: { }
5:
6: }
In this example I am creating a class named DateValidationAttribute.cs which extends base class ‘ValidationAttribute’ of System.ComponentModel.DataAnnotation package.
Now to provide the custom Validation Logic in this class we have to override the IsValid method of ValidationAttribute class and to make this class more generic, I have created a enum, which tells us what is the type of the validation I am going to use my DateValidation class.
1: public enum ValidationType
2: {
3: RangeValidation,
4: Compare
5: }
And before we override the IsValid method we have to pass the initialization parameters to our DateValidationAttribute class constructor with the fromDate, toDate ValidationType, defaultErrorMessage and basePropertyName, here propertyNameToCompare is the property name of the ‘FromDate’. We are going to need ‘FromDate’ to compare with ToDate and Validate the Dates.
1: private ValidationType _validationType;
2: private DateTime? _fromDate;
3: private DateTime _toDate;
4: private string _defaultErrorMessage;
5: private string _propertyNameToCompare;
6:
7: public DateValidationAttribute(ValidationType validationType, string message, string compareWith = "", string fromDate= "")
8: {
9: _validationType = validationType;
10: switch (validationType)
11: {
12: case ValidationType.Compare:
13: {
14: _propertyNameToCompare = compareWith;
15: _defaultErrorMessage = message;
16: break;
17: }
18: case ValidationType.RangeValidation:
19: {
20: _fromDate = new DateTime(2000,1,1);
21: _toDate = DateTime.Today;
22: _defaultErrorMessage = message;
23: break;
24: }
25:
26: }
27: }
Now we are ready to override the IsValid method where we are going to implement the actual business rule validation. I have used Switch statement here to check which Validation Type the user is requested for.
1: protected override ValidationResult IsValid(object value, ValidationContext validationContext)
2: {
3: switch (_validationType)
4: {
5: case ValidationType.Compare:
6: {
7: var baseProperyInfo = validationContext.ObjectType.GetProperty(_propertyNameToCompare);
8: var startDate = (DateTime)baseProperyInfo.GetValue(validationContext.ObjectInstance, null);
9:
10: if(value!=null)
11: {
12: DateTime thisDate = (DateTime)value;
13: Type classType = typeof(TelerikMvcCustomValidationApp.Models.AccountModel);
14: PropertyInfo methodInfo = classType.GetProperty(_propertyNameToCompare);
15: DisplayAttribute displayAttr = (DisplayAttribute)Attribute.GetCustomAttribute(methodInfo, typeof(DisplayAttribute));
16: if (thisDate <= startDate)
17: {
18: string message = string.Format(_defaultErrorMessage, validationContext.DisplayName, displayAttr.Name);
19: return new ValidationResult(message);
20: }
21: }
22: break;
23: }
24: case ValidationType.RangeValidation:
25: {
26: //Range Validation Logic Here
27: break;
28: }
29:
30: }
31: return null;
32: }
33: }
IsValid method above returns the ValidationResult which is a member of System.ComponentModel.DataAnnotation. Here ValidationResult represents a container for the results of a validation request. Now with these pieces of code our DateValidationAttribute class is ready to consume. I understand that there are lots of tight coupling with the implementation class with this Validation component, this code is just for indicative usage of the Custom Data Annotation an extensibility feature provided by ASP.NET. In actual this class may require few changes.
Now lets come to my model class where I am going to use this as Data Annotation Attribute. In this example I have created a AccountModel.cs class and declared just two properties one is ToDate and another is FromDate for this example.
1: public class AccountModel
2: {
3: [Display(Name = "From Date")]
4: [Required]
5: public DateTime FromDate { get; set; }
6:
7: [Display(Name = "To Date")]
8: [Required]
9: [DateValidation(ValidationType.Compare, "Selected dates should be Less than From Date.", compareWith: "FromDate")]
10: public DateTime ToDate { get; set; }
11: }
In this example I have used Telerik controls for DatePicker control. Telerik controls for MVC can be installed from Tools—>Extension Manager—> Online Templates. This Date controls I have created as a partial view in Views—>Shared folder, so that this can be used across my applications.
1: @model TelerikMvcCustomValidationApp.Models.AccountModel
2: @{
3: ViewBag.Title = "Home Page";
4: }
5: <form action="/Home/DateValidate" method="post">
6: <h2>@ViewBag.Message</h2>
7: <fieldset>
8: <span>
9: @Html.LabelFor(m => m.FromDate)
10: @Html.Telerik().DatePickerFor(m => m.FromDate)
11: @Html.ValidationMessageFor(m => m.FromDate)
12: </span>
13: <br />
14: <span>
15: @Html.LabelFor(m => m.ToDate)
16: @Html.Telerik().DatePickerFor(m => m.ToDate)
17: @Html.ValidationMessageFor(m => m.ToDate)
18: </span>
19: </fieldset>
20: <input type="submit" value="Validate Date" name="btnValidate" id="btnValidate" />
21: </form>
In the code above I am keeping the form method as post and Action to my DateValidation Action of HomeController. When the user clicks the Submit button the form Post the result to Controller and triggers the Validation logic defined in our Custom Validation Logic.
Now to embed this partial view into my Index page I have to write just one line as below in ‘Index.cshtml’ page.
@Html.Partial("DateValidate")
Now coming to my Home Controller, where I have created an Action method which Provides custom action on Validation failure and Success.
public ActionResult DateValidate(AccountModel model)
{
if (!ModelState.IsValid)
return View(model);
return RedirectToAction("About");
}
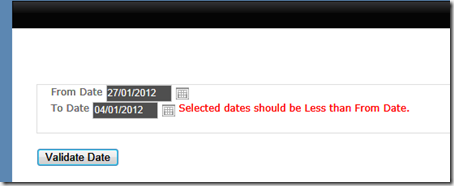
Just to keep this simple I am redirecting the user to About Page of my ASP.NET MVC Application, which is already provided. And for Validation failure I am keeping the user in the same page with the validation message displayed. Now lets assemble all the pieces of codes and test it. I am entering the invalid data where I am keeping the From Date more than To Date, with this I am getting the result as given in the screen below.
And for the built in Required Field Validation
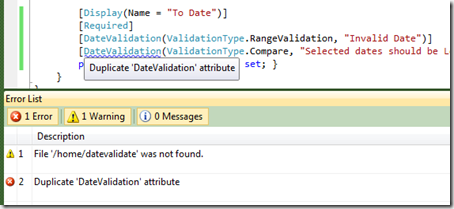
If you can look into the code above for DateValidationAttribute class I have also provided an additional Validation for Date Range Validation, this can be used to restrict the user to enter dates in some Range based on the Business requirements. I am leaving it for you to implement. In order to Implement the same attribute multiple times we have to just fine tune some lines of my code as below.
But you can see above by default you cannot use the same Data Annotation Attribute multiple times in the same Property. To Get this working you have to provide additional Attribute to our DateValidationAttribute Class as below.
With AllowMultiple=true we can use the same DataAnnotation attribute multiple times in the same Property.
This code is just an extract of the actual implementation which is more structured and bigger. But I hope this example will give you a quick start on how to use the Custom Validation Data Annotation attributes. For further reading you can follow the links below from MSDN.
- Validation with the Data Annotation Validators (C#)
- Using Data Annotations for Model Validation
- Introducing Data Annotations Extensions
You can also download the sample code from here.


