Serialize only specific class properties to JSON string using JavaScriptSerializer
About one year ago I wrote a blog post about JavaScriptSerializer and the Serialize and Deserialize methods it supports.
Note: This blog post has been in draft for sometime now, so I decided to complete it and publish it.
There might be situation when you want to serialize to JSON string only specific properties of a given class. You can do that using JavaScriptSerializer in combination with LINQ.
Let’s say we have the following class definition
public class Customer
{
    public string Name { get; set; }
    public string Surname { get; set; }
    public string Email { get; set; }
    public int Age { get; set; }
    public bool Drinker { get; set; }
    public bool Smoker { get; set; }
    public bool Single { get; set; }
}
Next, lets create method that will create sample data for our demo
private List<Customer> GetListOfCustomers()
{
    List<Customer> customers = new List<Customer>();
    customers.Add(new Customer()
    {
        Name = "Hajan",
        Surname = "Selmani",
        Age = 25,
        Drinker = false,
        Smoker = false,
        Single = false,
        Email = "hajan@hajan.com"
    });
    customers.Add(new Customer()
    {
        Name = "John",
        Surname = "Doe",
        Age = 29,
        Drinker = false,
        Smoker = true,
        Single = false,
        Email = "john@doe.com"
    });
    customers.Add(new Customer()
    {
        Name = "Mark",
        Surname = "Moris",
        Age = 34,
        Drinker = true,
        Smoker = true,
        Single = true,
        Email = "mark@moris.com"
    });

    return customers;
}
So, we have three customers with some property values for each of them. Now, lets serialize some of their properties using JavaScriptSerializer.
First, you must put the following directive:
using System.Web.Script.Serialization;
Next, we create list of customers that will get the returned value from GetListOfCustomers method and we create instance of JavaScriptSerializer class
List<Customer> customers = GetListOfCustomers();
JavaScriptSerializer serializer = new JavaScriptSerializer();
Now, lets say we want to serialize as JSON string and retrieve only the Age property data… We do that with only one simple line of code:
//this will serialize only the 'Age' property
string jsonString = serializer.Serialize(customers.Select(x => x.Age));
The result will be:

Nice!
Now, what if we want to serialize multiple properties at once, but not all class properties?
string jsonStringMultiple = serializer.Serialize(customers.Select(x => new { x.Name, x.Surname, x.Age }));
The result will be:
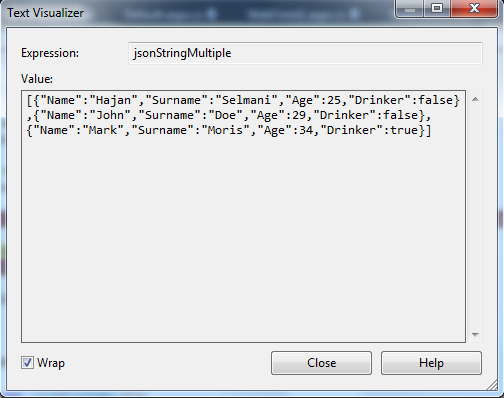
You see, the result is an array of objects with the four properties and their corresponding values we have selected using the LINQ query above. You can see that integer and boolean values are without quotes, which is correct way of serialization.
Now, you probably saw a difference somewhere? Namely, in the first example where we have selected only one property, there are only the values of the property (no property name), while in the second example we have the property name and it’s corresponding value… Why is it like that? It’s because in the second query, we use new { … } to specify multiple properties in the select statement. Therefore, the anonymous new { … } creates an object of each found item. So, if you are interested to make some more tests, run the following two lines of code:
var customers1 = customers.Select(x => x.Name).ToList();
var customers2 = customers.Select(x=> new { x.Name } ).ToList();
and you will obviously see the difference.
If we use the new { } way for single property selection, like in the following example
string jsonString2 = serializer.Serialize(customers.Select(x => new { x.Age }));
the result will be:

The complete demo code used for this blog post:
List<Customer> customers = GetListOfCustomers();
JavaScriptSerializer serializer = new JavaScriptSerializer();

//this will serialize only the 'Age' property
string jsonString = serializer.Serialize(customers.Select(x => x.Age ));

string jsonStringMultiple = serializer.Serialize(customers.Select(x => new { x.Name, x.Surname, x.Age, x.Drinker }));

var customers1 = customers.Select(x => x.Name).ToList();
var customers2 = customers.Select(x=> new { x.Name } ).ToList();

string jsonString2 = serializer.Serialize(customers.Select(x => new { x.Age }));
You can download the demo project here.
I hope this was useful blog post.
Regards,
Hajan