Window Clippings 2.1: How to Install

As Window Clippings 2.1 does not include an installer and requires no real installation or configuration steps prior to using it, it’s quite straightforward to “install” it. I do however realize that it may not be obvious to everyone and that is why the upcoming 2.5 release includes an installer. For now however I thought I’d briefly walk through the steps you need to follow to get Window Clippings up and running for the first time.

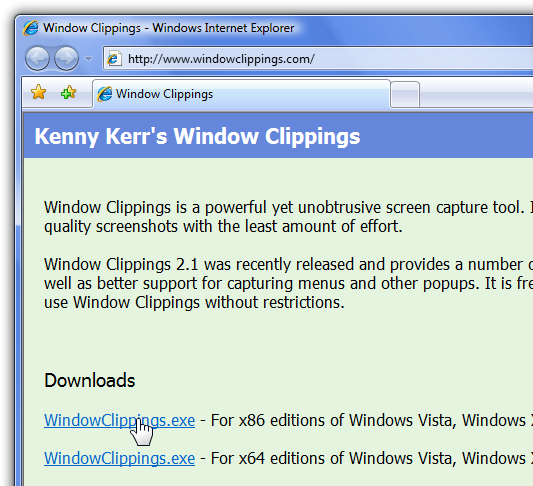
1. Go to www.WindowClippings.com.

2. Click on the link to download WindowClippings.exe. There are two links. If you’re not sure which one you need simply click the first one (for x86) as this will work either way.


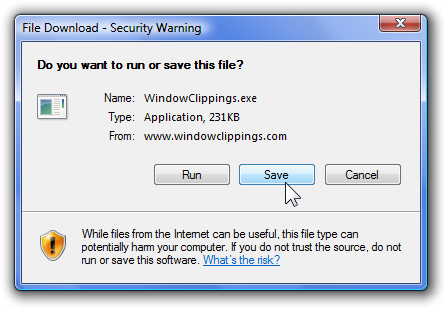
3. Save the file to your computer’s hard drive. This file is the Window Clippings application itself (and not an installer).

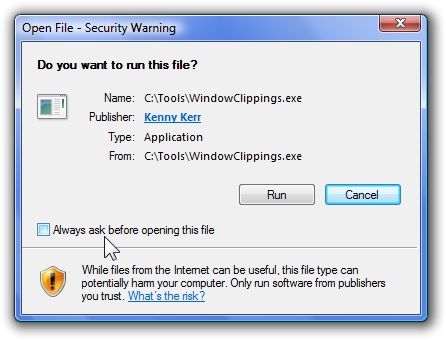
4. Open the folder where you saved the file and double click on WindowClippings.exe to start it for the first time. Windows may block the downloaded file to ensure that you really want to run a downloaded application. Be sure to clear the checkbox in the warning dialog so that Windows does not prompt you again, and then click the Run button.

5. Window Clippings is initially visible in the notification area. As the welcome balloon mentions, you can double click the icon to start capturing screenshots immediately or right click the icon for more options.

That’s it. You’ve installed Window Clippings!

You can purchase a Window Clippings license here.


Stay tuned for more “How to ...” articles.

© 2008 Kenny Kerr

Published Sunday, March 30, 2008 11:19 PM by KennyKerr
Filed under:

Comments

# re: Window Clippings 2.1: How to Install

Sunday, March 30, 2008 8:01 PM by ak

So, is this now a trial and not freeware for unlicensed versions?

# re: Window Clippings 2.1: How to Install

Monday, March 31, 2008 1:24 AM by mikedopp

So what is the difference between this and the Snipping tool(built into vista). I mean if it works better or something I am all for it. Please give a little more detail on why I would pay for this instead of camtasia's tool or all the freeware tools that seem to do the same. I am not trying to be a downer. Let me know. Thanks,

mikedopp - blog.mikedopp.com

# re: Window Clippings 2.1: How to Install

Monday, March 31, 2008 3:09 AM by KennyKerr

ak: There are no disabled features or limited trial period but the resulting images contains the text “WindowClippings.com” in the bottom right corner. A registered copy of Window Clippings will not include the text in resulting images. The idea is that if after you’ve tried it and would like to use the product that you will purchase a license and thereby support its continued development.

mikedopp: It’s a matter of quality. Try recreating the screenshots in this blog post with the Windows Vista Snipping Tool. Do they look anywhere near as professional?  :)  I’m preparing a short article comparing Window Clippings with Windows Vista’s built-in screen capture capabilities. Stay tuned.

# Window Clippings 2.1: Comparing Results with Windows Vista Tools - Kenny Kerr

Pingback from  Window Clippings 2.1: Comparing Results with Windows Vista Tools - Kenny Kerr

# Window Clippings 2.1: How to Get Started

Saturday, April 05, 2008 5:51 PM by Kenny Kerr

So you’ve compared the results of using Window Clippings with the other options provided by Windows.

# re: Window Clippings 2.1: How to Install

Saturday, May 10, 2008 8:48 AM by Laura

So far this is just fine, but, I don't know what to do with the watermark zip.

I have downloaded it & looked inside the zip file. Where do those files go & how do I go about adding my watermark?

Thanks,

Laura

# re: Window Clippings 2.1: How to Install

Saturday, May 10, 2008 10:22 AM by KennyKerr

Laura: Here’s how to install the Watermark add-in.

1. Copy all of the files from the watermark ZIP to the same folder as WindowClippings.exe.

2. Open the Window Clippings Options window and select the Add-Ins tab.

3. Click the Register button and select the “Kerr.WindowClippings.FilterWatermark.dll” file from the folder in step 1.

The “Add watermark” add-in should now be listed with the other “Filter” add-ins and is ready to be used. You can select the new add-in and click the Settings button to select a watermark image to use.

Hope that helps.

# re: Window Clippings 2.1: How to Install

Saturday, May 10, 2008 7:11 PM by Stephan Paternotte

After installing Window Clippings and first use, it has somehow managed to have itself auto-started at each startup of the computer. I say 'somehow' because SysAdmin Tools Autoruns seems not to detect it.

Anyways, for those like me who don't necessarily need a screen capture utility stand-by at all times, would it be a suggestion to make the autostart hotkey and icon optional?

Cheers, Stephan

# re: Window Clippings 2.1: How to Install

Sunday, May 11, 2008 1:01 AM by KennyKerr

Stephan Paternotte: It is indeed optional. This can be controlled using the options on the General tab of the Window Clippings Options window. If you clear the “Using Print Screen key...” and “Show Window Clippings icon...” check boxes it will not start automatically when you login. You can then create your own Windows shortcut to launch the capture screen as needed.

The Sysinternals Autoruns tool should display the Window Clippings startup options under the “HKCU\Software\Microsoft\Windows\CurrentVersion\Run” section.

# re: Window Clippings 2.1: How to Install

Sunday, May 11, 2008 3:03 AM by Stephan Paternotte

Thanks for the tip Kenny. I didn't realise these ticks were causing the autostart feature.

I figured out why Autoruns failed to spot the HKCU. I started autoruns "as adminstrator" and thus it didn't see the entry for my normal login guise. Stephan