Using Azure CDN to render media files
One of my customer, who was using a popular video service to render all his video files in the website was looking for alternatives. The concerns from the customer were the following
- The content to be delivered through the customer URL
- The video files should not use any branding from the service
The customer was looking for a cost effective solution where he will be able to render all his medial files super fast. I discussed Azure features with the customer and he was very much interested in the CDN service offered by Microsoft Azure. Azure CDN is very easy to configure and with minimal efforts, we configured Azure CDN with storage account. The performance was much faster than the previously used video service and the files are rendering with the customer domain name and no external logo in the Videos.
In this article I am doing a walkthrough of setting up storage account and CDN distribution in Microsoft Azure. To sign up for an Azure account, refer the below URL.
Once you configured your account login to your azure subscription. In Azure Resource Groups are used to group the service together so that you can manage them easily. So, let us create a resource group.
Create a Resource Group
From the Azure portal, Click on ![]() to create a new resource group. It is always a good idea to name your resource group with the purpose. Since my purpose is to create a CDN for my web site, I named it WebCDN. Make sure you select the correct subscription and the region for resource group, click on Resource groups and click create.
to create a new resource group. It is always a good idea to name your resource group with the purpose. Since my purpose is to create a CDN for my web site, I named it WebCDN. Make sure you select the correct subscription and the region for resource group, click on Resource groups and click create.
Make sure you select the right subscription and the region.
Create a Storage Account
Now you need to store your video files. Azure support several origin types. You can create a CDN end point for an origin from your own data center. The storage account from Azure is very cost effective, or I should say it is very cheap. I decided to store the media files in the Azure storage account.
From the resource group I just created in the previous step, click on the Add button to add a new Azure resource.
A form will appear for you to select the resource you are looking for. In the search text box, enter storage account and click enter. All matching resources will appear. Click on Storage Account from Microsoft.
Now you need to enter the details for the storage account. You can get more information about Azure storage account from the below URLs.
https://docs.microsoft.com/en-us/azure/storage/common/storage-create-storage-account
https://docs.microsoft.com/en-us/azure/storage/common/storage-account-options
I chose the options for my web distribution. When you create your storage account, you need to consider your requirements and choose the right options.
Once you enter all the options, click on the Create button to create the storage account. My requirement was to create a storage account for my media files. I need to use blob. In blob, I can create containers to logically group my contents. From the storage account, click on the Blobs to create containers.
Create Blob Containers
In the blob service page, you can see all your blob containers created. It is a good idea to logically organize your files in different blob containers
Click on ![]() button to create a new blob container.
button to create a new blob container.
In the New container dialog, enter your container name and select the access level. Since my files will be accessed from website, I selected anonymous read access.
Upload Files to storage account
Once you have the storage account, you need to upload your files to the containers. Microsoft offers Storage Explorer for free that can upload files to your storage account.
https://azure.microsoft.com/en-us/features/storage-explorer/
In storage account, you can access your storage account by providing Azure account credential, by providing a connection string or by providing storage account name and key.
From Azure portal, open your storage account. From the left menu, you can see Access Keys.
By default, Azure provides you two keys and connection string. You can either use the connection string or key to add the storage account to the storage explorer. Once you connected, you can go to the containers and you can have complete access to your storage account.
Configure CDN
Now we need to add CDN to distribute the content in the storage account. From your resource group add a resource. Enter CDN in the search box. Select CDN option from Microsoft and then click on the create option.
You need to select the CDN pricing tier. You can see the features from the below URL.
https://docs.microsoft.com/en-us/azure/cdn/cdn-overview#azure-cdn-features
when you create a CDN profile, you can opt to create a CDN end point. You can directly select a CDN endpoint and choose your storage account as the origin.
Once you create the CDN profile, you can access your files in the storage account with the CDN URL. The CDN URL is your http://cdnprofile.azureedge.net. You can access the files with the same path in the storage account. For e.g. if you have a containers images and a file 1.jpg in the container, the URL for the file will be http://cdnprofile.azureedge.net/images/1.jpg . Make sure you use the correct CDN profile.
Configure Custom Domain for CDN
Though Azure provides a URL for the CDN, there is an option to use your own domain name. Go to the CDN end point.
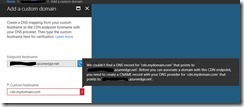
Click on ![]() to add a custom domain to the end point. Before you add your custom URL in Azure, you make sure you create a DNS CNAME entry that points your custom host name to CDN end point host name. When you add the custom hostname, it will validate your custom domain and if not matching, will through the error as follows.
to add a custom domain to the end point. Before you add your custom URL in Azure, you make sure you create a DNS CNAME entry that points your custom host name to CDN end point host name. When you add the custom hostname, it will validate your custom domain and if not matching, will through the error as follows.
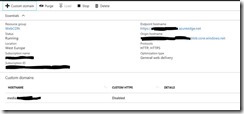
If you add the DNS record correctly and still getting the above error, give enough time for the DNS resolution to happen. Once you add the custom DNS, you can see that in your end point page as follows.
Once you have the custom domain, you can access your content by using the custom domain instead of CDN end point url. E.g. http://<media.mydomain.com>/images/1.jpg will be url for the example we discussed above.
Further Reads
https://docs.microsoft.com/en-us/azure/architecture/best-practices/cdn
https://azure.microsoft.com/en-us/resources/videos/index/?services=cdn
https://docs.microsoft.com/en-us/azure/storage/common/storage-introduction


