TDD: Test-Driven Development with Visual Studio 2008 Unit Tests
The purpose of this blog entry is to explain how you can create unit tests by using Visual Studio 2008. I’m not interested in unit tests in general -- I’m interested in building a particular type of unit test. I want to build unit tests that can be used when following good Test-Driven Development (TDD) practices when building ASP.NET MVC Web Application projects.
Not all unit tests are good TDD tests. In order for a unit test to be useful for Test-Driven Development, you must be able to execute the unit test very quickly. Not all unit tests meet this requirement.
For example, Visual Studio supports a special type of unit test for ASP.NET websites. You must execute this type of unit test in the context of either IIS or the development web server. This is not an appropriate type of unit test to use when practicing Test-Driven Development because this type of unit test is just too slow.
In this blog entry, I’m going to provide you with a walk-through of the process of building unit tests that can be used for Test-Driven Development. I’m going to dive into the details of the Visual Studio 2008 unit testing framework. I’m also going to discuss several advanced topics such as how you can test private methods and how you can execute tests from the command line.
Note: Most of the features described in this blog entry are supported by the Professional Edition of Visual Studio 2008. Unfortunately, these features are not supported by Visual Web Developer. For a comparison of the unit testing features that each edition of Visual Studio 2008 supports, see http://msdn.microsoft.com/en-us/library/bb385902.aspx.
A Quick Walk-through
Let’s start by creating a new ASP.NET MVC Web Application project and creating a Test Project. This part is easy. When you create a new ASP.NET MVC Web Application project, you are prompted to create a new Visual Studio Test Project. Just as long as you leave the top radio button selected -- the default option -- you get a new Test Project added to your solution automatically (see Figure 1).

Figure 1 – Creating a New ASP.NET MVC Web Application Project
The question is: now that you have a Test Project, what do you do with it?
When you create a new ASP.NET MVC application, the project includes one controller which is named HomeController. This default controller has two methods named Index() and About(). Corresponding to the HomeController, the Test Project includes a file named HomeControlleterTest. This file contains two test methods named Index() and About().
The two test methods, Index() and About(), are empty by default (see Figure 2). You can add your test logic into the body of these methods.
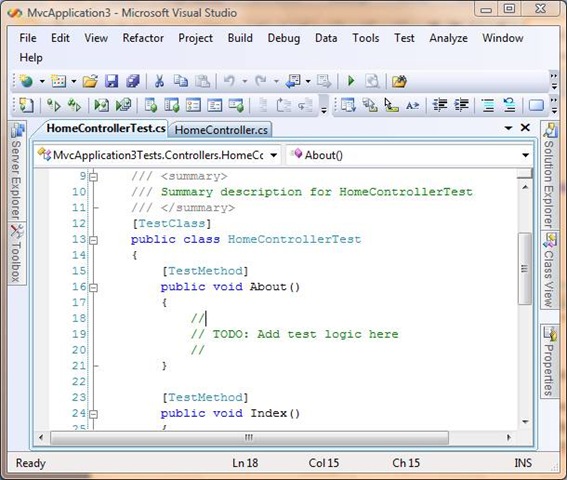
Figure 2 – Empty About() test method ready to be written.
Let’s imagine that you want to build an online store. Imagine that you want to create a Details page for your store that displays details for a particular product. You pass a query string that contains a product Id to the Details page, and the product details are retrieved from the database and displayed.
Following good Test-Driven Development practice, before you do anything else, you first write a test. You don’t write any application code until you have a test for the code. The tests for the Details page act as a criterion for success. To create a successful Details page, the following tests must be satisfied:
1. If a ProductId is not passed to the page, an exception should be thrown
2. The ProductId should be used to retrieve a Product from the database
3. If a matching Product cannot be retrieved from the database, an exception should be thrown
4. The Details View should be rendered
5. The Product should be assigned to the Details View’s ViewData
So let’s implement the first test. According to the first test, if a ProductId is not passed to the Details page, an exception should be thrown. We need to add a new unit test to our Test Project. Right-click the Controllers folder in your Test Project and select Add, New Test. Select the Unit Test Template (see Figure 2). Name the new unit test ProductControllerTest.
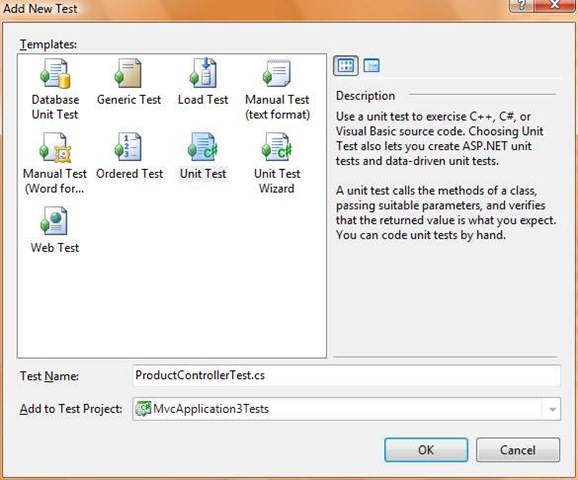
Figure 2 – Adding a new unit test
Be careful about how you create a new unit test since there are multiple ways to add a unit test in the wrong way. For example, if you right-click the Controllers folder and select Add, Unit Test, then you get the Unit Test Wizard. This wizard will generate a unit test that runs in the context of a web server. That’s not what we want. If you see the dialog box in Figure 3, then you know that you have attempted to add an MVC unit test in the wrong way.
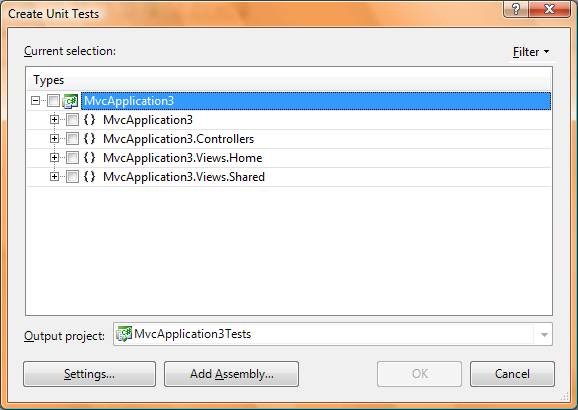
Figure 3 – Whenever you see this dialog box click the Cancel button!
The ProductControllerTest, by default, contains the single test method in Listing 1.
Listing 1 – ProductControllerTest.cs (original)
1: [TestMethod]2: public void TestMethod1()
3: {4: //
5: // TODO: Add test logic here
6: //
7: }We want to modify this test method so that it tests whether an exception is thrown when the Details page is requested without a ProductId. The correct test is contained in Listing 2.
Listing 2 – ProductControllerTest.cs (modified)
1: [TestMethod]2: [ExpectedException(typeof(ArgumentNullException), "Exception no ProductId")]
3: public void Details_NoProductId_ThrowException()
4: {5: ProductController controller = new ProductController();
6: controller.Details(null);
7: }Let me explain what is going on with the test in Listing 2. The method is decorated with two attributes. The first attribute [TestMethod] identifies the method as a test method. The second attribute [ExpectedException] sets up an expectation for the test. If executing the test method does not throw an ArgumentNullException, then the test fails. We want the test to throw an exception because we want an exception to be thrown when the Details page is requested without a ProductId.
The body of the test method contains two statements. The first statement creates an instance of the ProductController class. The second statement calls the controller’s Details() method.
Now, at this point, we have not created the ProductController class in our MVC application. So there is no way that this test will execute successfully. But that is okay. This is the correct path to walk when practicing Test-Driven Development. First, you write a test that fails, and then you write code to fix it.
So let’s run the test so we can enjoy some failure. There should be a toolbar at the top of the code editor window that contains two buttons for running tests. The first button runs the tests in the current context and the second button runs all the tests in the solution (see Figure 4).
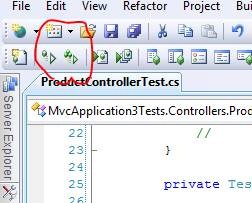
Figure 4 – Executing Visual Studio 2008 Tests
What’s the difference between clicking the two buttons? Running tests in the current context executes different tests depending on the location of your cursor in the code editor window. If your cursor is located on a particular test method, only that method is executed. If your cursor is located on the test class, all tests in the test class are executed. If the Test Results window has focus, all of your tests are executed (for details, see http://blogs.msdn.com/nnaderi/archive/2007/05/11/new-unit-testing-features-in-orcas-part-1.aspx).
Actually, you should always strive to avoid clicking buttons with your mouse. Clicking buttons is slow and Test-Driven Development is all about executing tests quickly. You can execute tests by using these keyboard combinations:
· Ctrl-R, A – Run all tests in solution
· Ctrl-R, T – Run all tests in current context
· Ctrl-R, N – Run all tests in current namespace
· Ctrl-R, C – Run all tests in current class
· Ctrl-R, Ctrl-A – Debug all tests in solution
· Ctrl-R, Ctrl-T – Debug all tests in current context
· Ctrl-R, Ctrl-N – Debug all tests in current namespace
· Ctrl-R, Ctrl-C – Debug all tests in current class
If you run the test method that we just created -- by hitting Ctrl-R, A -- it will fail miserably. The test won’t even compile since we have not created the ProductController class or a Details() method. This is what we need to do next.
Switching back to the ASP.NET MVC project, right-click the Controllers folder and select Add, New Item. Select the Web category and select MVC Controller class. Name the new controller ProductController and click the Add button (or just hit the Enter key). A new controller is created that includes one Index() method.
We want to write the bare minimum amount of code necessary to cause our unit test to pass. The ProductController class in Listing 3 will pass our unit test.
Listing 3 – ProductController.cs
1: using System;
2: using System.Collections.Generic;
3: using System.Linq;
4: using System.Web;
5: using System.Web.Mvc;
6: 7: namespace MvcApplication3.Controllers
8: {9: public class ProductController : Controller
10: {11: public void Details(int? ProductId)
12: {13: throw new ArgumentNullException("ProductId");
14: } 15: } 16: }The class in Listing 3 contains one method named Details(). I erased the Index() method that you get by default when you create a new controller. The Details() method always throws an ArgumentNullException.
After entering the code in Listing 3, hit the keyboard combination Ctrl-R, A (You don’t need to switch back to the Test Project to run the test). The Test Results window shows that our test was successfully passed (see Figure 5).
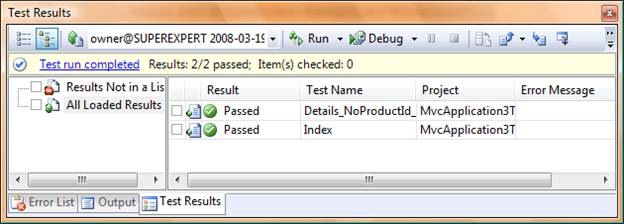
Figure 5 – The happy green of a test successfully passed
You might be thinking that this is crazy. Currently, our Details() method always throws an exception. And, yes, the Details() method would be a crazy method to use in a production application. However, the whole point of Test-Driven Development is that you focus on satisfying the test that is sitting in front of you right now. Later tests will force you to triangulate and build a more respectable looking controller method.
Visual Studio Test Attributes
When we built our test in the previous section, we were required to use the following two attributes:
· [TestMethod] – Used to mark a method as a test method. Only methods marked with this attribute will run when you run your tests.
· [TestClass] – Used to mark a class as a test class. Only classes marked with this attribute will run when you run your tests.
When building tests, you always use the [TestMethod] and [TestClass] attributes. However, there are several other useful, but optional, test attributes. For example, you can use the following attribute pairs to setup and tear down tests:
· [AssemblyInitialize] and [AssemblyCleanup] – Used to mark methods that execute before and after all of the tests in an assembly are executed
· [ClassInitialize] and [ClassCleanup] – Used to mark methods that execute before and after all of the tests in a class are executed
· [TestInitialize] and [TestCleanup] – Used to mark methods that execute before and after each test method is executed
For example, you might want to create a fake HttpContext that you can use with all of your test methods. You can setup the fake HttpContext in a method marked with the [ClassInitialize] attribute and dispose of the fake HttpContext in a method marked with the [ClassCleanup] attribute.
There are several attributes that you can use to provide additional information about test methods. These attributes are useful when you are working with hundreds of unit tests and you need to manage the tests by sorting and filtering the tests:
· [Owner] – Enables you to specify the author of a test method
· [Description] – Enables you to provide a description of a test method
· [Priority] – Enables you to specify an integer priority for a test
· [TestProperty] – Enables you to specify an arbitrary test property
You can use these attributes when sorting and filtering tests in either the Test View window or the Test List Editor.
Finally, there is an attribute that you can use to cause a particular test method to be ignored when running a test. This attribute is useful when one of your tests has a problem and you just don’t want to deal with the problem at the moment:
· [Ignore] – Enables you to temporarily disable a test. You can use this attribute on either a test method or an entire test class
Creating Test Assertions
Most of the time, when you are writing the code for your test methods, you use the methods of the Assert class. The last line of code contained in most test methods uses the Assert class to assert a condition that a test must satisfy in order for the test to pass.
The Assert class supports the following static methods:
· AreEqual – Asserts that two values are equal
· AreNotEqual – Asserts that two values are not equal
· AreNotSame – Asserts that two objects are different objects
· AreSame – Asserts that two objects are the same object
· Fail – Asserts that the test fails
· Inconclusive – Asserts that a test result is inconclusive. Visual Studio includes this assertion for methods that it generates automatically and that you need to implement
· IsFalse – Asserts that a given condition expression returns the value False
· IsInstanceOfType – Asserts that a given object is an instance of a specified type
· IsNotInstanceOfType – Asserts that a given object is not an instance of a specified type
· IsNotNull – Asserts that an object does not represent the Null value
· IsNull – Asserts that an object represents the Null value
· IsTrue – Asserts that a given condition expression returns the value True
· ReplaceNullChars – Replaces Null characters in a string \0 with \\0
When an Assert method fails, the Assert class throws an AssertFailedException.
For example, imagine that you are writing a unit test to test a method that adds two numbers. The test method in Listing 4 uses an Assert method to check whether the method being tested returns the correct result for 2 + 2.
Listing 4 – CalculateTest.cs
1: [TestMethod]2: public void AddNumbersTest()
3: {4: int result = Calculate.Add(2, 2);
5: Assert.AreEqual(result, 2 + 2); 6: }There is a special class for testing assertions about collections named the CollectionAssert class. The CollectionAssert class supports the following static methods:
· AllItemsAreInstancesOfType – Asserts that each item in a collection is of a specified type
· AllItemsAreNotNull – Asserts that each item in a collection is not null
· AllItemsAreUnique – Asserts that each item in a collection is unique
· AreEqual – Asserts that the value of each item in two collections are equal
· AreEquivalent – Asserts that the values of each item in two collections are equal (but the order of the items in the first collection might not match the order of the items in the second collection).
· AreNotEqual – Asserts that two collections are not equal
· AreNotEquivalent – Asserts that two collections are not equivalent
· Contains – Asserts that a collection contains an item
· DoesNotContain – Asserts that a collection does not contain an item
· IsNotSubsetOf – Asserts that one collection is not a subset of another collection
· IsSubsetOf – Asserts that one collection is a subset of another collection
This also is a special class, named StringAssert, for performing assertions about strings. The StringAssert class supports the following static methods:
· Contains -- Asserts that a string contains a specified substring
· DoesNotMatch – Asserts that a string does not match a specified regular expression
· EndsWith – Asserts that a string ends with a specified substring
· Matches – Asserts that a string matches a specified regular expression
· StartsWith – Asserts that a string starts with a specified substring
Finally, you can use the [ExpectedException] attribute to assert that a test method should throw a particular type of exception. We used the ExpectedException attribute in the walkthrough above to test whether or not a Null ProductId caused a controller to throw an ArgumentNullException.
Generating Tests from Existing Code
Visual Studio 2008 enables you to generate unit tests from existing code automatically. You can right-click any method in a class and select the option Create Unit Tests.

Figure 6 – Generating a unit test from existing code
Even practitioners of Test-Driven Development must work with legacy code. If you need to add unit tests to existing code, you can take advantage of this option to quickly create the necessary test method stubs.
One big warning about this approach to adding unit tests. If you use this option on a class located in an ASP.NET MVC Web Application Project, then the Unit Test Wizard opens. Unfortunately, this wizard generates a unit test that executes within the context of a web server. This type of unit test is not appropriate for Test-Driven Development because it just takes too long to execute. Therefore, I recommend that you take the approach to generating unit tests described in this section only when working with Class Library projects.
Testing Private Methods, Properties, and Fields
When following good Test-Driven Development practices, you test all of your code, including the private methods in your application. How do you test private methods from your test project? The problem, it might seem, is that you cannot call the private methods from within a unit test.
There are two ways around this problem. First, Visual Studio 2008 can generate a façade class that exposes all the private members of the class being tested. Within Visual Studio 2008, you can right-click any class within the Code Editor and select the menu option Create Private Accessor. Selecting this menu option generates a new class that exposes all of the private methods, private properties, and private fields of the class as public methods, public properties, and public fields.
For example, imagine that you want to test a class named Calculate that contains a private method named Subtract(). You can right click this class and generate an Accessor (see Figure 7).

Figure 7 – Creating a Private Accessor
After you create the Accessor, you can use it in your unit test code to test the Subtract method. For example, the unit test in Listing 5 tests whether the subtract method returns the right result for 7 – 5.
Listing 5 – CalculateTest.cs (Accessor)
1: [TestMethod]2: public void SubtractTest()
3: {4: int result = Calculate_Accessor.Subtract(7, 5);
5: Assert.AreEqual(result, 7 - 5); 6: }Notice that in Listing 5, the Subtract() method is called on the Calculate_Accessor class and not the Calculate class. Because the Subtract() method is private, you can’t call it on the Calculate class. However, the generated Calculate_Accessor class exposes the method just fine.
If you prefer, you can generate the Accessor class from the command line. Visual Studio includes a command line tool named Publicize.exe that generates a public façade for a class with private members.
The second method for testing private class methods is to use reflection. By taking advantage of reflection, you can bypass access restrictions and invoke any class method and access any class property. The test in Listing 6 uses reflection to call the private Calculate.Subtract() method.
Listing 6 – CalculateTest.cs (reflection)
1: [TestMethod]2: public void SubtractTest()
3: {4: MethodInfo method = typeof(Calculate).GetMethod("Subtract",
BindingFlags.NonPublic | BindingFlags.Static);
5: int result = (int)method.Invoke(null, new object[] { 7, 5 });
6: Assert.AreEqual(result, 7 - 5); 7: }The code in Listing 6 calls the private static Subtract() method by calling the Invoke() method on a MethodInfo object that represents the Subtract method (this is the kind of code that you would want to package into a utility class so that it would be easy to reuse for other tests).
All of Those Confusing Test Windows
I confess that one of my main motivations for writing this blog entry was that I was confused by all of the various test windows and I wanted to sort them out. Visual Studio 2008 has 3 windows related to unit tests.
First, there is the Test Results window (see Figure 8). This window is displayed after you run your tests. You also can display this window by selecting the menu option Test, Windows, Test Results. The Test Window displays each test that was run and displays whether the test failed or passed.
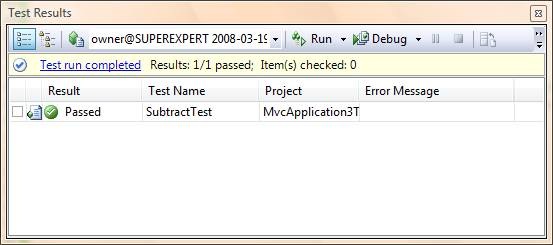
Figure 8 – The Test Results window
If you click on the link labeled Test run completed or Test run failed you get a page that provides more detailed information about the test run.
Second, there is the Test View window (see Figure 9). You can open the Test View window by selecting the menu option Test, Windows, Test View. The Test View window lists all of your tests. You can select an individual test and run the test. You can also filter the tests in the Test View using particular test properties (for example, show only the tests written by Stephen).
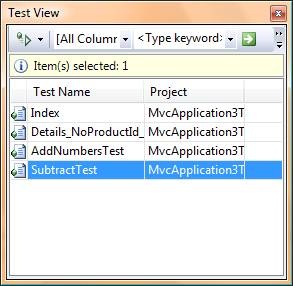
Figure 9 – The Test View window
Third, there is the Test List Editor window (see Figure 10). Open this window by selecting the menu option Test, Windows, Test List Editor. This window enables you to organize your tests into different lists. You can create new lists of tests and add the same test to multiple lists. Creating multiple test lists is useful when you need to manage hundreds of tests.
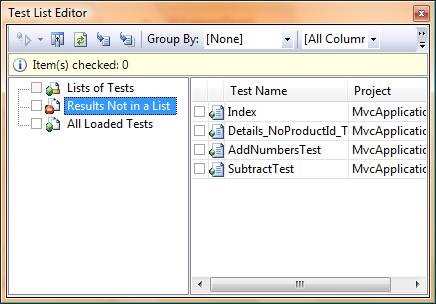
Figure 10 – The Test List Editor window
Managing Test Runs
After you execute your unit tests more than 25 times, you get the dialog box in Figure 11. Until I received this warning, I didn’t realize that Visual Studio creates a separate copy of all of the assemblies in a solution each time you do a test run (each time you run your unit tests).
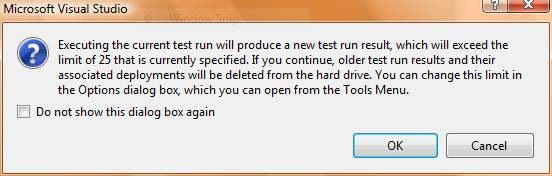
Figure 11 – A mysterious message about test runs
If you use Windows Explorer and take a look inside your application’s solution folder on disk, then you can see a folder named TestResults that Visual Studio 2008 creates for you automatically. This folder contains an XML file and a subfolder for each test run.
You can prevent Visual Studio 2008 from creating copies of your assemblies for each test run by disabling test deployment. In order to do this, you modify your test run configuration file. Select the menu option Test, Edit Test Run Configurations. Select the Deployment tab and uncheck the checkbox labeled Enable deployment.

Figure 12 – Disabling Test Deployment
Sometimes, when you go to the Test, Edit Test Run Configurations menu item, you see the message that there are no test run configurations available. In that case, you need to right-click your solution in the Solution Explorer window, select Add, New Item, and add a new Test Run Configuration. After you add a new Test Run Configuration file, you can open the dialog box in Figure12.
Be warned that if you disable test deployment, you can no longer take advantage of the code coverage feature. If you aren’t using this feature, then don’t worry about it.
Running Tests from the Command Line
You might want to run your unit tests from the command line. For example, you might just have a perverse dislike for Integrated Development Environments like Visual Studio and want to write all of your code using Notepad. Or, more likely, you might want to run your tests automatically as part of a custom code check-in policy.
You run your tests from the command line by opening up a Visual Studio 2008 Command Prompt (All Programs, Microsoft Visual Studio 2008, Visual Studio Tools, Visual Studio 2008 Command Prompt). After you open the command prompt, navigate to the assembly generated by your test project. For example:
Documents\Visual Studio 2008\Projects\MyMvcApp\MyMvcAppTests\Bin\Debug
Run your tests by executing the following command:
mstest /testcontainer:MyMvcAppTests.dll
Issuing this command will run all of your tests (see Figure 13).
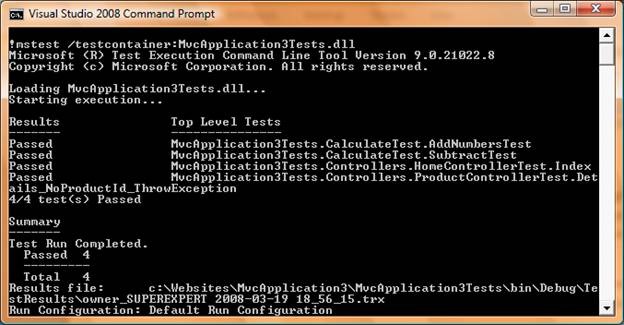
Figure 13 – Running your unit tests from the command line
Summary
The goal of this blog entry was to get a better understanding of how you can use Visual Studio 2008 to write unit tests that can be used for Test-Driven Development. Visual Studio was designed to support many different types of tests and many different testing audiences. The sheer number of testing options (and test related windows) can be overwhelming. However, I hope that I have convinced you that Visual Studio 2008 can be a very effective environment for performing Test-Driven Development.
Okay, so if you ignored everything else in this blog entry, at least remember that using the keyboard combination Ctrl-R, A runs all of the tests in your solution. Enough said.