Getting started with Unit Testing in C#
Introduction:
In this post, I will explain you how can we write a unit test in c#. It is a basic guideline for those who wants a quick start.
Unit testing is an integral part of any software that is developed. It is an advantage which most of us are either not aware of or we are neglecting it. It actually helps a developer to write error free code.
To write unit test, we will first install a unit-testing framework.
About Unit-Testing Framework:
Well, Unit-Testing Frameworks are useful to simplify the process of unit testing. If you don’t want to use any framework then you can still do unit-testing by writing the client code which implements assertions, exception handling etc.
There are numerous framework available for unit testing. A list of which can be found here . But in our case, we will use NUnit to test our code because it is easy to use, show detail test reports and of course open source.
Installing NUnit:
To download the NUnit goto : http://www.nunit.com/ and download NUnit Windows MSI. The installation is a conventional next next stuff. So, you will not face any hard time.
Writing Testable code:
Now open visual studio and create a new console application (I name it TestAbleApp). Please note, to do unit-testing it is not important to write your code in console application. It is just a matter of my choice because I want to make it simple and easy to understand.
Create a new class call it “Utilities” and write the following code.
public class Utilities
{
    public enum Gender
    { Male =1,
      Female = 2
    }


    public string GetCompleteProfession(string professionName, Gender g)
    {
        string strPronoun = string.Empty;

        if (g == Gender.Male)
            strPronoun = "he";
        else
            strPronoun = "she";

        if (Regex.IsMatch(professionName,"^[aeiou]"))
            return strPronoun + " is an " + professionName;
        else
            return strPronoun + " is a " + professionName;
    }

    public decimal GetWeeks(DateTime dtFrom, DateTime dtTo)
    {
        int Days = ((TimeSpan)(dtTo - dtFrom)).Days;
        decimal Weeks = Math.Ceiling((decimal)Days / 7);
        return Weeks;
    }
    public decimal GetDays(DateTime dtFrom, DateTime dtTo)
    {
        int Days = ((TimeSpan)(dtTo - dtFrom)).Days;
        return Days;
    }
}
Let me explain, we have an enum here which hold the gender and we have a function which have Profession and Gender as parameter. it will simply return a formatted string. For example if someone pass
GetCompleteProfession(“System Analyst”,Gender.Male). It will return “He is a System Analyst”. A very simple function.
Then we have a function that will take date range as parameter and return the number of weeks in that range. We call it GetWeeks and another function is GetDays which takes same date range as parameter but return days instead of week.
We are completed with the testable code. If you want, you can check the output of the functions.
Writing Unit-Test:
To write a unit-test, create a class library project under the same solution and call it, “TestProject”. Now, create a new class and name it “UtilitiesUnderTest”. The naming convention can explain that this class contain the unit test of class “Utilities”.
Now, Add the executable of console application which we have created before (In my case, it is TestableApp ) as a reference in TestProject.
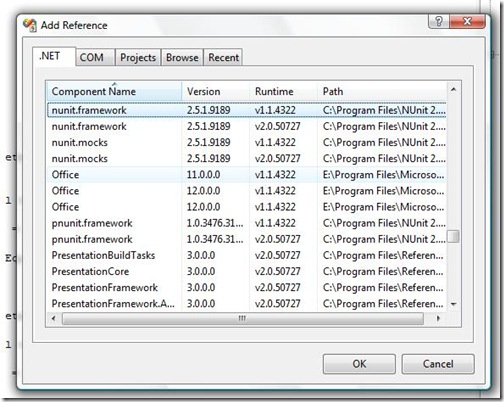
To use the NUnit Testing framework, we also need to add the reference of NUnit Dll which you will find under the .net Tab in Add Reference window.
Create a class and call it UtilitiesUnderTest. Naming convention shows that we are creating a test code for class “Utilities”. Now write the following code.
[TestFixture]
class UtilitiesUnderTest
{
    [Test]
    public void GetCompleteProfession_Return_SheIsASoftwareEngineer()
    {

        Utilities objUtil = new Utilities();

        string strResult = objUtil.GetCompleteProfession("software engineer", Utilities.Gender.Female);

        StringAssert.AreEqualIgnoringCase("She is a software engineer", strResult);
    }

    [Test]
    public void GetCompleteProfession_Return_HeIsAProjectManager()
    {
        Utilities objUtil = new Utilities();

        string strResult = objUtil.GetCompleteProfession("software engineer", Utilities.Gender.Male);

        StringAssert.AreEqualIgnoringCase("He is a software engineer", strResult);
    }

    [Test]
    public void GetCompleteProfession_Return_HeIsAnEngineer()
    {
        Utilities objUtil = new Utilities();

        string strResult = objUtil.GetCompleteProfession("engineer", Utilities.Gender.Male);

        StringAssert.AreEqualIgnoringCase("He is an engineer", strResult);
    }

    [Test]
    public void GetWeeks_Return_6()
    {
        Utilities objUtil = new Utilities();

        decimal weeks = objUtil.GetWeeks(DateTime.Now.AddDays(-42), DateTime.Now);

        Assert.AreEqual(6, weeks);
    }

    [Test]
    public void GetDays_Return_25()
    {
        Utilities objUtil = new Utilities();

        decimal days = objUtil.GetDays(DateTime.Now.AddDays(-25), DateTime.Now);

        Assert.AreEqual(25, days);
    }
}
Notice the Attribute, [TestFixture] is used to mark a class as a test class where as [Test] is used to mark a method as Unit-Test (test method). It is used by Unit testing framework like N-Unit to test the code.
Also notice, the name of methods. It is named like “{MethodUndertestName}_Return_{ExpectedReturnValue}”. The naming convention is there to make your tests readable for others.
Now come to the explanation part of the first three functions.
In the first of line each function we are creating an object of the class under test (In our case Utilities).
In the second line we are calling a method under test by specifying parameters.
In the third line we are using StringAssert to Assert the returned value.
Now notice the last two functions, the first two lines are same. The minor difference is in the last line. Instead of using StringAssert, we are using Assert to test the return value.
Once, you have complete writing the Unit-Test. Now its time to see it in action.
Running Unit-Tests:
Run NUnit, Goto File –> New Project and specify the location.
Now, Goto Project menu and select Add Assembly and locate your TestProject DLL, the one which you created to test your code.
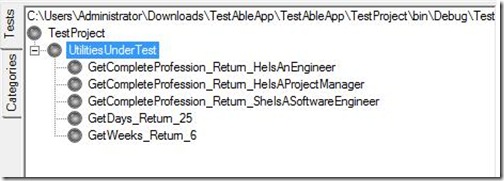
Once, you have done that, you will all your Unit-Test in the left pane as shown below.
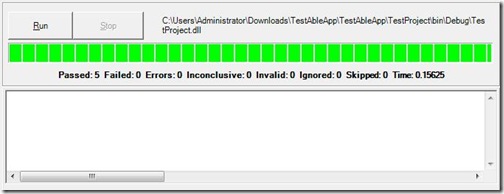
Now, click the big run button on the right pane and you will see the result as give below.
Happy ending, green progress bar means every thing went well. Now let’s create another unit-test in out test class which will fail out tests. So that, we can see how NUnit reacts when a test fails.
Lets add the following method in our test class.
[Test]
public void GetWeeks_Return_3()
{
    Utilities objUtil = new Utilities();

    decimal weeks = objUtil.GetWeeks(DateTime.Now.AddDays(-8), DateTime.Now);

    Assert.AreEqual(3, weeks);
}
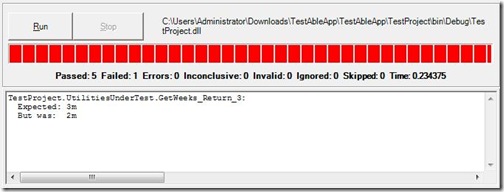
Here I am giving the range of eight days and expecting my function to return 3 weeks instead of two. Now, when I run the test it will get fail and NUnit display us something like below.
Red progress bar means, some thing went wrong and notice the text area at the bottom. It will show you the detail that you were expecting three but the function returns two. That is the test get fails.
Now lets see what happen when any exception occur in the function we are testing. Add the following line in GetWeek function
throw new ArgumentOutOfRangeException();
Now, when we run out tests, we will see some thing like below.
NUnit fails our test with the exception with Stacktrace at the botoom.
Conclusion:
This was just a quick start of doing test driver development and write Unit-Tests that is why we create unit-test for very simple functions. In future, I will be posting the unit-tests which I will write for some more complex functions.
I have tried to make it simple for you guys to grab it and start writing your own unit-test. The resource I found very valuable for starting test driven development is Roy Osherove’s The Art of Unit Testing.


