DotNetStories
This is going to be the first post of a series of posts regarding ASP.Net and Entity Framework and how we can use Entity Framework to access(select,insert,update,delete) the database. We will start with some simple samples but then we will look into more advanced uses of Entity Framework.
In order to follow along you must have some knowledge of C#
and know what an ORM system is and what kind of
problems Entity Framework addresses.It will be handy
to know how to work inside the Visual Studio 2010 IDE.
I have a post regarding ASP.Net and EntityDataSource. You can read it here.I have 3 more posts on Profiling Entity Framework applications. You can have a look at them here,here and here.
I will be using Entity Framework version 4.0 that ships with
Visual Studio 2010 and .Net 4.0.
In this very first post we will create a simple website and use Entity Framework as our data access layer.
I assume that you have access to a version of SQL Server and AdventureWorkLT database.
If you do not, you can download and install the free SQL Server Express edition
from here. If you need the installation scripts for the sample
AdventureWorkLT
database, click here
1) Launch Visual Studio 2010 (express edition will work fine). Create a new empty website and choose a suitable name for it. Choose C# as the development language.
2) Add a new item to your site, a web form. Leave the default name, Default.aspx
3) Add a new project to your solution, a class library project.Remove the class1.cs file from the project.
4) Add a new item to your class library project, a ADO.Net Entity Data model. Choose a suitable name for it, e.g AdventureWorkLT.edmx.
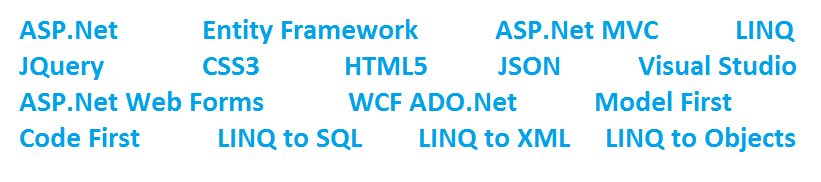
5) Then the Wizard pops up. Choose "Generate from Database". Have a look at the picture below
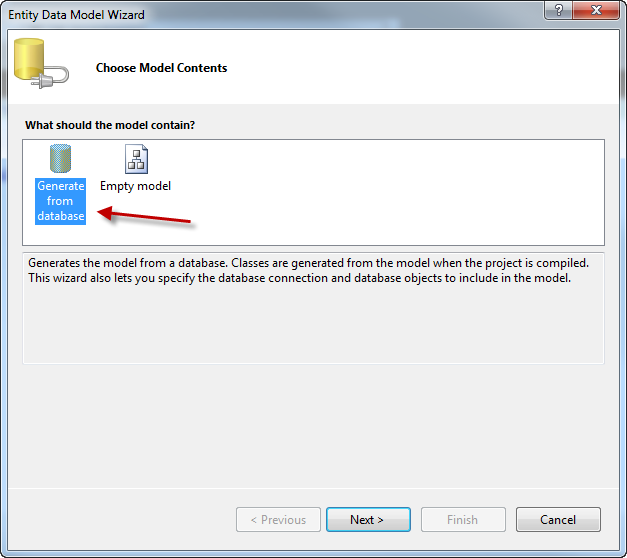
6) Click Next and Create a New Connection (as
you see in the picture below) and hit the
Continue button.
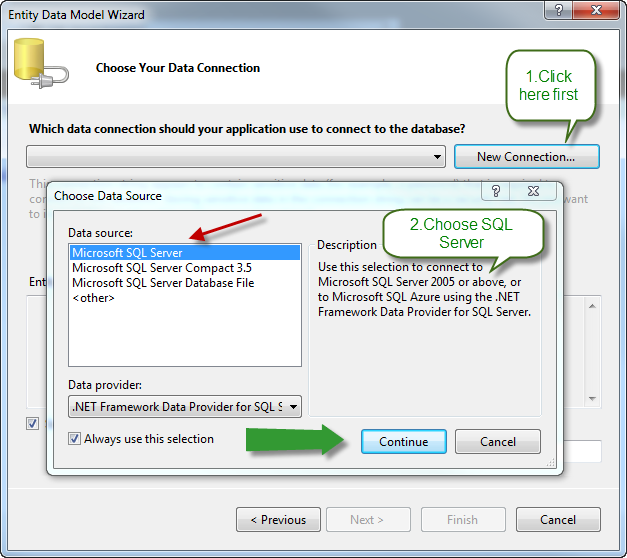
7) Then follow the instructions as shown in the picture
below.Select the local installation of your SQL Server and
the database name and then click OK.

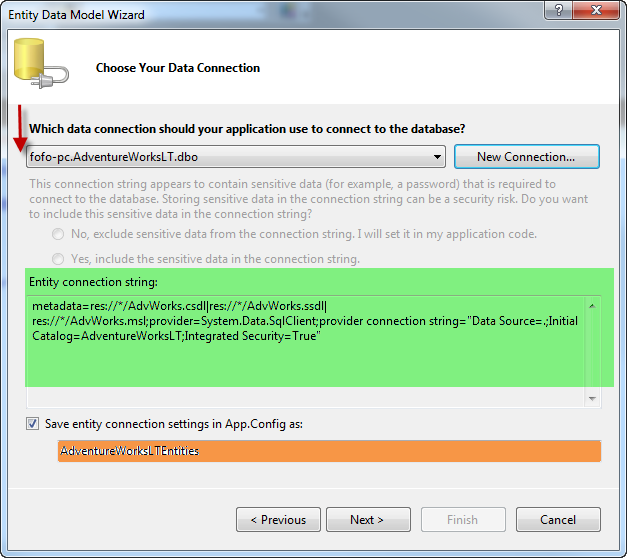
8) After you complete the steps above you will see something
like the picture below. You can see the
Entity connection string and where these setting will
be saved.Hit the Next button.Then click Finish
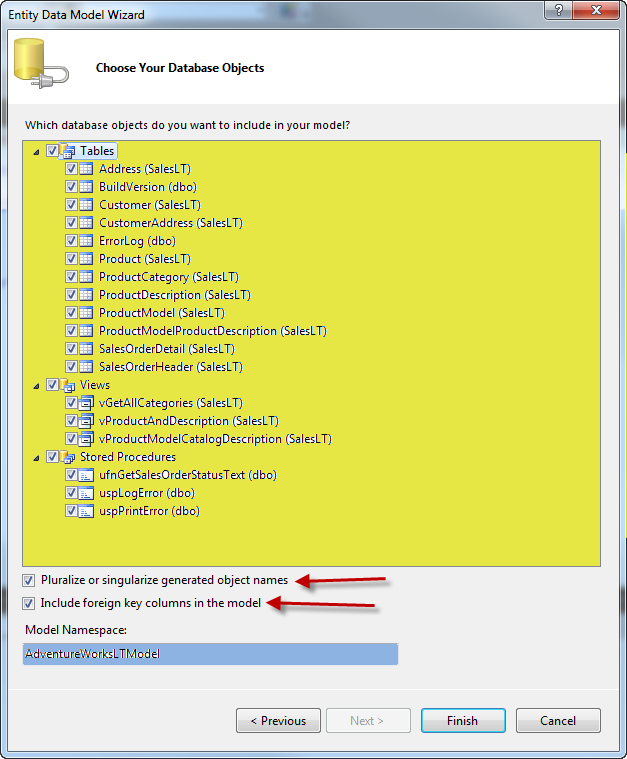
9) Now the wizard will identify the database objects and
let us choose which database objects we want to include in
our model.I included all the database objects.Hit the
Finish button.
10) Have a look at your entity model as it is visualized in the Entity Model Designer. Have a look at the Entity classes and their relationships/associations.Have a look at the properties of each Entity class. Have also a look at the Navigation Properties of each entity class.Basically the entity framework generates classes for all the entities in the designer. You can have a look at the generated code if you want by opening the class file, which in my case is AdvWorks.Designer.cs.
All the entities that are represented as classes in our
AdvWorks.Designer.cs file inherit from
EntityObject class
public partial class Customer : EntityObject
    {
Inside each class you fill find the usual class definition. This is the public property declaration for the Title property. All the properties in the classes in the entire model have getter and setter methods.There are public properties and private fields.Have a look at the snippet below.
public global::System.String Title
        {
            get
            {
                return _Title;
            }
            set
            {
                OnTitleChanging(value);
                ReportPropertyChanging("Title");
                _Title = StructuralObject.SetValidValue(value, true);
                ReportPropertyChanged("Title");
                OnTitleChanged();
            }
        }
We can also have partial methods defined inside the
AdvWorks.Designer.cs. This is the pair of methods for
the Title property.
partial void OnTitleChanging(global::System.String value);
partial void OnTitleChanged();
You can create additional class files and implement the business logic for these methods.
There is another very important class in our
AdvWorks.Designer.cs file , AdventureWorksLTEntities which inherits from ObjectContext class.
public partial class AdventureWorksLTEntities : ObjectContext
The whole model and all the entities on it are represented by the ObjectContext class.This is an object that gives us a way to connect to the database. This is our gateway to the database. It gives us a way to update,insert,delete objects and keeps a change tracking mechanism.
ObjectContext class is responsible for relationship
management.ObjectContext class manages change
tracking.ObjectContext class manages things like
concurrency,connections and transactions
All these classes were generated automatically from the
underlying xml file. If you want to see the xml file just
select the .edmx file and choose to open it with an
XML Editor.Inside there you can spend some time looking into
the Storage model, the Conceptual model and
the Mapping of the two previous models (Storage &
Conceptual).
11) So we have our conceptual model and we can have a look at it in the entity designer. Choose the SalesOrderHeader and choose Mapping Details and you can see the mapping between the database columns and the class properties. You can rename the properties in the Mapping Details window,if you want.This mapping mechanism knows how to bind the objects values back to the database.
12) Now we are ready to start querying our database. We will issue Linq to Entities query against the conceptual schema.
In this very first query we want to get the customers that their firstname starts with the letter N.
Just above the Page_Load event handling routine
type
AdventureWorksLTEntities ctx = new AdventureWorksLTEntities();
We need to create an instance of the
AdventureWorksLTEntities to get access to our model.
This is something that you always must do in EF projects.
In the Page_Load event handling routine type,
GetNames();
We will create a simple void method to get the information we want. The code for the GetNames() method follows
private void GetNames()
    {
        var query = from custname in ctx.Customers
                    where custname.FirstName.StartsWith("N")
                    orderby custname.FirstName descending
                    select custname;


        foreach (var item in query)
        {
            Response.Write(item.FirstName);
            Response.Write("<br/>");
        }
    }
If you are not so familiar with Linq queries, have a look at
my other posts in this blog regarding LINQ.
13) Run your application and you will see all the customer names starting with N displayed on the screen.
14) Let's create a new query and bind the resultset to a GridView control. Add a GridView control to the default.aspx page.
In this query we want to get only the customers that have
more than one order and the Title equals
"Ms"
In the Page_Load event handling routine comment out
everything and type,
 var query = from mycust in ctx.Customers
       join sho in ctx.SalesOrderHeaders on mycust.CustomerID
equals sho.CustomerID
       into myorders
       where (mycust.Title=="Ms." && mycust.SalesOrderHeaders.Count >= 1)
       select new { mycust.FirstName, mycust.LastName,OrdersCount =
myorders.Count() };

        GridView1.DataSource = query;
        GridView1.DataBind();
15) Run your application and you will see all the customer firstname,lastname and the number of their respective orders displayed on the screen.
This is a projection query (uses anonymous types in the background) .
16) Now that we know how to get / select data from the entity data model, let's see how we can insert, update, delete data from the entity data model/database.
In the Page_Load event handling routine type,
GetSpecificCustomer();
We need to add the GetSpecificCustomer() method, so
we have
  private void GetSpecificCustomer()
    {
    var query = from mycust in ctx.Customers
          where mycust.CustomerID == 3
          select new {mycust.CustomerID,mycust.FirstName,mycust.LastName};

        GridView1.DataSource = query;
        GridView1.DataBind();

    }
Add a new button to the default.aspx page and in the
Button1_Click event handling routine type,
var query = ctx.Customers.First(mycust => mycust.CustomerID == 3);
        query.FirstName = "Julia";
        query.LastName = "Ormond";
        ctx.SaveChanges();
GetSpecificCustomer();
17) Run your application and click the button. Make sure
the data has changed in the underlying database.
Feel free to open your local instance of SQL Server and see the actual changes in the database. Another thing you can do is to open SQL Server Profiler and have a look at the T-SQL code generated on the fly from the LINQ to Entities engine.
18) Now we can add another query that inserts a new address
for a specific customer.
In the Page_Load event handling comment out
everything routine and type,
AddCustomerAddess();
We create a new void method that does that looks something
like this
private void AddCustomerAddess()19) Run your application and see the new record in the CustomerAddress table for the specific customer.
{
var query = ctx.Customers.First(mycust => mycust.CustomerID == 5);
query.CustomerAddresses.Add(new CustomerAddress
{
CustomerID = 29485,
AddressID = 1087,
AddressType = "Shipping",
rowguid = Guid.NewGuid(),
ModifiedDate = DateTime.Now.AddDays(-100)
}
);
ctx.SaveChanges();
}
20) Let's try to delete all orders for a specific
customer.
We need to create a new void method.
private void DeleteCustomerOrders()
    {
var query = from sho in ctx.SalesOrderHeaders where sho.CustomerID == 29982
select sho;

        foreach (var item in query)
        {
            ctx.SalesOrderHeaders.DeleteObject(item);
        }
        ctx.SaveChanges();
    }
In the Page_Load event handling comment out
everything routine and type,
DeleteCustomerOrders();
21) Run your application and see the records in the SalesOrderHeader table deleted.
Drop me an email if you need the source code.
Hope it helps!!
Comments have been disabled for this content.