DotNetStories

In this blog post I will demonstrate with a hands-on example how to use EF Code First Workflow to create an entity data model, an .edmx file so I can visualise my POCO classes
I will follow the steps that I created in this post. In that post I managed to create POCO classes without actually writing the classes myself, but I had EF taking care of that by pointing to the right database.
Please note that what I am about to show will work just fine when one creates his own POCO classes. By that I mean is that you do not need to reverse engineer Code First classes from an existing database for the visualisation to work. You can create your POCO classes from scratch and still use Entity Framework Power Tools to create the .edmx file.
I am going to re-create some of the steps of my other post in this one.
I am running VS Studio 2012 Ultimate edition but you can use Visual Studio Express 2012 for Web. You can install Visual Studio Express 2012 for Web if you download Web Platform Installer.You can download this tool from this link.
1) I am launching VS 2012 and I will Visual C# as the programming language. I will also select ASP.NET MVC 4 Web Application from the available templates.I will name my application CodeFirstExistingDatabase
2) Normally with Code First we create new classes and then EF knows how tο create the database from those classes. In this application we will do the reverse.
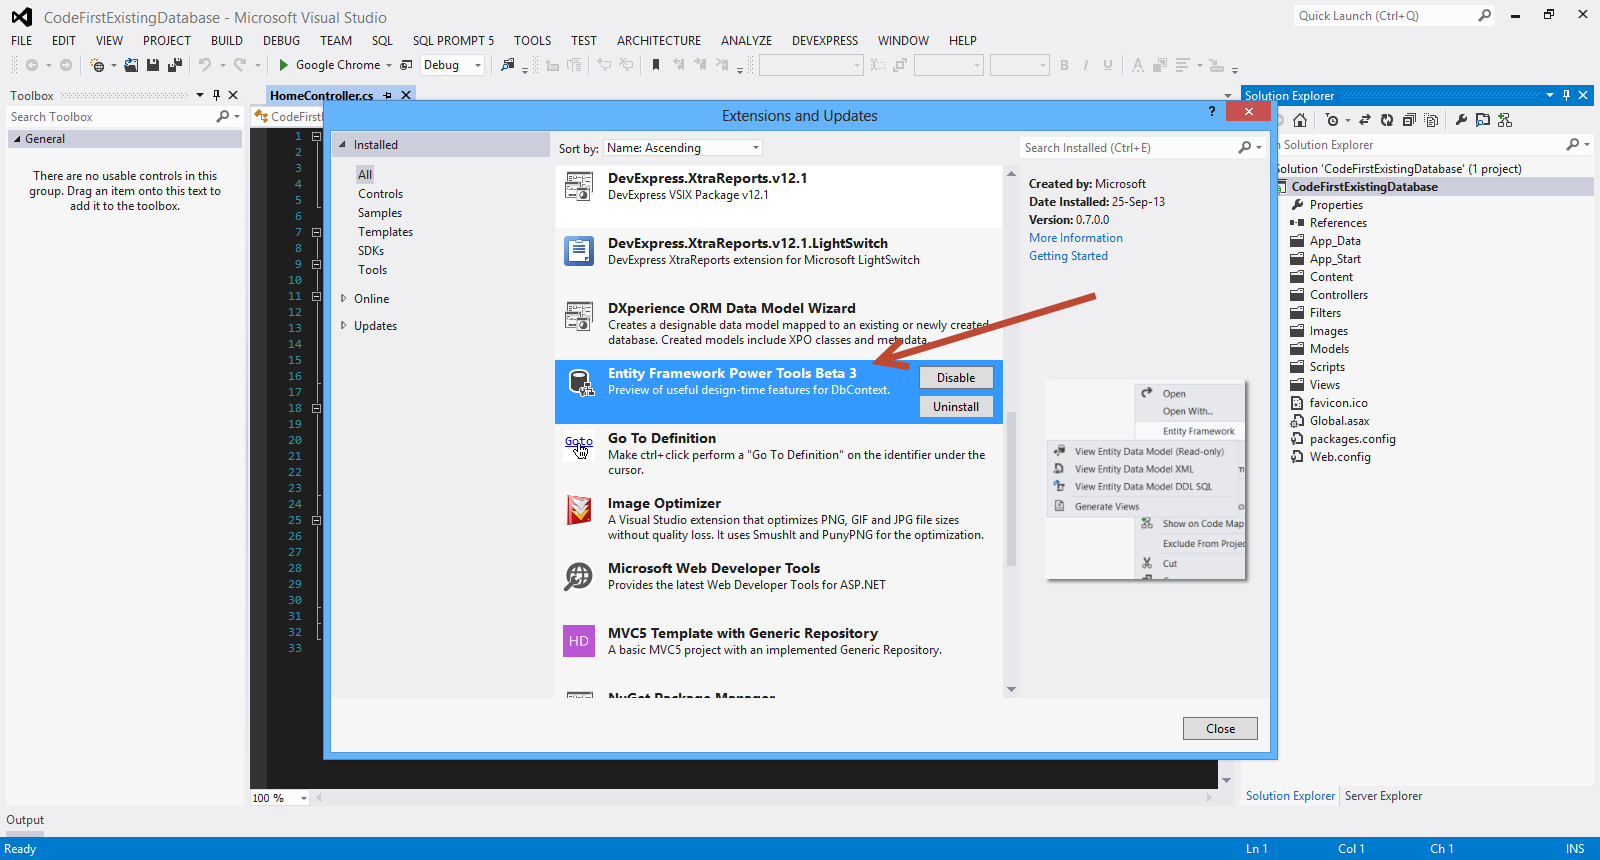
3) Before I create the database I need to download and install Entity Framework Power Tools Beta 3. Go to Tools -> Extensions and updates and search for Entity Framework Power Tools Beta 3 and then install it. Have a look at the picture below. I have already installed it.In you case it will say Install.
The good news is that Entity Framework Power Tools will be included in EF 6.0.
4) I have already created a sample database. It is called School. It has two tables with data, Course and Department. There is one to many relationship between Department and Course. A Department has many Course(s). This is the script ( SchoolDB.zip) that will install the database with the data in your SQL Server instance.Make sure you have the database installed.
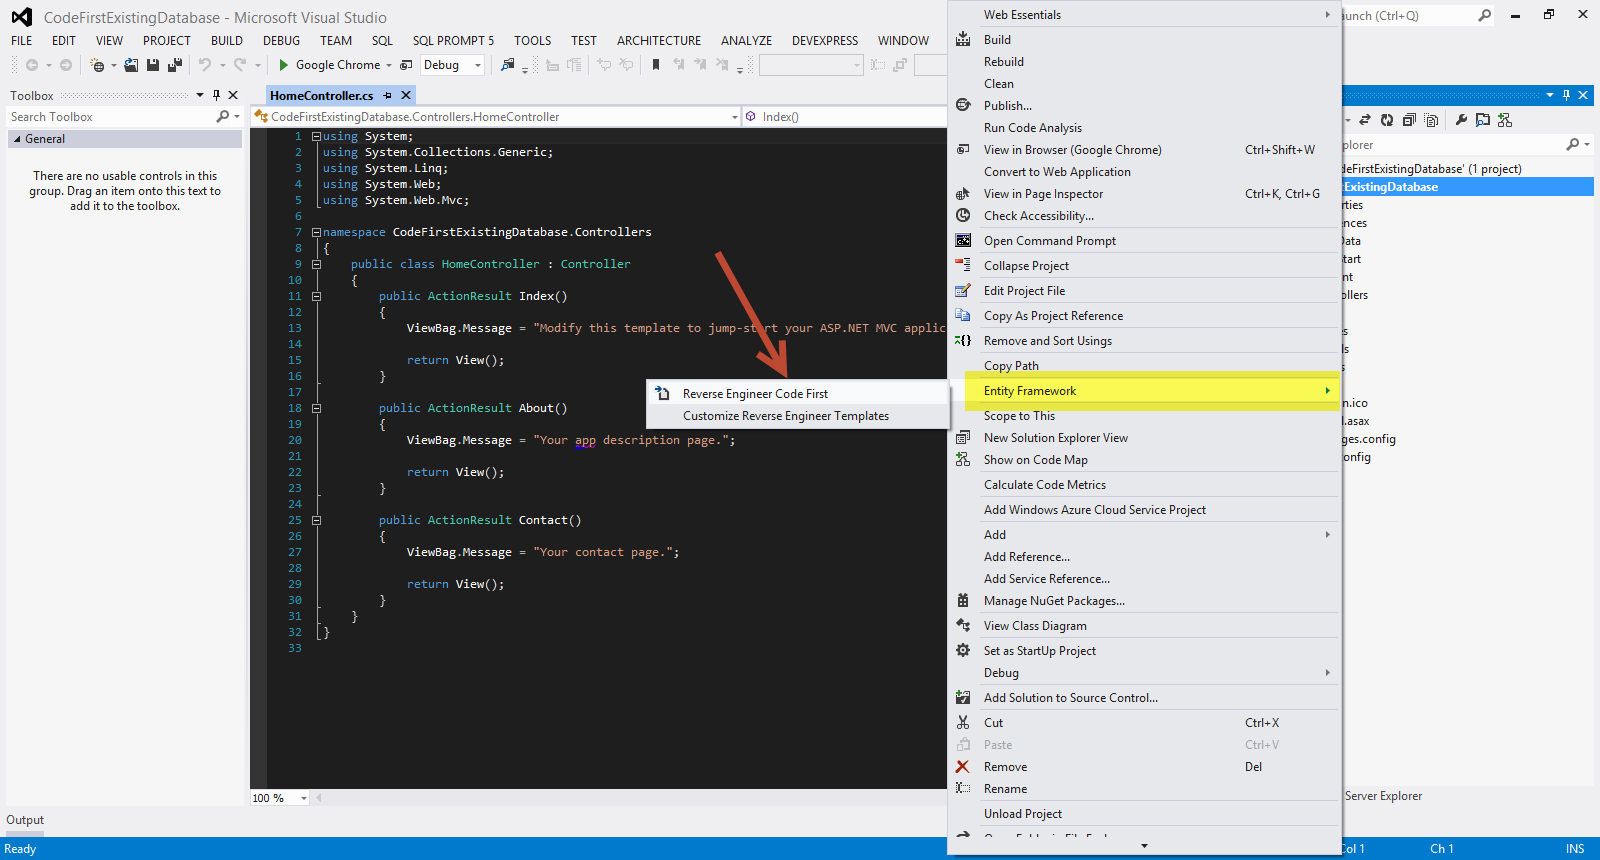
5) Right-click on your project, then select Entity Framework -> Reverse Engineer Code First.Have a look at the picture below
6) In the next step we will be prompted to connect to the database. Connect to the SQL Server instance and the connect to the DB and hit OK.Have a look at the picture below

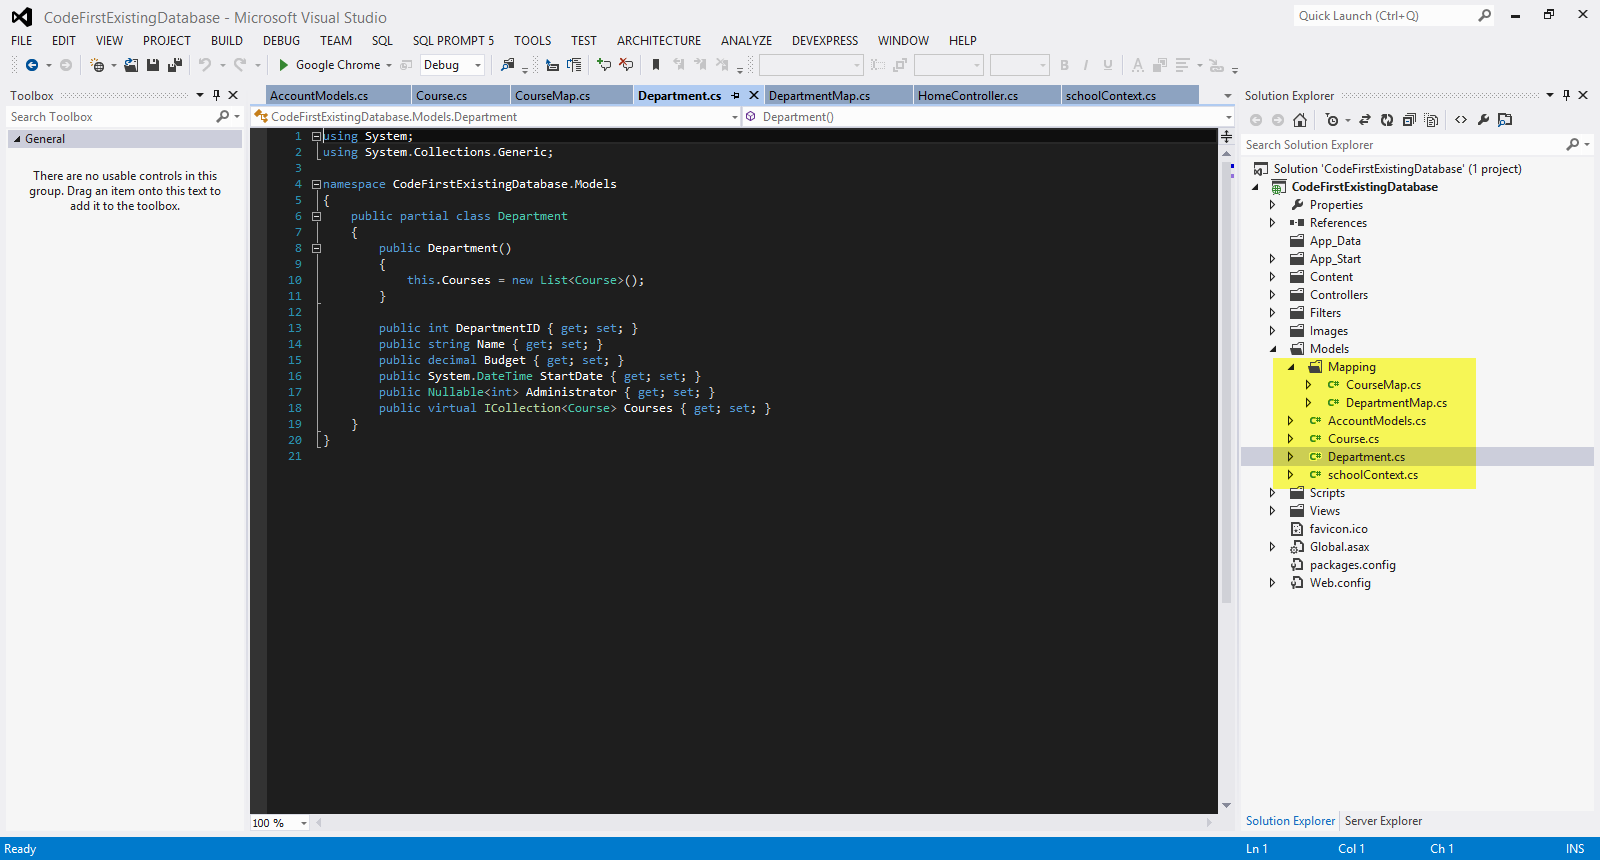
7) Now the Power Tools of EF have created the necessary classes. Have a look under the Models,Mapping folder to see the generated files.
Have a look at the picture below
Open web.config. EF has added a connection string to the database
<add name="schoolContext" connectionString="Data Source=.\sqlexpress;Initial Catalog=school;
         Integrated Security=True;MultipleActiveResultSets=True"
      providerName="System.Data.SqlClient" />
The schoolContext.cs file has been created. There is a class in there schoolContext. It has the same name as the name in the name property of the connection string above (name=schoolContext).The schoolContext class derives from the DbContext. DbContext is a base class in EF and it is responsible for change tracking,persisting data back to the database and in general managing the entity objects during runtime. DbSet properties are also exposed and those properties represent collections of the specified entities in the context.
 public schoolContext()
            : base("Name=schoolContext")
Those two lines of code above tell EF that the connection information for this context should be loaded from web.config.
Τhese are the contents of the schoolContext.cs file
public partial class schoolContext : DbContext
    {
        static schoolContext()
        {
            Database.SetInitializer<schoolContext>(null);
        }

        public schoolContext()
            : base("Name=schoolContext")
        {
        }

        public DbSet<Course> Courses { get; set; }
        public DbSet<Department> Departments { get; set; }

        protected override void OnModelCreating(DbModelBuilder modelBuilder)
        {
            modelBuilder.Configurations.Add(new CourseMap());
            modelBuilder.Configurations.Add(new DepartmentMap());
        }
    }
There Department.cs and Course.cs are also included.These are the POCO classes i was talking earlier. These two classes are very simple classes and have no dependency from EF. The Department class follows.
public partial class Department
    {
        public Department()
        {
            this.Courses = new List<Course>();
        }

        public int DepartmentID { get; set; }
        public string Name { get; set; }
        public decimal Budget { get; set; }
        public System.DateTime StartDate { get; set; }
        public Nullable<int> Administrator { get; set; }
        public virtual ICollection<Course> Courses { get; set; }
    }
You can see the properties that map to the columns of the Department table in the database. The Courses property is a navigation property. A Department entity can related to any number of Courses entities.Navigation properties are typically defined as virtual so that they can take advantage of certain Entity Framework functionality such as lazy loading.
The Course.cs file follows
 public partial class Course
    {
        public int CourseID { get; set; }
        public string Title { get; set; }
        public int Credits { get; set; }
        public int DepartmentID { get; set; }
        public virtual Department Department { get; set; }
    }
The DepartmentMap.cs file is a configuration file for the Department entity type in the model.It uses Fluent API to configure the type.It defines the table the entity maps to. It defines-matches the columns
of the table with the entity properties. Also defines any relationships
and things like Primary key e.t.c. Its contents follow.
public class DepartmentMap : EntityTypeConfiguration<Department>
    {
        public DepartmentMap()
        {
            // Primary Key
            this.HasKey(t => t.DepartmentID);

            // Properties
            this.Property(t => t.DepartmentID)
                .HasDatabaseGeneratedOption(DatabaseGeneratedOption.None);

            this.Property(t => t.Name)
                .IsRequired()
                .HasMaxLength(50);

            // Table & Column Mappings
        this.ToTable("Department");
        this.Property(t => t.DepartmentID).HasColumnName("DepartmentID");
        this.Property(t => t.Name).HasColumnName("Name");
        this.Property(t => t.Budget).HasColumnName("Budget");
        this.Property(t => t.StartDate).HasColumnName("StartDate");
        this.Property(t => t.Administrator).HasColumnName("Administrator");
        }
    }
The CourseMap.cs file is a configuration file for the Course entity type in the model. It uses Fluent API to configure the type.It defines the table the entity maps to. It defines-matches the columns of the table with the entity properties. Also defines any relationships and things like Primary key e.t.c. Its contents follow.
public class CourseMap : EntityTypeConfiguration<Course>
    {
        public CourseMap()
        {
            // Primary Key
            this.HasKey(t => t.CourseID);

            // Properties
            this.Property(t => t.CourseID)
                .HasDatabaseGeneratedOption(DatabaseGeneratedOption.None);

            this.Property(t => t.Title)
                .IsRequired()
                .HasMaxLength(100);

            // Table & Column Mappings
          this.ToTable("Course");
          this.Property(t => t.CourseID).HasColumnName("CourseID");
          this.Property(t => t.Title).HasColumnName("Title");
          this.Property(t => t.Credits).HasColumnName("Credits");
          this.Property(t => t.DepartmentID).HasColumnName("DepartmentID");

            // Relationships
            this.HasRequired(t => t.Department)
                .WithMany(t => t.Courses)
                .HasForeignKey(d => d.DepartmentID);

        }
    }
8) Finally we need to create the .edmx file. Select the schoolContext.cs file in the Solution Explorer then right-click, select Entity Framework ->View Entity Data Model (Read-only)
Have a look at the picture below.

9) Then the entity data model is created.This is read-only model. You cannot work with your model (.edmx) and POCO classes at the same time.This is just for visualisation purposes
Have a look at the picture below

if you want to have the XML representation of the .edmx file you can select the View Entity Data Model XML.Select Entity Framework ->View Entity Data Model XML.
If you want to displays the DDL SQL statements that corresponds to the SSDL in the underlying Entity Data Model select Entity Framework ->View Entity Data Model DDL SQL
In my case I see the following T-SQL statements that create my DB structure.
create table [dbo].[Course] (
    [CourseID] [int] not null,
    [Title] [nvarchar](100) not null,
    [Credits] [int] not null,
    [DepartmentID] [int] not null,
    primary key ([CourseID])
);
create table [dbo].[Department] (
    [DepartmentID] [int] not null,
    [Name] [nvarchar](50) not null,
    [Budget] [decimal](18, 2) not null,
    [StartDate] [datetime] not null,
    [Administrator] [int] null,
    primary key ([DepartmentID])
);
alter table [dbo].[Course] add constraint [Course_Department] foreign key
([DepartmentID]) references [dbo].[Department]([DepartmentID])
 on delete cascade;
Hope it helps!!!