DotNetStories

This is a post relevant to all the developers out there that
use Web Forms as their main ASP.Net platform.
In this post I would like to talk about ViewState and
how we can move it and store it in a session on the server's
memory. We know that the default hidden client field for
ViewState can become very large on pages.That can
problematic in terms of SEO and performance.
Let's talk a little bit about ViewState since not
everybody knows what it is and why we need it. We need those
state preserving mechanisms due to the fact that the web and
HTTP in particular, are stateless.
ViewState represents the state of the page when it was last processed on the server. We use it to retain values across two successive requests for the same page. It is a hidden field added to the page and is restored on the server before the page request is processed. The Viewstate information travels back and forth with the page itself, but contains no visual elements that need to be rendered.
Have a look here and here to see two posts of mine talking about ViewState.If you want to see some other posts of mine that I talk about State mechanisms have a look here and here
I am going to create a simple website that retrieves data
from a database using the well established
Entity Framework ORM.
I will be using Entity Framework version 4.0 that
ships with Visual Studio 2010 and .Net 4.0.
We will create a simple website and use Entity Framework as our data access layer.
I assume that you have access to a version of SQL Server and AdventureWorkLT database.
If you do not, you can download and install the free SQL Server Express edition
from here. If you need the installation scripts for the sample
AdventureWorkLT
database, click here
1) Launch Visual Studio 2010 (express edition will work fine). Create a new empty website and choose a suitable name for it. Choose C# as the development language.
2) Add a new item to your site, a web form. Leave the default name, Default.aspx
3) Add a new item to your site, a ADO.Net Entity Data model. Choose a suitable name for it, e.g AdventureWorkLT.edmx.
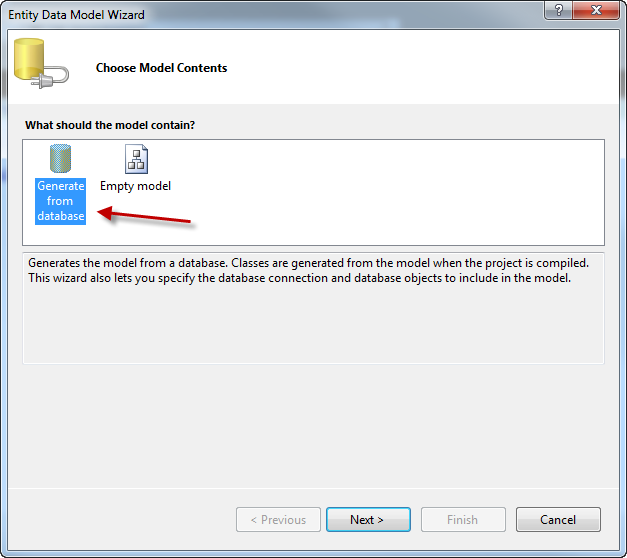
4) Then the Wizard pops up. Choose "Generate from Database". Have a look at the picture below
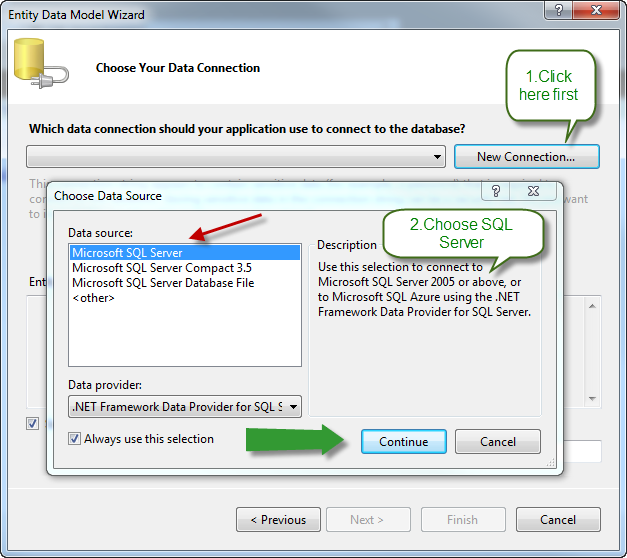
5) Click Next and Create a New Connection (as
you see in the picture below) and hit the
Continue button.
6) Then follow the instructions as shown in the picture
below.Select the local installation of your SQL Server and
the database name and then click OK.

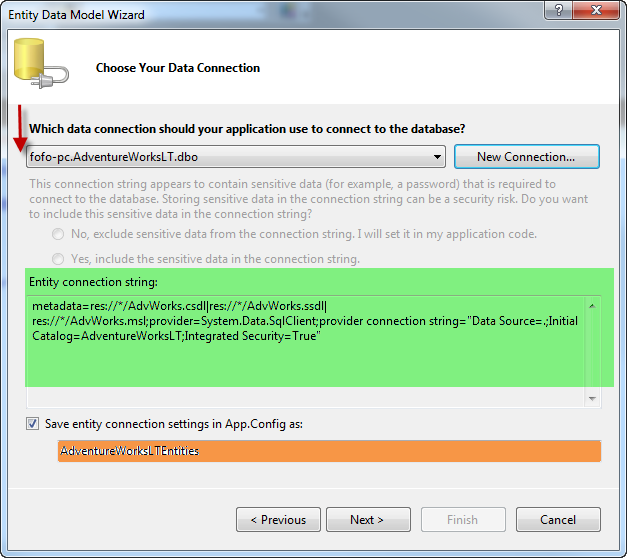
7) After you complete the steps above you will see something
like the picture below. You can see the
Entity connection string and where these setting will
be saved.Hit the Next button.Then click Finish
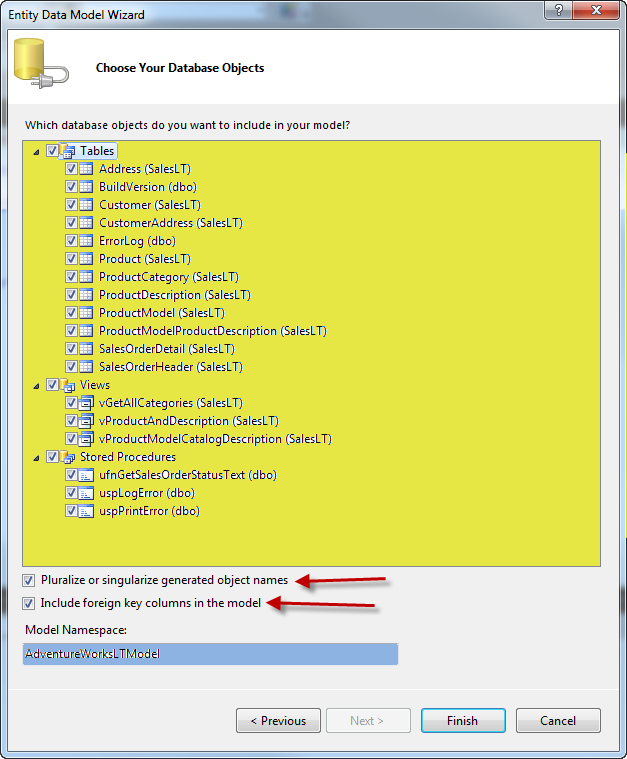
8) Now the wizard will identify the database objects and
let us choose which database objects we want to include in
our model.I included all the database objects.Hit the
Finish button.
9) Have a look at your entity model as it is visualized in the Entity Model Designer. Have a look at the Entity classes and their relationships/associations.Have a look at the properties of each Entity class. Have also a look at the Navigation Properties of each entity class.Basically the entity framework generates classes for all the entities in the designer. You can have a look at the generated code if you want by opening the class file, which in my case is AdvWorks.Designer.cs.
10) Now we are ready to start querying our database. We will issue a Linq to Entities query against the conceptual schema.
Let's create a new query and bind the resultset to a GridView control. Add a GridView control to the default.aspx page.
In this query we want to get only the customers that have more than one order and the Title equals "Ms"
If you are not so familiar with Linq queries, have a look at my other posts in this blog regarding LINQ.
In the Page_Load event handling
routine type:
AdventureWorksLTEntities ctx = new AdventureWorksLTEntities();
var query = from mycust in ctx.Customers
       join sho in ctx.SalesOrderHeaders on mycust.CustomerID
equals sho.CustomerID
       into myorders
       where (mycust.Title=="Ms." && mycust.SalesOrderHeaders.Count >= 1)
       select new { mycust.FirstName, mycust.LastName,OrdersCount =
myorders.Count() };

        GridView1.DataSource = query;
        GridView1.DataBind();
Do not forget to add this as well in .cs file
using AdventureWorksLTModel;
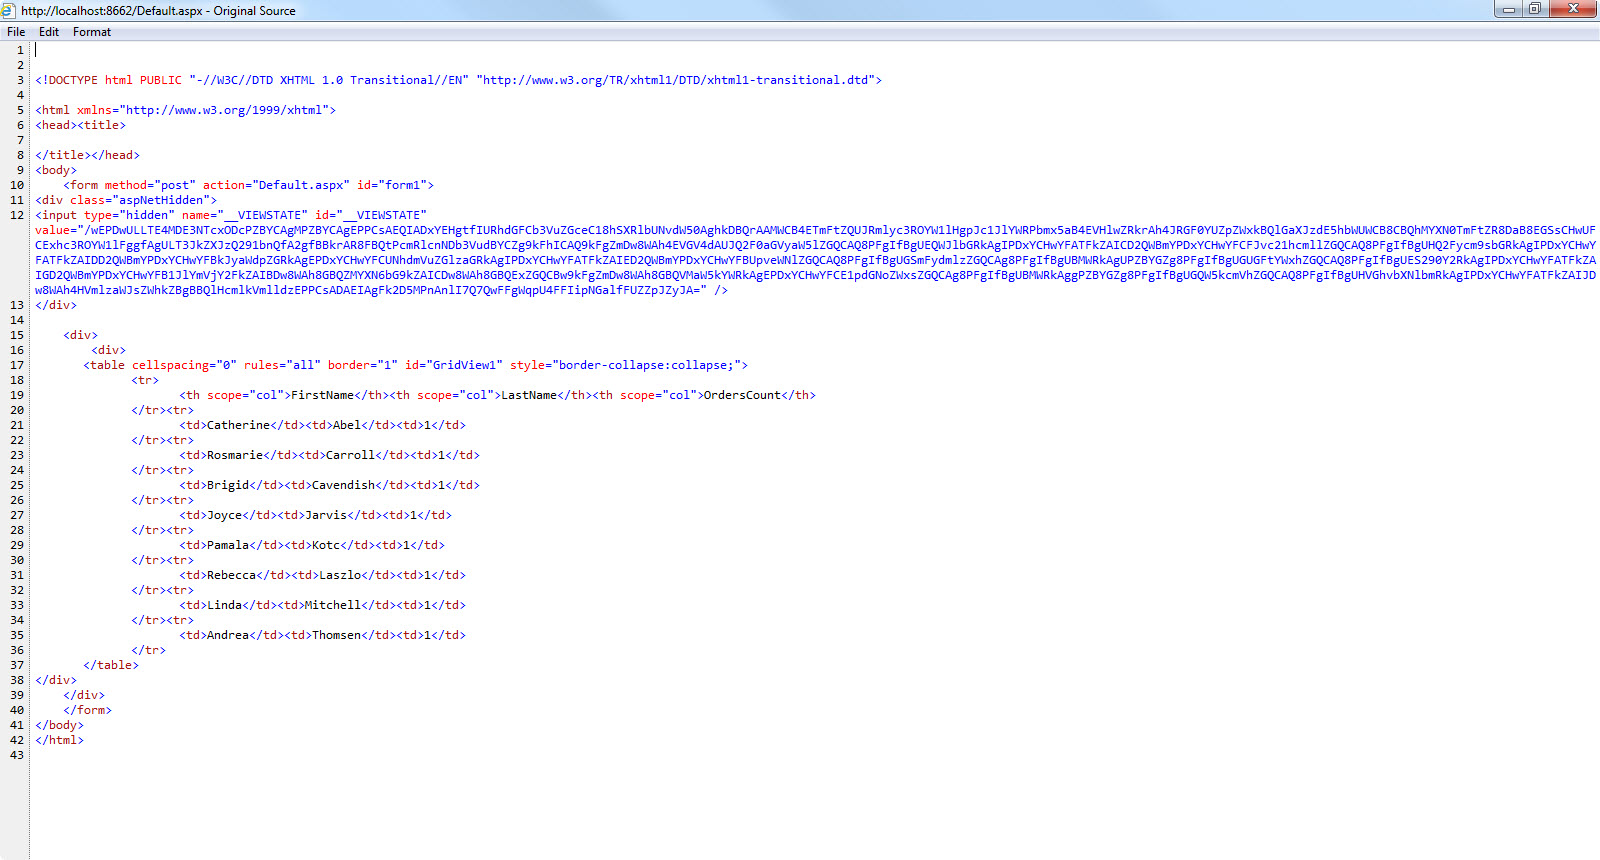
11) Run your application and you will see the results.
12) Have a look at the View Source of your page and see the ViewState hidden field.You will see a large hidden field with lots of encoded data in it. We need to move it from the client (the browser will not have to download it) and store it on the server's memory where RAM is not an issue.Have a look at the picture below
13) Now let's see how we can accomplish that.I am going to
use an Adapter which is basically a class file. Add
another class file in the App_Code special
folder.Name it ServerSideViewStateAdapter.cs.
The code for the .cs file follows
public class ServerSideViewStateAdapter:PageAdapter
{
	public override PageStatePersister  GetStatePersister()
{
 	 return new SessionPageStatePersister(this.Page);
}

}
Let me explain what the code above does.I have my newly created class that needs to implement the PageAdapter class.
There is a method in that class called
GetStatePersister that returns the
SessionPageStatePersister that stores ASP.Net page
view state on the web server.
You can read more here.
Do not to forget to use in your code the two namespaces
using System.Web.UI.Adapters;
using System.Web.UI;
14) Now we need to configure the Adapter. We need to add a new special folder to our site, a App_Browsers folder. Add a new item to this special folder,a .browser file and name it ViewStateAdapter.browser.
The code inside this file follows
<browsers>
    <browser refID="Default">
        <controlAdapters>
            <adapter controlType="System.Web.UI.Page"
                     adapterType ="ServerSideViewStateAdapter">


            </adapter>

        </controlAdapters>
    </browser>
</browsers>
I define that this Adapter (that I have already
created) will target all browsers (
<browser refID="Default">)
15) Now that you have everything configured, view the page
on the browser again. You will have the same results. Look
now in the Page --> View Source and you will see
that the ViewState has been removed and there is only
a simple key now present.If I had huge ViewState info
in my page by using this technique my clients would download
much less client code. My website's responsiveness and
performance would significantly increase.
Have a look at the picture below to see what I actually
mean.

Having said all that I would like to mention once more that you can disable ViewState at application,page and control level.
If you go to your web.config file you can disable it for the whole application
<pages enableViewState-"false" />
You can disable it on page level inside the Page directive
<%@ Page EnableViewState = "false" %>
and you can also disable it on each individual control
<asp:Button id="mybutton" runat="server"
EnableViewState="false" />
Drop me an email if you need the source code.
Hope it helps!!
Comments have been disabled for this content.