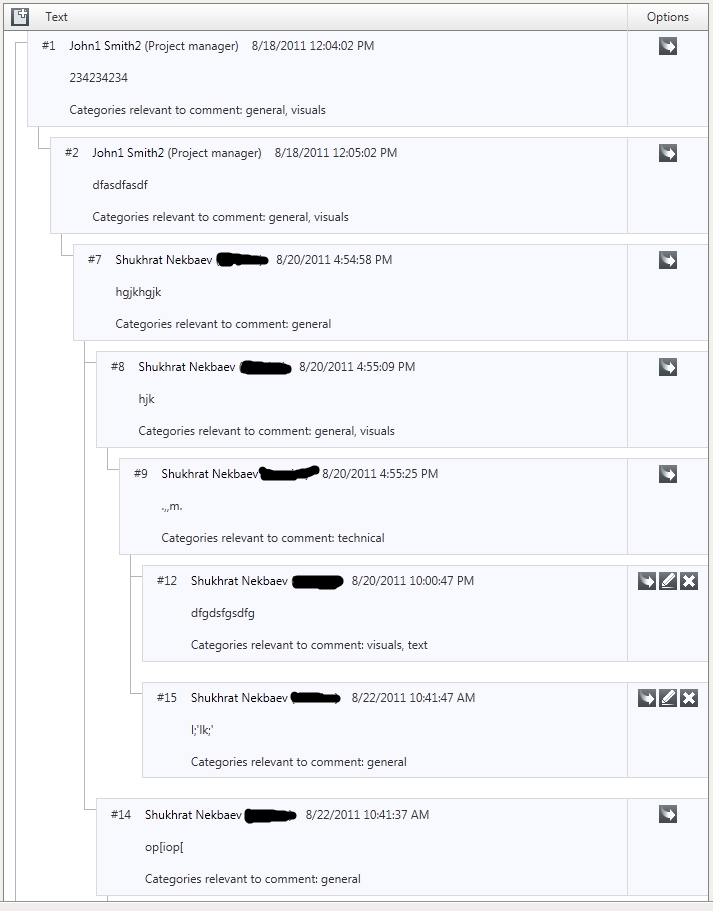
Adjusting Telerik RadTreeList to display visually separated items with depth level margins
Hi, in this post I would like to brief you how to make RadTreeList visually render like that (separated items depending on their level):

This could be usefull in scenarios of comment threads, where you would like to show all the comments expanded and highlight with different (main and alternative) color each of comment threads.
Consider comment thread as comment starting at root level with possbile child elements. Icons you see here are not native, but you can easily customize those.
I cleaned and removed extra stuff from my own sample, so here you go the template:
<telerik:RadTreeList ID="radListComments" runat="server" DataKeyNames="ID_HERE"
ParentDataKeyNames="PARENT_ID_HERE" AutoGenerateColumns="false" OnItemCreated="radListComments_ItemCreated"
OnUpdateCommand="radListComments_UpdateCommand" OnInsertCommand="radListComments_InsertCommand"
OnNeedDataSource="radListComments_NeedDataSource" ClientSettings-ClientEvents-OnTreeListCreated="createPrettyCommentsView"
AllowRecursiveDelete="true" ondeletecommand="radListComments_DeleteCommand" onitemdatabound="radListComments_ItemDataBound">
<EditFormSettings EditFormType="Template" />
<Columns>
<telerik:TreeListTemplateColumn HeaderStyle-Width="75%">
<HeaderTemplate>
<asp:LinkButton ID="LinkButton1" ToolTip="New comment thread" ForeColor="Blue" runat="server" CommandName="InitInsert"><img src="/Images/btnAddNewCommentGray.png" alt="" style="display:inline; line-height:17px; vertical-align:middle; margin-bottom:2px;" /></asp:LinkButton>   <asp:Literal ID="Literal2" runat="server" Text="Text" />
</HeaderTemplate>
<ItemTemplate>
<div style="height:20px">Customize for your needs</div>
</ItemTemplate>
</telerik:TreeListTemplateColumn>
<telerik:TreeListTemplateColumn>
<HeaderTemplate><asp:Literal ID="ltrCol2" runat="server" Text="Options" /></HeaderTemplate>
<ItemTemplate>
<asp:LinkButton ID="LinkButton1" ToolTip="Reply" ForeColor="Blue" runat="server" CommandName="InitInsert" CommandArgument='<%# Eval("ID_HERE" %>'>
<img src="/Images/btnReplyGray.png" alt="" style="display:inline; line-height:17px; vertical-align:middle; margin-top:3px;" />
</asp:LinkButton>
<asp:LinkButton ID="EditButton" ToolTip="Edit" ForeColor="Blue" runat="server" CommandName="Edit">
<img src="/Images/btnEditGray.png" alt="" style="display:inline; line-height:17px; vertical-align:middle; margin-top:3px;" />
</asp:LinkButton>
<asp:LinkButton ID="DeleteButton" ToolTip="Delete" ForeColor="Blue" runat="server" CommandName="Delete">
<img src="/Images/btnDeleteRemoveGray.png" alt="" style="display:inline; line-height:17px; vertical-align:middle; margin-top:3px;" />
</asp:LinkButton>
</ItemTemplate>
</telerik:TreeListTemplateColumn>
</Columns>
<EditFormSettings EditFormType="Template">
<FormTemplate>
Removed as not relevant to topic
</FormTemplate>
</EditFormSettings>
</telerik:RadTreeList>
You will need to adjust it for your needs, as you can see it required also event handlers to exist in code behind, but will take a look only at some of those:
OnItemCreated:
make you handler look like that:
protected void radListComments_ItemCreated(object sender, TreeListItemCreatedEventArgs e)
{
if (e.Item is TreeListDataItem)
{
Control expandButton = e.Item.FindControl("ExpandCollapseButton");
if (expandButton != null)
expandButton.Visible = false;
}
}
this will remove expand/collapse feature of tree items.
Next add you private fields to you page/control and handle:
private int _radTreeListLastLevelHelper;
private bool _isRadTreeListItemBgColorAlternative;
protected void radListComments_ItemDataBound(object sender, TreeListItemDataBoundEventArgs e)
{
if(e.Item.ItemType == TreeListItemType.Item || e.Item.ItemType == TreeListItemType.AlternatingItem)
{
var di = (TreeListDataItem)e.Item;
// add required attributes for js script
_radTreeListLastLevelHelper = HelperMethods.AddAdditionalAttribUsedInUIPrettifierJSScript(di, _radTreeListLastLevelHelper);
// set bg color
_isRadTreeListItemBgColorAlternative = HelperMethods.SetCommentItemBgColor(di, _isRadTreeListItemBgColorAlternative);
}
}
Static methods are defined as:
public static int AddAdditionalAttribUsedInUIPrettifierJSScript(TreeListDataItem di, int radTreeViewLastLevelHelperVariable)
{
// skip first root element
if (di.DataItemIndex == 0)
return 0;
//
if (radTreeViewLastLevelHelperVariable >= di.HierarchyIndex.NestedLevel)
di.Attributes.Add("shouldBeSeparated", "20px");
else
di.Attributes.Add("shouldBeSeparated", "10px");
if (di.HierarchyIndex.NestedLevel == 0)
di.Attributes.Add("shouldBeSeparated", "45px");
return di.HierarchyIndex.NestedLevel;
}
public static bool SetCommentItemBgColor(TreeListDataItem di, bool isAlt)
{
if (di.HierarchyIndex.NestedLevel == 0)
isAlt = !isAlt;
di.BackColor = isAlt ? Color.GhostWhite : Color.WhiteSmoke;
return isAlt;
}
Former method adds additional attributes and specify margin depending on the item level. So root items will have 45px between, child of a parent - 10px and when depth level is decreasing use 20px
Latter mathod sets colors of each comment thread (starting from root), so one comment thread will have GhostWhite color and another WhiteSmoke (similar to item and alt item coloring).
Next we need JS method to run on the tree html elements, from markup of RadTreeList you see ClientSettings-ClientEvents-OnTreeListCreated="createPrettyCommentsView":
function is:
function createPrettyCommentsView(sender) {
var commentsToAdjust = $("#" + sender.get_id() + " tr[shouldBeSeparated]");
if (commentsToAdjust.length > 0) {
for (var i = 0; i < commentsToAdjust.length; i++) {
var separator = $(commentsToAdjust[i]).clone();
separator.removeClass().removeAttr("id");
separator.children().html("").css("height", $(commentsToAdjust[i]).attr("shouldBeSeparated"));
separator.children(":regex(class, .rtlL\\d+)").removeClass().addClass("rtlL rtlL0");
$("#" + $(commentsToAdjust[i]).attr("id")).prev().children(".rtlCF, .rtlCL").filter(function (index) {
return $(this).css("border-bottom-width") == "0px";
}).css("border-bottom-width", "1px");
$("#" + $(commentsToAdjust[i]).attr("id")).children(".rtlCF, .rtlCL").filter(function (index) {
return $(this).css("border-top-width") == "0px";
}).css("border-top-width", "1px");
$("#" + $(commentsToAdjust[i]).attr("id")).next().children(".rtlCF, .rtlCL").filter(function (index) {
return $(this).css("border-top-width") == "0px";
}).css("border-top-width", "1px");
$("<tr>" + separator.html() + "</tr>").insertBefore(commentsToAdjust[i]);
}
}
}
yeah, might be slightly not optimal, was hacked fast, but does what's needed. And yes, you will need jQuery and one adjustment to jQuery:
/* http://james.padolsey.com/javascript/regex-selector-for-jquery/ */
jQuery.expr[':'].regex = function (elem, index, match) {
var matchParams = match[3].split(','),
validLabels = /^(data|css):/,
attr = {
method: matchParams[0].match(validLabels) ?
matchParams[0].split(':')[0] : 'attr',
property: matchParams.shift().replace(validLabels, '')
},
regexFlags = 'ig',
regex = new RegExp(matchParams.join('').replace(/^\s+|\s+$/g, ''), regexFlags);
return regex.test(jQuery(elem)[attr.method](attr.property));
}
snippet above will allow regex based selectors to be used.
Finally to expand all items handle OnPreRender in your page/control:
protected override void OnPreRender(EventArgs e)
{
radListComments.ExpandAllItems();
base.OnPreRender(e);
}
That should do it! Hopefully while cleaning for post I didn't break/skipped too much relevant stuff :)))