ASP.Net MVC Framework - List and Save data
When building application today (X)HTML-based web interfaced
is often used as the front-end choice today. Several
companies used Microsoft SharePoint or other web-based
portals solutions as intranet; we have several public
applications which are web based. Enterprise applications
continue to adopt web-based user interfaces, and this will
unlikely change in the near future. A web-based user
interface can today target almost any platform, and the
deployment of web-based application is much easier than a
desktop application that needs to be installed on every
client. It’s easier to brand a web application than a
desktop application like a Windows Form. A web based
application will not take up to much resource on the
client’s computer. But there are some challenges also.
The
Request-Response paradigm can complicate interactions that
would be simple in traditional UI. For example if we have a
Windows application we can simply hold the state, HTTP is a
stateless protocol which will complicate state management.
A web applications user interface today can also be complex,
often produced by tools like DreamWeaver and “probably”
FrontPage ;) The applications also often use client-side
JavaScript. Some content can be hard to be edited by a .Net
developer. But for a designer and of course some developers
it’s easy to change the user interface, and often a web
applications user interface will be changed. This requires
a clean separation of presentation from business logic.
With
the ASP.Net MVC Framework we will have separation of
concerns. We separate the presentation from the business
logic. The MVC is an abbreviation of Model View Controller,
where the Controller objects accept user input and invoke
business logic to create and update model objects. The Model
object has the responsibility to provide the data to
display; the model is a contract between controller and
view. The View objects are responsible to display the Model,
as provided by the controller that invokes it. By using the
ASP.Net MVC Framework we will have more control over the
HTML (a cleaner HTML page), we will have a controller
separated from the View. By having this separation
developers can create controllers and use unit-testing or
TDD without knowing anything about how the model should be
presented. The designer of the User Interface doesn’t need
to know about the controller, only what data that should be
displayed and sent back during a POST. The three parts in
the MVC pattern, the View, Controller and Model can be
implemented by three different developers and designer at
the same. TDD can be applied when creating the Controllers
and also the Model, this because of the separations and the
possibility to create mock objects. The MVC Framework works
against interface so we have interfaces for everything so we
can easy create our mocks and test our controllers without
needing to know about the View. We can also mock the Model.
I will go on by showing how we can create a
simple Blog application with the ASP.Net Framework and LINQ
to SQL.
To create a MVC Web Application we select
File -> New Project and select the MVC Web Application
template:
Then we enter the name of the application, I
will give it the name MyBlog. The “MVC Web Application”
template will create some template files and folders for us:
The folders and files the MVC Web Application
template has created are:
/Controllers
/Models
/Views
/Common
/Home
/Masters
The Controllers folder should contain the Controllers we
will use in our application. In the Models folder we put our
model and business objects. In a larger application we will
probably use separated class libraries instead of adding the
objects to the web application project, this is of course
possible. In the Views folder we add the pages (Views). The
Views have the responsibility to render the Model. A View is
a normal .aspx page, but instead of inheriting the Page
object, it inherits the ViewPage object or
ViewPage<T>. We can also put MasterPages and Style
Sheets into the View folder. In the Common folder we can put
Style Sheets; in the Masters we put master pages. You have
probably also notice the Home folder. If we create a
Controller, for example <name>Controller (Controller
is a suffix used for controllers), we should also create a
folder under the View with the same <name> as the
Controller where we add our Views. This is not necessarily;
we can also add the View directly under the Views folder.
The first place the MVC Framework will look for a View when
we want to render a View is in the folder that has the same
name as the Controller used by the View. If it can’t find a
folder with the same name as the Controller, the MVC
Framework will see if it can find the View in the root of
the Views folder. When we create a “MVC Web Application” we
will also get an empty Default.aspx page and a Global.asax
file. In the Global.asax we will map a URL to a
Controller.
Explanation about Routing and how to setup a
route.

In the Application_Start we add a Route to the
RouteTable’s Routes collection. The first Route uses an URL
with the format “[controller]/[action]/[id]”. With the MVC
Framework we don’t enter a URL directly to a specific file;
instead we use a cleaner format. Like: /Posts/List/.Net
The
“[controller]” in the Url specifies what part of the Url has
the name of the Controller that should be used. The
“[action]” specifies a Controller’s method that should be
executed. The last “[id]” specifies an argument that should
be passed to the Controller’s action methods. So if we use
the format “[controller]/[action]/[id]” and enter an Url
like this: /Posts/List/.Net the MVC Framework will
instantiate a Controller with the name
Posts<Controller> (PostControllers) and execute the
Controller’s List method and pass “.Net” as an argument to
the method.
public void List(string id)
We
can customize the format in different ways. We can use the
Defaults property of the Route object to specify which
Controller we should use for a specific URL and also which
Action. For example for the URL /MyBlog/Posts/List the
Posts<Controller> will be used and the Controller’s
List method will be executed.
Url =
“MyBlog/Posts/List”
Default = new { action=”List”,
controller=”Posts” }
If we use a format like
“[controller]/[action]/[id]” we don’t need to enter an URL
that must match the whole format, we can for example enter
URLs like the following ones:
/Posts
/Posts/List
/Products/Edit/.Net
If
our action methods should be able to take more arguments, we
can simply add them by name to the URL property of the Route
class:
“[controller]/[action]/[id]/[PageIndex]”
We
can then use the Defaults property of the Route object to
specify the default value for the Id and PageIndex
argument:
Defaults = new { id = 1; pageIndex = 2
}
The Defaults property uses an anonymous type
and by using reflection behind the scene the Deafults
property can be dynamic. The name of the property we specify
must have the same name as the action methods arguments. So
in the above case our action method would look like:
public
void <Name of method>(int? id, int? pageIndex)
As
you can see a Nullable type of Int is used, the reason to
this is that we can now enter an URL that executes our
action method without specifying the value of the
arguments.
The RouteHandler property of the Route
object specifies which class should handle the routing of an
URL to a Controller.
There is one more property
of the Route object we can use and it’s the Validation
property. With the Validation property we can set up a
validation role for the specified action method’s arguments.
For example if we want to make sure the id argument only
have a maximum value of 9999 and the pageIndex a maximum
value of 99 we can do the following:
RouteTable.Routes.Add(new
Route
{
…
Defaults = new { Validation
= new { id = @”\d{1,4}”, pageIndex = @”\d{1,2}” }
});
Modify the RouteTable for the Blog application we are
building
We will change the default action method to “Home”
instead of ”Index”. We will also create a Controller with
the name “BlogController” later so we will change the
controller for the Default.aspx to “Blog”. When we enter the
URL to the default.aspx, the BlogController will be
instantiated and the default action method “Home” will be
executed.
Creating a Controller
Now when we have setup the routing we can start
to create the BlogController. To create a Controller we
right click on our Controller folder and select “Add New
item” and then select the “MVC Controller Class” template.
We give the Controller the name “BlogController” and hit the
Add button.

A Controller inherits from the base class
Controller by default. We don’t need to inherit this class
if we don’t want to, but it has some nice helper methods
that we can use, and the base class will also make it easier
to create a Controller. “The MVC Controller Class” template
will add an Index method to the Controller, We change the
name to “Home”. We add three other methods also, Add, About
and Contact to the BlogController:
The ControllerAction attribute must be added
to the action method, it’s because of security reason so we
can’t invoke other method in a Controller by entering the
method in the URL.
Pre- and PostConditions
The Controller base class has two methods that we can
override, onPreAction and onPostAction. By using those
methods we can add logic that should be executed before and
after an action method is executed.
We will not
add any logic to the Controller yet, instead we will move on
to the Model layer.
Note: In normal situation I should have used Test
Driven Development or Unit test, but if I should include
it in this post, it should only make the post longer.
The Model
We can use LINQ to SQL to do the data access, so the
first thing we will do is to create a DataContext class.
This can be done by using the designer tool in Visual Studio
2008 and generate the DataContext classe for us. Right click
on the Model folder and select “Add New Item” and select
“Linq To Sql Classes”.
Give it the name MyBlogDataContext and open a
connection to MyBlog database and drag out the Post table to
the designer.
Note: You can easy create the MyBlog database and add
one Table with the name Post, and then four complumen,
ID (Integer and auto increment), Title (mvarchar),
Message (nText) and Posted (DateTime).
Now when our DataContext is genereated we
create one class which should use it. So we can create
a class with the name PostRepository. We add two methods,
GetAll and Add. The GetAll will return a List of Post and
the Add will take a Post object as an argument.

No when our Model is created we can go back to the BlogController and implement the first action “Home”. The “Home” action should get all blog posts from the Post table in our database and then pass them to the “Home” View. This is done by making a call to our PostRepository.GetAll method.

The RenderView method is a method on the
Controller base class. The method takes the name of the View
to render and the Model that should be rendered by the View
as arguments. It can also take a MasterPage as an argument
if we want to render a View with a specific MasterPage:
RenderView(“View”,”MasterPage”)
In
this example we will use the MasterPageFile attribute on the
@Page directive for all the pages so we don’t need to
dynamically specify a MasterPage to use.
Creating Views
Now when the Model is created and the “Home” action
for the BlogController is implemented, we can start to add
Views. We will use a MasterPage for all Views and by default
when we create a MVC Web Application we will get a
MasterPage located in the Views/Masters folder. We can
change the MasterPage to fit our needs. We can for example
add a header, three links, Home, About and Contact and
specify where our ContentPlaceHolder should be: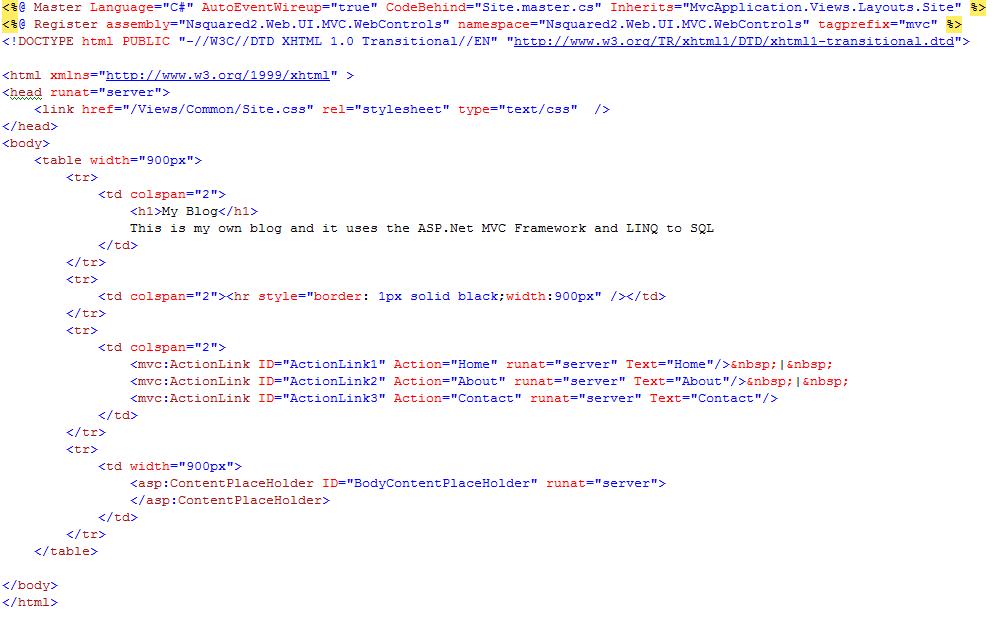
The three Links in the MasterPage will call
the Home, About or Contact action method of the
BlogController. To specify which action the Links should
call, we can use an ActionLink server-control which I have
created. Send me an e-mail and I will send the source code.
The Action attribute of the control specifies which action
we should call when we press the link. The ActionLink server
control is an abstraction of the Html.ActionLink helper
method of the ViewPage object. Instead of using a Script
block and call the ActionLink method like this:
<%=
Html.ActionLink("Home", "Home"); %>
We can use
the ActionLink control instead.
<mvc:ActionLink
ID="ActionLink3" Action="Contact" runat="server"
Text="Contact"/>
We can add any attribute to
the ActionLink control and it will take the attribute and
value and add it as a QueryString to the Links URL, for
example:
<mvc:ActionLink ID="ActionLink3"
Action="Contact" PostId=”1” runat="server"
Text="Contact"/>
Will generate the following
HTML:
<a
href=”/Blog/Contact?PostId=1”>Contact</a>
The
MasterPage will look like this: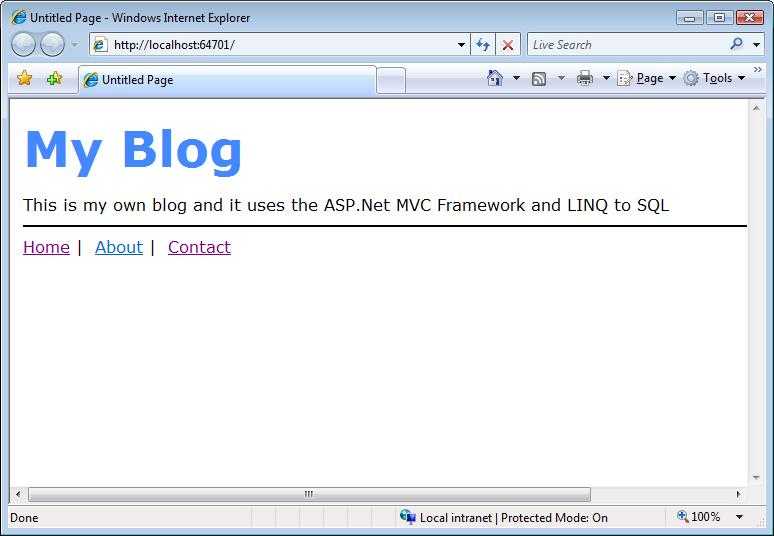
Now when the MasterPage is created we can add
the first View for the blog. Because the Controller has the
name Blog we first create a folder in the Views folder with
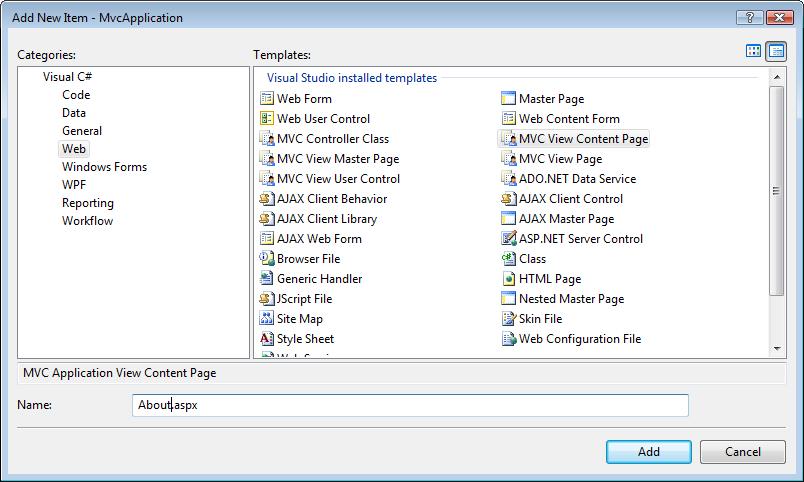
the name “Blog” and then right click on the folder and “Add
New Item” and select the “MVC View Content Page” template to
create View as a content page.
Name the View “Home”. When we add the View we
also point out the MasterPage page we should use. When this
is done we open the code-behind file of the View and change
so the Home View inherits the ViewPage<T> instead of
the ViewPage. By using the ViewPage<T>, we can specify
the type of the ViewData property of the View (The ViewData
property holds the data passed as an argument to the
RenderView method) we will change so the Home View inherits
VierwPage<List<Post>>.

Then we add some inline code to the View to iterate through
all posts and display them by using a table.

Note: We can use a ListView control shipped with
ASP.Net 3.5 if we want to avoid using too much inline
code. We can then do the data binding from the Page_Load
method of the code-behind of the View by using the
ListView’s DataSource property and DataBind method.
The ViewData property used in the code will contain a
List of Posts. It’s the Home action method of the
BlogController that will make sure this View will be
rendered. And the Home method will get all posts from the
data source and pass it to the RenderView.
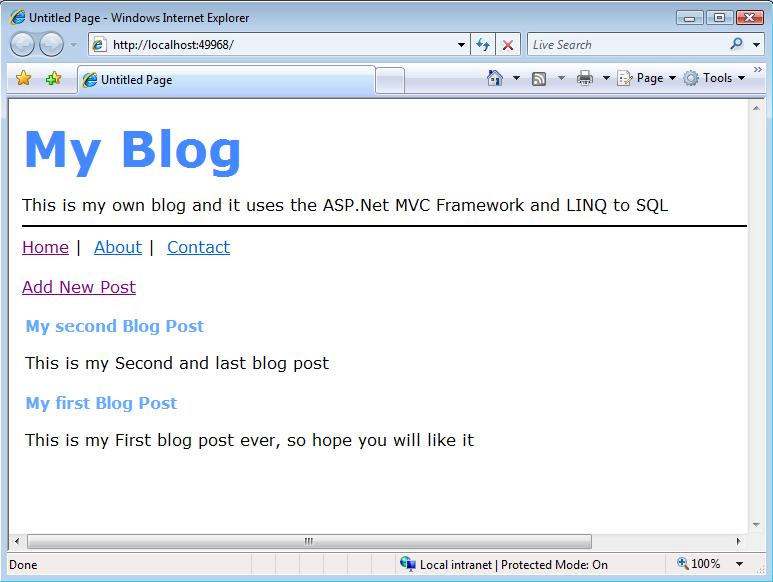
At the top of the View we add an ActionLink
control to the View with the Action attribute set to “New”.
We set the Text property to “Add New Post”. We will use this
ActionLink control to navigate to a new View where we can
add new posts to the blog.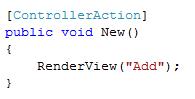
The “New” action method will render the “Add”
View which is the next “MVC View Content Page” we will add.
The “Add” View is responsible to render an input form where
we can write a new blog post.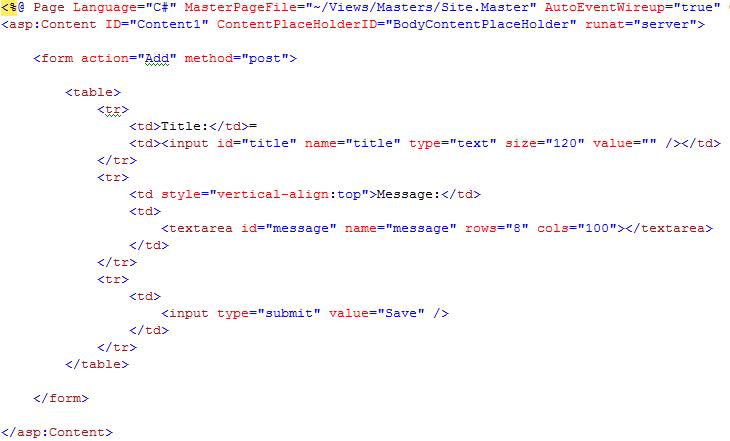
The “Add” View will have two input field, one
for the title of a blog post and one for the message body.
The action attribute of the <form> element it set to
the action method that should we called when we submit the
page. In this case the “Add” method. When we have created
our new Post, we will make a call to the PostRepositories
Add method. The “Add” method will look like this: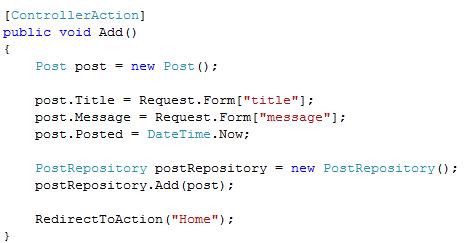
To get the input fields data we need to use
the Controller base class’s Request property. In the future
we will see some other solutions for this. When we have
saved the new blog to the data source we will make a call to
the RedirectToAction method to make sure our “Home” action
method will be executed. We do this because we want to
render all the available posts after we have added one post.
The last thing to do now is to add the View for the About
and Contact link, when this is done we make sure to add the
action methods “About” and “Contact” to the controller and
make sure they render each Views. The “About” and “Contact”
View has only static information so we only make a call to
the RenderView method.
Summary
You have
now seen a simple demo where a View lists available blog
posts and also how we can add a new blog post to our data
source. I will add more posts about the MVC Framework, so
keep watching my blog if you find it interesting.