WinMerge as a Comparison Tool in Visual Studio 2008
Ok I know VS 2010 is the new toy to be seen playing around with, but as I have just recently got delivery of my new Windows 7 pc I thought I would document how to get WinMerge to work as a comparison tool with VS2008 Team System. If for anything, so I know myself when the time comes to do it all over again.
Team Foundation Server does have a built in comparison and merge tool, but personally I find WinMerge to be far better. Oh and it is free.
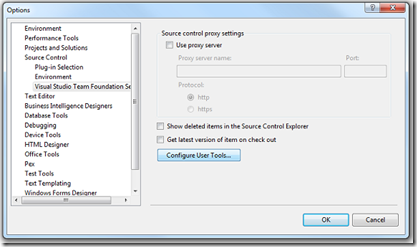
- After downloading and installing, you need to configure Visual Studio. Go to Tools >> Options
- Find the ‘Source Control’ section in the tree view and select ‘Visual Studio Team Foundation Server’
- Click the ‘Configure User Tools’ button.

- Click on the ‘Add’ button on the ‘Configure User Tools’ window.
- Enter these values in the textboxes:
Extension: *
Operation: Compare
Command: C:\Program Files\WinMerge\WinMergeU.exe (or wherever you have installed WinMerge to)
Arguments: /x /e /ub /wl /dl %6 /dr %7 %1 %2

- Click OK all the way back down to get back to the main IDE.
Now when you view a file history from Solution Explorer it will start up WinMerge.