ASP.NET MVC 3: Building simple image editor using WebImage helper
In my previous posting about WebImage helper I introduced how to use WebImage for different image manipulations. In this posting I will show you how to build simple online image editor using WebImage helper.
Source code
You can find source code of this example from Visual Studio 2010 experiments repository at GitHub.
| Source code repository GitHub |
Simple image editor belongs to Experiments.AspNetMvc3NewFeatures solution, project name is Experiments.AspNetMvc3NewFeatures.Aspx.
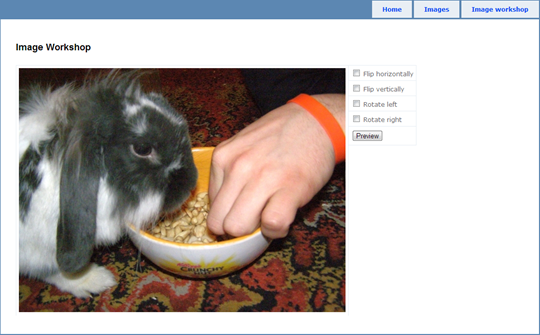
Here you can see the screenshot of simple image editor.
Four simple operations is enough for current example.
Building editor view
Before going to controller that is extremely simple – believe me, it is no-brainer – let’s take a look at view. The editor is made up from following parts:
- image tag that shows image with current effects,
- effects checkboxes,
- JavaScript that requests image with selected effects from server.
Here is the view.
<%@ Page Title="Image Worksop" Language="C#" MasterPageFile="~/Views/Shared/Site.Master"
    Inherits="System.Web.Mvc.ViewPage<dynamic>" %>

<asp:Content ID="Content1" ContentPlaceHolderID="TitleContent" runat="server">
    Image Workshop
</asp:Content>

<asp:Content ID="Content2" ContentPlaceHolderID="MainContent" runat="server">
    <script type="text/javascript">
        function updateImage() {
            var req = '/ImageWorkshop/GetImage?';
            var query = '';

            if ($('#HorizontalFlip').is(':checked'))
                query += '&HorizontalFlip=1';
            if ($('#VerticalFlip').is(':checked'))
                query += '&VerticalFlip=1';
            if ($('#RotateLeft').is(':checked'))
                query += '&RotateLeft=1';
            if ($('#RotateRight').is(':checked'))
                query += '&RotateRight=1';

            req += query.substr(1);
            $('#image').attr("src", req);
        }
    </script>

    <h2>Image Workshop</h2>

    <% using(Html.BeginForm()) { %>
        <table border="0" cellpadding="0" cellspacing="5">
        <tr>
        <td valign="top" rowspan="10">
            <img src="/ImageWorkshop/GetImage"  id="image" alt="" />
        </td>
        <td valign="middle"><input type="checkbox" id="HorizontalFlip" value="1" />
            Flip horizontally</td>
        </tr>
        <tr>
        <td valign="middle"><input type="checkbox" id="VerticalFlip" value="true" />
            Flip vertically</td>
        </tr>
        <tr>
        <td valign="middle"><input type="checkbox" id="RotateLeft" value="true" />
            Rotate left</td>
        </tr>
        <tr>
        <td valign="middle"><input type="checkbox" id="RotateRight" value="true" />
            Rotate right</td>
        </tr>
        <tr>
        <td><input type="button" value="Preview" onclick="updateImage()" /></td>
        </tr>
        </table>
    <% } %>
</asp:Content>
The JavaScript function updateImage() checks what checkboxes are checked and creates query string for GetImage controller action. This query string contains values only for applied effects.
Controller actions
When you take a look at image definition in view you can see that we need two separate actions – one that returns editor view and the other that returns image. I said before that controller is extremely simple. Don’t mind my not so nice solution for image action – it is my working draft.
public class ImageWorkshopController : Controller
{
[HttpGet]
public ActionResult Index()
{
return View();
}
public void GetImage(string horizontalFlip="", string verticalFlip="",
string rotateLeft="", string rotateRight="")
{
var imagePath = Server.MapPath("~/images/bunny-peanuts.jpg");
var image = new WebImage(imagePath);
if (!string.IsNullOrWhiteSpace(verticalFlip))
image = image.FlipVertical();
if (!string.IsNullOrWhiteSpace(horizontalFlip))
image = image.FlipHorizontal();
if (!string.IsNullOrWhiteSpace(rotateLeft))
image = image.RotateLeft();
if (!string.IsNullOrWhiteSpace(rotateRight))
image = image.RotateRight();
image.Write();
}
}
Applying effects to image is very easy. We just check the values sent from view and apply the effect only if appropriate value is not null or empty string. That’s why I created query string with effect values as ones ("1") in JavaScript.
