Integration of jQuery DatePicker in ASP.NET Website – JS Validation Script (part 2)
In part 1 I’ve shown the way to integrate the KeithWood’s jQuery DatePicker on an ASP.NET website in just few simple steps.
In this blog post I’m going to do something more advanced comparing with the part 1 blog post, but still, I will stick enough clear with the code and explanation to make this simple for everyone (not only for JS Ninjas).
The script will do the following things:
- Validate date string
- Validate startdate and enddate logic ( !(startdate>enddate) )
- Validate empty text boxes
- Create nice error messages using fadeIn/Out effects
NOTE: If you want to test the scenario on your own environment while reading this blog post, download the source code from part 1, here. Otherwise, you have the complete source code at the end of this blog post.
So, here is what I have in my Solution Explorer for this project
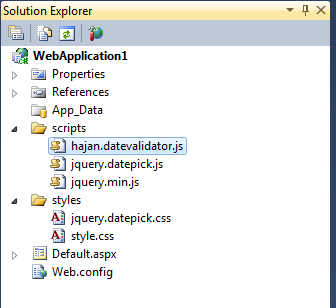
CSS Files:
- jquery.datepick.css – this file remains same as in the part 1.
- style.css – here I have made some little modifications to the layout.
JavaScript Files:
- jquery.datepick.js – the plugin script with no changes at all – same as in part 1.
- hajan.datevalidator.js – the validation script, our main focus in this blog post.
style.css
* { margin:0; }
body { font-family:Verdana; font-size:10pt; background-color:#eeeeee; margin-top:5px; }
#content { padding:10px; border:0px solid red; }
input.field { width:110px; border:1px solid black; padding:1px; background-color:#fff; }
.msg { display:none; padding:10px; }
.btn { padding:1px; width:100px; border:1px solid black; background-color:gray; color:White; }
span#messages { margin-left:10px; }
NOTE: The bolded lines are modifications in part 2, comparing with part 1 style.css
hajan.datevalidator.js function
The following flowchart represents the algorithm of this JS function:
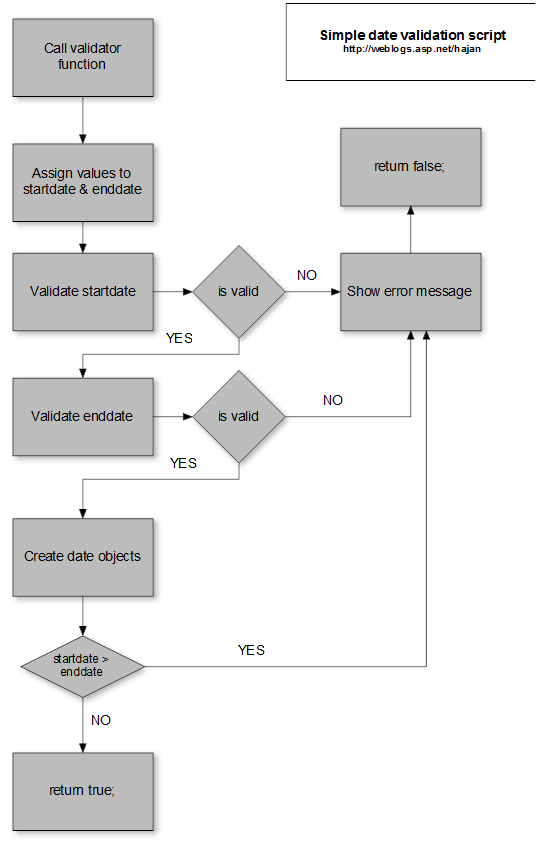
The JavaScript function code of the above drawn flowchart diagram is:
function validate(obj,sDat,eDat) {
    //assigning the textbox values to startdate and enddate variables
    var startdate = document.getElementById(sDat).value;
    var enddate = document.getElementById(eDat).value;
    var btnName = obj.name; //assign obj.name to btnName, this is the ID of the asp.net serverside button control

    var regEx = /^\d{1,2}(\-|\/|\.)\d{1,2}\1\d{4}$/;
    if(!regEx.test(startdate))
    {
        //make startdate text box border-color to 'red'
        $('#' + sDat).css('border-color', 'red');
        $('#' + eDat).css('border-color', 'black');
        //check startdate if string empty
        if (enddate != '') {
            errorMessage(btnName, 'messages', 'Start date text box value is not valid date!', 2000, true);  //call errorMessage function
        }
        return false;
    }
    else if (!regEx.test(enddate)) {
        //make end date text box border-color to 'red'
        $('#' + sDat).css('border-color', 'black');
        $('#' + eDat).css('border-color', 'red');
        //check enddate if string empty
        if (enddate != '') {
            errorMessage(btnName, 'messages', 'End date text box value is not valid date!', 2000, true);  //call errorMessage function
        }
        return false;
    }
    else {
        //creating new date objects for start and end date
        var sDate = new Date(startdate);
        var eDate = new Date(enddate);

        //if startDate is greater than endDate
        //print error message and color the textboxes with border-color:red;
        if (sDate > eDate) {
            //make border color red to both text boxes
            $('#' + sDat).css('border-color', 'red');
            $('#' + eDat).css('border-color', 'red');

            //call errorMessage function and print the message
            errorMessage(btnName, 'messages', 'Start date must be smaller than End date', 3000, true);

            //validation is false
            return false;
        }
        else {
            $('#' + sDat).css('border-color', 'black');
            $('#' + eDat).css('border-color', 'black');
            return true;
        }
    }
}
You have short comments on each code block in order to help you better understand the code, even though it’s completely same as the flowchart diagram processes.
Probably you’ve already noticed, I’m using errorMessage function that accepts five parameters. I’ve made this function in order to provide nice messages to the user. The function code is:
///
///JS Function: errorMessage
///Params:
///-> btnId -           the ID of the button used when validate() function is called
///-> msgInfoId -       the ID of the <span>, <div> or any html object where error message will be displayed
///-> messageText -     the Error message that will be displayed
///-> timeoutPeriod -   time the error message will stay visible
///-> disableBtn -      true/false boolean to specify whether you like the button to get disabled once the error
///                     messgae is displayed or not.
function errorMessage(btnId, msgInfoId, messageText, timeoutPeriod, disableBtn) {
    if (disableBtn == true) {
        $('#' + btnId).attr('disabled', true); //disable button
        $('#' + btnId).attr('value', '...'); //change text to '...'
        $('#' + msgInfoId).html(messageText).fadeIn('slow').delay(timeoutPeriod).fadeOut('slow'); //show error message
        setTimeout(function() {
            $('#' + btnId).removeAttr('disabled', true);
            $('#' + btnId).attr('value', 'TEST');
        }, timeoutPeriod + 1000); //after timeoutPeriod + 1 more second, remove disabled attribute and change value to TEST
    }
    else {
        //just show the error message without disabling the button
        $('#' + msgInfoId).html(messageText).fadeIn('slow').delay(timeoutPeriod).fadeOut('slow');
    }
}
So, it mainly shows error message with fadeIn/fadeOut effects with display time defined in the parameters. Moreover, you can specify whether you want the button to get disabled while error message is displayed or not. This might be good in order to prevent user clicking multiple times if an error occurs.
The ASPX code
In the head section of your ASPX page, reference the scripts as follows:
<link rel="Stylesheet" type="text/css" href="styles/style.css"></link>
<script src="http://ajax.microsoft.com/ajax/jquery/jquery-1.4.2.min.js" type="text/javascript"></script>
<script type="text/javascript" src="scripts/jquery.datepick.js"></script>
<script type="text/javascript" src="scripts/hajan.datevalidator.js"></script>
<script type="text/javascript">
$(function() {
$('#startdate').datepick({ dateFormat: 'mm/dd/yyyy' });
$('#enddate').datepick({ dateFormat: 'mm/dd/yyyy' });
});
</script>
We have the same script as in part 1, only our new hajan.datevalidator.js script is added.
In the body, add the following code:
To <asp:TextBox ID="enddate" class="field" runat="server"></asp:TextBox>
<asp:Button ID="btnValidate" runat="server" OnClientClick="return validate(this,'startdate','enddate');" class="btn" Text="TEST"
OnClick="Button1_Click" />
<br /><br />
<span id="messages" class="msg" style="background-color:#bb1100; color:White;"> </span>
Here we have the same text boxes for startdate and enddate, plus added one button with id btnValidate and <span> where the error messages will be displayed.
The function validate is executed when button OnClientClick event is fired. You can see I’m passing three parameters:
- this – the button object
- ‘startdate’ – the id of the startdate text box
- ‘enddate’ – the id of the enddate text box
Note: you can change the object (this) parameter because there is no need in this script to send the whole object as parameter. It’s enough to have only the button id. Be careful, you will need to modify the validate() function too if you make such change.
The complete source code you have it here.
Please do let me know your feedback and remarks.
Best Regards,
Hajan