MVC 3 – Supporting Custom View Engines
MVC 3 Preview 1 was released earlier this week. It’s packed with new features such as dependency injection, global filters and new tooling to support multiple view engines, including the new Razor view engine for C# (see the end of this post for a list of related posts). Support for Visual Basic will be included in a future release of MVC. For now, our focus has been on getting as much of the C# support completed, including new project types, item templates and T4 files. In this post I will focus on the new tooling support we included for this release.
Adding Custom View Templates to a Project
We’ve retained the support we introduced in MVC 1 that allow users to customize the T4 templates used by the Add View dialog. You can add a new template for the ASPX (C#) view engine by doing the following:
-
Create a new MVC 3 (ASPX) project.
-
In your project, create a new folder named CodeTemplates.
-
Create a folder named AddView under the CodeTemplates folder.
-
Create a folder named AspxCSharp under the AddView folder. The name of this folder must match the name of the view engine. In MVC 1 and 2, this folder did not exist since we did not support multiple view engines. If you are converting a project from an earlier version of MVC and you had local T4 files, you will need to add an additional folder and move your files one level deeper.
-
Place your T4 files in the AspxCSharp folder. Remember to clear the Custom Tool property of the T4 file. Right click on the template, select properties and delete the Custom Tool property.
-
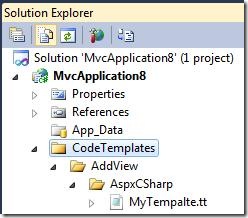
At this point your solution should look like the example below.
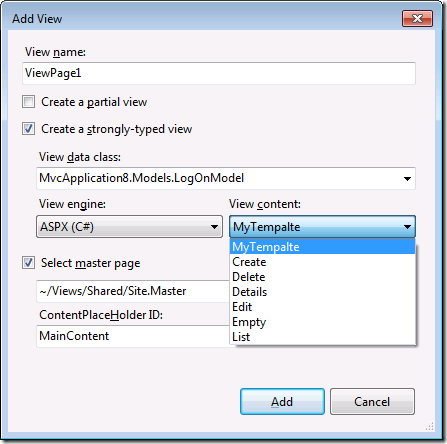
You can now use your custom template when adding a view by doing the following:
-
Build your solution. This ensures that all the types in the solution become available when you want to create a strongly typed view.
-
Right click on the Views folder, or any of its subfolders and select Add View from the context menu.
-
Check the Create a strongly-typed view checkbox and select a view data class. This will enable the View content dropdown.
-
Select your new template.
Global Templates
Chances are that if you’ve customized templates in one project, you may want to reuse the templates in other projects. Instead of placing the template within the CodeTemplates folder of a the project you can place your new template alongside the default files that MVC installs under C:\Program Files\Microsoft Visual Studio 10.0\Common7\IDE\ItemTemplates\CSharp\Web\MVC 3\CodeTemplates\AddView\AspxCSharp
First-Class Support for Third Party View Engines
Apart from supporting the new Razor view engine, we also added support for other view engines such as Spark and NHaml to register their templates in MVC 3 projects. Although MVC does not ship templates for these view engines, we included some extensibility points to make it easier for developers to benefit from the tooling support we have. The support is still limited and we plan on expanding this in a future release, but we believe that we have a fairly solid foundation to work from right now.
Let’s look at an example on how you might add support for Spark. In this example, I will be making the view engine globally visible, but you can also limit the scope locally within a project.
-
Create a new folder named SparkViewEngine under C:\Program Files\Microsoft Visual Studio 10.0\Common7\IDE\ItemTemplates\CSharp\Web\MVC 3\CodeTemplates\AddView
-
Place your T4 files for Spark inside the SparkViewEngine folder.
-
Create an XML file in the SparkViewEngine folder named ViewEngine.xml that contains the following markup:
1: <?xml version="1.0" encoding="utf-8" ?>
2: <ViewEngine DisplayName="Spark"
3: ViewFileExtension=".spark"
4: DefaultLayoutPage="~/Views/Shared/Application.spark"
5: PartialViewFileExtension=".spark" />
When you select Add View the dialog will now offer Spark as an option.
A few things to note about the markup:
-
The DisplayName attribute determines the value in the View engine dropdown. Recall that in step 1 you created a folder named SparkViewEngine. Note that the dropdown simply says Spark, not SparkViewEngine.
-
The ViewFileExtension attribute is required and will be used for normal views, partial views and layout pages.
-
The DefaultLayoutPage attribute is used to specify a default value for the master page textbox.
-
The PartialViewFileExtension attribute is used to specify a different extension if partial views require a different one. If this attribute is not specified then we use the value of the ViewFileExtension attribute.
Beyond Preview 1
The XML for the view engine definition is not 100% supported today. To fully support third party view engines we need to expose additional extensibility points. Below is a list of some areas that we are currently investigating.
-
Users need to be able to hook into the browse functionality to select a different layout (master) page and filter the selection based on the view engine’s supported file extensions.
-
The ContentPlaceHolder ID textbox is specific to ASPX pages. Spark for example, has a similar concept. To ensure that the templating host correctly identifies placeholders we need to enable authors of view engines to provide us with a parser that can extract the content sections from a layout page based on the view engine’s syntax.
-
We haven’t exposed all the attributes in the XML yet, since some of them tie directly into how layout pages are processed and also control the state of certain UI elements.
These are just ideas that we are considering and things may change significantly in the next release. Hopefully the functionality we provided in this preview is enough to get people started and have a better understanding of the direction we are taking with MVC 3 tooling support.
If you are developing a view engine or you wish to integrate into our tooling support, please leave some feedback so that we can start a discussion on what extensibility we should enable.
Enjoy!
Other Resources
- Scott Guthrie’s introductory post.
- Phil Haack’s announcement.
- Eilon Lipton has a post on how to convert your existing projects to MVC 3.
- Brad Wilson has a series of posts that cover dependency injection.


