ASP.NET MVC book: Chapter 1: Plumbing
ASP.NET MVC: From Webforms to MVC
by Jeff Putz
The following is a barely-edited draft from the
forthcoming book
that will explore Microsoft’s ASP.NET
MVC framework from the
view of a traditional Webforms
developer. This chapter goes over
the basic plumbing
of the framework, while subsequent chapters
will be
more focused on the typical use cases that every developer
encounters, and how they relate to their Webforms
analogs.
Again, this is a draft, so read with
caution. You can find updates on
the status of the
book, which will likely be published early summer,
2009, at the following locations:
http://weblogs.asp.net/Jeff/
http://twitter.com/jeffputz
Download a more formatted version in PDF form... it's
much easier to read!
The text is ©2009, Jeff Putz, all rights reserved.
Feedback is welcome, especially if you find something that is outright incorrect. Thanks for reading! Did I mention the PDF version is easier to read?
EDIT, Previously:
Introduction
The M, The V, The C and Other Plumbing
We
explained in the introduction what MVC is, the
model-view-controller
pattern. Let’s get to a quick
and dirty example to see it in action.
Hello
kittehs
As a tribute to those illiterate
captioning cats on the Internet, why don’t we
quickly
build an application that gets the names of cats and
displays them. We’ll
fire up Visual Studio, choose a
new ASP.NET MVC Web Application from the
File ->
New Project menu, and get to work immediately. For now,
we’ll skip
creating a test project. 
If we take a peak in the
solution explorer,
we’ll see
all kinds of goodies created
for us.
You’ll immediately
notice that there are several
folders that correspond with
the three facets of
our
pattern, Models, Views and
Controllers. This
is
where the app expects to
find the pieces by
convention, much in the
same way that it expects
to
find compiled assemblies in
the /bin folder
or themes in
/App_Themes.
You’ll also
notice some
other folders for content and
scripts. The former is for
things like images
and style
sheets, the latter is intended
for
scripts. This project
template is good enough to
add both the jQuery library
and the ASP.NET AJAX
files for you.
Figure 1.1: The new MVC project generated
by
Visual Studio.
--sidebar
You might be wondering if you’re stuck putting all of your
code in
this structure, but rest assured, it’s not
required. Most of the teams
that I’ve worked with
break out all of their code into one or more
library
projects, compiled into their own assemblies. All of your
model and controller code can go in separate projects,
just make sure
that the MVC project references the
other projects. You do lose the
convention-based
association between controllers and views (we’ll
go
over that momentarily), but that’s far from being a deal
breaker.
--/sidebar
If you look a little closer, you’ll also notice that the
Views folder has subfolders
that correspond to the
names of the C# files found in Controllers. This allows
you to return views without having to explicitly
choose them. That will be
obvious once we flesh out
our simple example.
The Views folder contains
.aspx files that make the views. They also may contain
.ascx files, which are known as partial views. They
act somewhat like the user
controls you’re used to in
Webforms, but they’re used in a different way.
Furthermore, it’s critical to understand that these
views are not a one-to-one
mapping with URL’s in your
app. There is no /views/home/index.aspx to view. If
you look at the web.config file found in the Views
folder, you’ll notice an
HttpHandler is set up to
block the direct viewing of these files entirely.
Before you start scratching your head, think
back to our first description of how
MVC works.
Incoming requests are routed to controllers, which based on
some
logic, return a particular view. The missing link
is the routing table, which takes
the URL of the
request and hands it off to a controller. The routing table
is
established in global.asax, so let’s take a peek at
what the project template has
put there. The default
is shown in Listing 1.1.
In the world of MVC,
global.asax is used as the location for establishing the
route table, a special collection object used to map
requests to controllers. The
RouteTable class has a
single static property, Routes, of type
RouteCollection, used to store these mappings. It has
the typical methods for
manipulating a collection, and
a class of extension methods
(RouteCollectionExtensions) adds two other important
methods,
IgnoreRoute() and MapRoute(). These do
exactly what you expect, forcing
the MVC routing
engine to ignore certain URL’s and send others to certain
controllers.
--sidebar
This is a very quick overview on
routing. ASP.NET MVC is
extremely extensible, and you
can do a lot with custom routes,
constraints, custom
view engines, etc.
--/sidebar
Listing 1.1: The default global.asax file
using System.Web.Mvc;
using
System.Web.Routing;
namespace HelloKittehs
{
public class MvcApplication :
System.Web.HttpApplication
{
public static
void RegisterRoutes(RouteCollection
routes)
{
routes.IgnoreRoute("{resource}.axd/{*pathInfo}");
routes.MapRoute(
"Default", // Route name
"{controller}/{action}/{id}", // URL with parameters
new {controller = "Home", action = "Index", id
= ""}
// Parameter defaults
);
}
protected void
Application_Start()
{
RegisterRoutes(RouteTable.Routes);
}
}
}
The first line of our
RegisterRoutes() method tells the engine to ignore the
.axd pieces typically found in an ASP.NET application,
like script handlers and
the trace page. The second
one sets up the default route, using one of several
overloads. The comments generated explain what each
parameter does. The first
is a name for the route, in
this case, “Default.” The second parameter outlines the
URL structure by naming parameters that will establish
the route, including the
controller name, the action
to call on the controller and an ID to pass along. The
final parameter creates an anonymous type with the
default values for the route
parameters. Following
this convention, a request for “/home/getcat/3” will route
the request to the HomeController class, call its
GetCat action method and
pass in “3” as a parameter.
--sidebar
Not familiar with anonymous types? They’re a key
feature of C# 3.0
and essential to using LINQ, and to
serialize JSON for AJAX calls.
An anonymous type
creates a class with the properties you declare,
without the formal declaration of a named class. The
anonymous
type in Listing 1.1 creates a class with
controller, action and id
properties.
--/sidebar
One final thing to note in the default generated code, is
the presence of a
Default.aspx page. Its code behind
class creates and executes an instance of
the
MvcHttpHandler class, which according to the routes just
established will
execute the HomeController and call
its Home method, since those are the
default values we
established. That code is there so Internet Information
Services
(IIS) knows what to do with a request that
has no path.
Let’s get to our simple app.
Delete the three folders under Views, but leave the
web.config in place. Delete the AccountController.cs
file under
Controllers. Now that we have a clean
start, right-click the Models folder and
add a new
class file called KittehNames.cs. We’re going to write a
ridiculously simple method to return names, and you
can see it Listing 1.2.
Listing 1.2:
KittehNames.cs
namespace HelloKittehs.Models
{
public class KittehNames
{
public static string[] Get()
{
string[] names = new [] {"Cosmo", "Emma", "Gideon",
"Oliver"};
return names;
}
}
}
There isn’t anything
remarkable about this method at all. It exists solely to
return
an array of strings. Naturally you could also
return an array or List<T> of
objects that
offered more detail, like the cat’s gender or age, but we’ll
keep it
simple with strings.
Let’s move
on to the controller. So as not to change that which has
been
generated for us, we’ll use the HomeController
class, but remove the About()
method. We’ll replace
the contents of the Index() method and the result will
look like Listing 1.3.
Requests routed to
the HomeController class, taking the Index action, will
execute the Index() method. Controller actions return
ActionResult objects,
which come in many derived
forms, but for now we’ll stick to the ViewResult.
The
System.Web.Mvc.Controller base class includes helper methods
to
return results, including the View() method, which
we have in our action here.
The only line we
have added is one to retrieve the cat names, and add them to
ViewData property, a dictionary objet and member of
the Controller base class.
Returning a call to the
View() method, with no parameter, tells the controller to
look for a view in the Views folder, under a subfolder
that matches the name of
the controller, Home, and an
actual view file that matches the name of the action,
in this case Index.aspx. If it can’t find the view in
the path
“/Views/Home/Index.aspx,” it will look in
“/Views/Shared/Index.aspx.” These
naming conventions
are built in to the MVC framework.
Listing 1.2:
KittehNames.cs
using System.Web.Mvc;
using HelloKittehs.Models;
namespace
HelloKittehs.Controllers
{
public class
HomeController : Controller
{
public
ActionResult Index()
{
ViewData["AllKittehNames"] = KittehNames.Get();
return View();
}
}
}
We deleted all of the views, so
let’s create one now. To create one that follows
the
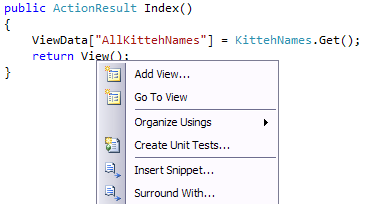
naming conventions, right-click on our call to the View()
method, as shown
in Figure 1.2. Uncheck the boxes and
click OK.
Figure 1.2: Adding a view from
a controller action.
The view is created with the path
“/Views/Home/Index.aspx,” because it’s being
called by
the HomeController class from the Index() action. Let’s fill
it out
with Listing 1.3. The bold piece is new.
Listing 1.3: /Views/Home/Index.aspx
<%@ Page
Language="C#" Inherits="System.Web.Mvc.ViewPage" %>
<!DOCTYPE html PUBLIC "-//W3C//DTD XHTML 1.0
Transitional//EN"
"http://www.w3.org/TR/xhtml1/DTD/xhtml1-
transitional.dtd">
<html
xmlns="http://www.w3.org/1999/xhtml" >
<head
runat="server">
<title>Index</title>
</head>
<body>
<div>
<p>
<% foreach (var name in
ViewData["AllKittehNames"] as
string[]) { %>
<%= name %><br />
<% } %>
</p>
</div>
</body>
</html>
This view is about as simple as it gets.
We’ve added a loop to cycle through all of
the values
from the ViewData entry we added in the controller. Note
that we use
the as keyword to indicate the type of the
dictionary entry we’re calling. If the
object can’t be
cast to the type indicated, it’s treated as a null. This is
different
from a straight cast, which will throw an
exception when the cast fails. That’s an
important
consideration when choosing how you perform the cast.
Note the subtle, yet different syntax for
executing code and for resolving a value.
Code
execution happens inside of the <% %> block, while
values are resolved and
output from the <%= %>
block.
Figure 1.3: The default view, rendered.
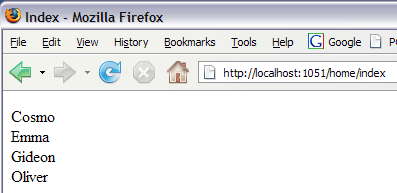
If you run the site, you’ll get the results in your browser
shown in Figure 1.3.
Because of the routing set up in
global.asax, you can point the browser to
“/home/index” as well.
To recap, here’s
what happens when the request is made to the server:
• The routing to a controller and action is
determined. In the case of
“/home/index,” or the root
of the site (which is handled by
Default.aspx), the
routing table determines that MVC should
instantiate
the HomeController class and call its Index() method.
The naming convention take the “home” and adds
“Controller” to
determine the class name of the
controller.
• The framework makes an instance
of the HomeController, calling its
default
constructor. We did not explicitly write one, but the
compiler
makes it for us.
• The correct
action method is called. The method must return a derivative
of ActionResult. In our example, the Index() method is
called.
• Logic is performed as needed in the
action method, but it should be
limited to handling
input or, in this case, preparing data for output in the
view.
• The action method returns a view
for rendering to the browser. Without
any parameters,
we’re creating an instance of a view by naming
convention.
• The view executes its
display logic, and uses data sent to it by the
controller.
The great thing about this
arrangement is the separation of concerns we’ve been
talking about from the start. The model, view and
controller can all execute
without having to know
anything about the internal processes of each other. This
is especially helpful for testing purposes, and we’ll
get deeper into that later.
Models
The model part of MVC in the strictest sense
refers to the data infrastructure for
your
application. It’s the stateful part of your app, where real
things are stored. In
the broader sense, the Models
folder of your MVC app ends up acting much like
/App_Code, because your application logic goes here.
It can also live in external
libraries, compiled
projects that have no dependency on your application.
The most common set of tutorials you’ll see on
models for MVC involve the
creation of data entities
that map to a database technology, usually SQL Server.
We’ll go deeper into that in the next chapter.
However, it’s important to note that one of the
key benefits to using ASP.NET
MVC is the ability to
test the snot out of as much of your application as
possible.
In that sense, solid designs that code
against interfaces, combined with mocking
frameworks,
make it easier to test your model code. Stay tuned for more
on that.
Controllers
The
System.Web.Mvc.Controller class is the basis for the magic
glue that
bridges application logic and data (models)
with the presentation of a user
interface (view).
You’ve already seen how a request is mapped to a specific
controller. It should also be obvious that the
controller must inherit from the
Controller base
class.
By convention, these controllers must be
named with the “Controller” suffix. So
or example,
requests routed to the “Admin” controller require that the
controller
class be named AdminController.
The second part of the routing equation calls a
specific action method on the
controller class. These
methods must have a return type of ActionResult. This
abstract class has ten derivatives (if you count the
PartialViewResult). You
don’t need to create specific
instances of these result classes, but can use the
helper methods that come free with the Controller
class:
• View() – This is the most common
helper you’ll use, as it returns
instances of the
views that you create. It has several overloads, the
simplest being one that takes no parameters. It will
look for a view that
matches the name of the action.
So if your action is named Cat and your
controller
class is AdminController, it will look for a view called
Cat.aspx in /Views/Admin. If it can’t find it there,
it will look in
/Views/Shared. There are additional
overloads that allow you to
return a specific view and
even specify a certain master page. By
passing an
object in to View(), you can bind data to a strongly typed
view, as we’ll see in the next section.
•
Redirect(), RedirectToAction() and RedirectToRoute() –
This set of methods and their various overloads do
exactly what the
names imply. There are times when you
don’t want to return a view, but
send the user to some
other location. The regular Redirect() is about
the
same as Response.Redirect() in Webforms. The other two take
a variety of parameters to send the user to a specific
destination based
on the controller, action and route
you specify. The helpful angle is that
you don’t need
to know what the actual URL is, and if you change the
routing, you won’t have a hard-coded (and broken) URL
in your code.
• Json() – The secret sauce to
quick AJAX enriched Web apps is
JavaScript Object
Notation, or JSON. This light-weight data format is
deal for sending short messages back to the client,
and requires no
special parsing or processing in the
browser. You can pass in any
serializable object to
this method. We’ll be talking about it extensively
in
a later chapter.
• JavaScript() – Returns,
believe it or not, some JavaScript.
• File() –
This one has some of the goodness you would expect from a
straight IHttpHandler in the Webforms world. You can
pass it
Stream objects and byte arrays and specify the
MIME type of the
response. This is ideal for returning
images or documents.
• Content() – This is the
best choice for returning string content. It too
allows you to specify the MIME type.
We
can limit the kinds of requests that come in to controller
actions with special
attributes, but we’ll cover those
along with the use cases that match their use.
The Controller class also has several
properties to get at the objects you would
typically
find as part of System.Web.UI.Page, like Request, Response,
HttpContext and User.
--sidebar
As is the case with a lot of classes in the framework, there
are many
members to explore, and we’re not going to
mention them all.
Fortunately, they’re easy to Google
by simply searching for the
class, like
“system.web.mvc.controller class.” It’s even faster if you
have http://msdn.microsoft.com/ bookmarked.
--/sidebar
Views
The views you create with .aspx
file names are not pages, in the strict sense of
the
word. You should think of them as, well, views on data!
Several different
URL’s can eventually route to
controllers and actions that serve up the same
views,
so there is not a one-to-one relationship between the URL
and the view.
At the very least, a view is any
HTML that you choose. Using a series of helpers,
we
can cause additional markup to be rendered around data that
we pass through
to a view from a controller action.
This results in what appears at first to look like
classic ASP, but it’s not. As a rule, there should be
absolutely no logic in the
page unless it has
something to do with the display (or validation) of data.
You
would never calculate tax or make a database call
from a view. On the other
hand, it’s OK to decide
whether or not to display a block of HTML based on
whether or not the user is logged in.
--sidebar
Hardcore computer science people may engage in some level of
debate about what data is OK to act on. For example,
checking
Request.IsAuthenticated definitely isn’t
rooted in the data populated
by the controller, but
it’s a common sense way to do things. My
advice: It’s
a not a religion, so if it doesn’t violate the separation of
concerns by creating a difficult dependency, don’t
lose sleep over it.
--/sidebar
HTML helpers create form tags, user interface
elements, links and other useful
stuff for rendering
in your views. The class used for this is
System.Web.Mvc.HtmlHelper, augmented by several
classes full of extension
methods. Because all view
pages inherit from the ViewPage class, you can use
its
Html property to access these helpers. In the next chapter,
we’ll demonstrate
how many of these helpers are used.
There are also a great many methods for use in
the AjaxHelper class and its
extension methods.
While ViewPage does inherit from the
traditional Page class, most of what you
find there is
not relevant to an MVC view. The HTML helpers and straight
forms
do not participate in the event or postback
model, so avoid getting into the events
you’re used to
using in Webforms.
There are several new
properties that you will want to take note of.
• Html – As mentioned previously, this property
accesses the wealth of
the HtmlHelper class and its
various extensions.
• ViewData – Remember our
simple example that rendered cat names?
This property
is your one-stop access to the data assigned in the
controller.
• ViewContext – This property
give you access to ViewContext, which
is a derivative
of ControllerContext. It gives you access to the
Controller, HttpContext, RequestContext, RouteData and
TempData. Be careful when accessing these objects so
as not to create
any dependencies on specific
controllers.
• Ajax – Provides access to the
AjaxHelper class and its extensions.
Views can
also be strongly typed. ViewPage and ViewUserConrol (the
class
used for partial views, later in this chapter)
have a generic descendent that tie the
view to a
specific model. Visual Studio will automatically set this up
for you in
the create view dialog, which we’ll use
later. We can rewrite our original view
and controller
action method from HelloKitteh as shown in Listing 1.4
Listing 1.4: Strongly typing the
view, and passing a model to it
HomeController.cs
namespace
HelloKittehs.Controllers
{
public class
HomeController : Controller
{
public
ActionResult Index()
{
var names
= KittehNames.Get();
return View(names);
}
}
}
/Views/Home/Index.aspx
<%@ Page
Language="C#"
Inherits="System.Web.Mvc.ViewPage<String[]>"
%>
<!DOCTYPE html PUBLIC "-//W3C//DTD XHTML 1.0
Transitional//EN"
"http://www.w3.org/TR/xhtml1/DTD/xhtml1-
transitional.dtd">
<html
xmlns="http://www.w3.org/1999/xhtml" >
<head
runat="server">
<title>Index</title>
</head>
<body>
<div>
<p>
<% foreach (var name
in Model) { %>
<%= name %><br
/>
<% } %>
</p>
</div>
</body>
</html>
The changes we made
are in bold, as compared to Listings 1.2 and 1.3. We’re
passing an object to the controller’s View() method,
which is designated as the
model for the view. The
view itself inherits from a generic version of ViewPage,
in this case, ViewPage<String[]>. You can use
any type you like here,
including complex types that
encapsulate any number of different data items. If
our
view were more complex, the Intellisense in the page would
generate
whatever properties and methods are found on
the model when we type a period
after it, because the
Model property is an alias to the type you’ve designated in
the @Page declaration.
--sidebar
The cool thing going on here is that instead of a dictionary
object
like ViewData, we’re enforcing some very
specific contracts
between the controller and the
view. Pulling stuff from the
dictionary isn’t as safe
and there’s no warning at compile time about
whether
or not the data will be there. It makes testing a lot easier
too,
because your controller methods return strongly
typed data. That
said, it may not be appropriate for
every case, and you can still use a
combination of a
strongly typed view and ViewData.
--/sidebar
Under the hood of ASP.NET MVC
Let’s step back
for a moment to talk about what’s going on under the hood,
especially since we glossed over the notion that there
is no one-to-one
relationship between URL’s and views.
In a traditional Webforms application, a
request comes into the Web server,
Internet
Information Server (IIS), and does one of two things,
depending on the
version of IIS. If it’s IIS 6, the
server determines that the incoming request
should be
handled by ASP.NET, usually because of the file extension,
like
.aspx. If it’s IIS 7, ASP.NET already has access
to everything coming in.
Next, ASP.NET checks
web.config’s HttpHandlers section to see what class
should handle the request. If no entry is found, it
checks at the machine level,
which says that .aspx
requests will be handed off to
System.Web.UI.PageHandlerFactory, a class that
implements the
IHttpHandlerFactory interface. This
class looks at the URL of the request,
and serves up
the appropriate instance of a class that implements
IHttpHandler. As you may guess, this will be your
page, which inherits from
the Page class (which
implements IHttpHandler). From there, all of the
familiar things happen inside your page.
If you’ve never implemented an IHttpHandler
class yourself, the premise is
pretty simple: Make
something to send back to the browser. At its most basic
level, it provides access to the stream that is sent
out by the server to the client.
One of the most
common uses that I’ve encountered is to send the bytes that
together make an image that is stored in a database.
You set the MIME type, put
the bytes in the output
stream, and enjoy.
--sidebar
It’s true, you can do the same thing in the Load event of a
page, but
you’re creating all of that overhead and
baggage that comes with
creating a page. Remember, a
page is just a really robust
HttpHandler. It’s easier
and more efficient to strip it down and
implement your
own for something like serving an image.
--/sidebar
Understanding how a request is handled, you’re empowered
even in Webforms to
break the notion that a request
must map to an actual file. You might build an
application with a handler that intercepts URL’s like
“/news/371.aspx” and
creates an instance of the page
of your choosing using
System.Web.UI.PageParser.GetCompiledPageInsance(). At
that point,
there’s no going back to thinking of your
app as a series of pages, but rather an
application!
It’s not hard to figure out what’s going on
with MVC once you have this
knowledge either. The
differences are, however, noticeable between the two
versions of IIS. In IIS 6, an .mvc file extension is
mapped to ASP.NET, and
handled by an HttpHandler
specified in web.config. The reason for this is that
IIS 6 by default treats ASP.NET as a subsystem that
runs as an ISAPI module
(Internet Server Application
Programming Interface). We’re not going to get into
it
here, but as the name slightly implies, it’s a way to plug
in pretty much
anything into the server’s
request/response pipeline. So now a request ending in
.mvc is routed to ASP.NET, and new entries in
web.config in turn map it to the
right handler. If you
want to work without these nasty file extensions, you can
simply set the wildcard map in IIS 6 to send all
requests to ASP.NET.
IIS 7 integrates ASP.NET
much closer to the Ethernet port on the server, so to
speak. That means that configuration files are
considered immediately. The
system.webServer section
of web.config allows you to adjust the plumbing
without having to set configuration properties in the
IIS control panel.
This probably has you
wondering how ASP.NET MVC knows how to handle a
request with no particular file extension. Enter the
HttpModule! These classes
implement IHttpModule, and
have access to many events in the
request/response
lifecycle, set at the application level. Back in the early
days of
ASP.NET this interface is what you used to
implement your own logic to assign
roles to user on
each request. You might use it today to implement logic that
indicates a user’s subscription status. And because it
has access to the Error
event, you can build an error
logging module here too.
ASP.NET MVC uses
System.Web.Routing.UrlRoutingModule to look at
the
request, compare it to the routing table, and find the right
IRouteHandler
object for the route, the default being
the MvcRouteHandler. IRouteHandlers
are intended to
return an IHttpHandler (which is not specific to MVC, thus
the
inclusion in the System.Web.Routing namespace),
and MvcRouteHandler
returns an instance of MvcHandler.
That class loads an instance of the
appropriate
Controller derivative, which fires off an action. Got all
that? One
of the important points here is that the
whole system is extensible, and starting at
the top,
with the routing table, you can specify alternate route
handlers.
More on routing
You’ll
recall in our trivial example that global.asax declares a
default route to
follow:
routes.MapRoute(
"Default", // Route name
"{controller}/{action}/{id}", // URL with parameters
new {controller = "Home", action = "Index", id =
""}
// Parameter defaults
);
This route says the first component in the path
of the URL will name the
controller, the second will
name the action to take, and the third will name an ID
of some kind. When any of them are missing, from right
to left, the defaults
specified in the third parameter
are used. Thus, no path in the URL would call the
Index method on the HomeController, a URL of “/Admin”
will call the
Index method of the AdminController, and
if no ID is specified, it will try
first to call an
action method with no parameters.
Chances are
good that you don’t want to be constrained to this one
routing
situation. You could have a blogging app (oh,
wait, we have one of those!),
where the path should be
“/post/some-post-name,” but using the default route,
this maps to the PostController class calling an
action method of some-
post-name, which obviously
would not exits. This is a case for a custom route,
which we’ve typed out in Listing 1.5.
Listing 1.5: Adding a custom route to
global.asax
routes.MapRoute("PostRoute",
"blog/{id}",
new {controller = "Post", action =
"Detail"});
routes.MapRoute("Default",
"{controller}/{action}/{id}",
new {controller =
"Home", action = "Index", id = ""});
The
first thing you’ll notice is that we explicitly spell out
the first part of the
URL, with “blog” followed by the
slash and the “id” in brackets. Because we’re
not
getting a controller name or action from the URL, we specify
the one to use
in the default object parameter, in
this case the Detail action method of the
PostController.
As we’ll find later in
more detailed examples, the kind of data you want to pass
to an action varies. In some cases, passing a string
where the method wants an
integer will simply throw an
exception (like “/Admin/Edit/foo” when the method
is
Edit(int id), for example). That may or may not be adequate
for your
exception handling skills. But there are also
cases where you may actually
require one or the other.
Fortunately, you can pass a fourth parameter into the
MapRoute() method that indicates a regular expression
that the request must
conform to. If you only wanted
to match blog entries by an integer ID, you would
map
the route as indicated in Listing 1.6.
Listing
1.6: Adding a custom route with a constraint
routes.MapRoute("PostRoute", "blog/{id}",
new {controller = "Post", action = "Detail"},
new
{id = @"\d+"});
The regular expression
forces a match for requests like “/blog/509” but not
“/blog/foo.” I know, a lot of developers hate regular
expressions, but the power in
front of you is nearly
limitless. You can require that the path match any arbitrary
thing you can come up with!
As with
everything else in ASP.NET MVC, constraints are also
extensible. The
framework provides a simple interface
called IRouteConstraint, and with it,
you can
implement almost any kind of logic you can think of to
accept or decline
the matching of a request. The basic
scaffolding of a custom route constraint
class is
shown in Listing 1.7.
Listing 1.7: A bare bones
custom route constraint class
public class
SampleRouteConstraint : IRouteConstraint
{
public bool Match(HttpContextBase httpContext,
Route route,
string parameterName,
RouteValueDictionary values,
RouteDirection
routeDirection)
{
// do some logic
return true;
}
}
There isn’t much to the interface, only
a single method called Match(), which
returns a
Boolean value indicating whether or not the request meets
the constraint
(this one isn’t useful since it always
returns true). You’ve got all of the relevant
data
here to act on and make a decision on, including the
HttpContext, so you
could make the matching criteria
consider the identity or role of a user. You also
may
consider some deeper format for the path that you can’t
express (or would
rather not express) with a regular
expression.
The order in which you create
routes is the order in which MVC tries to find a
match, so the default route is placed last, unless you
have some clever reason to
do otherwise.
Master pages and partial views
By now you
probably have a pretty good feel about how ASP.NET MVC works
compared to Webforms, but can’t imagine life without
the beloved master page,
and probably user controls.
Let’s review how those work.
A master page, or
more to the point, a System.Web.UI.MasterPage, is a page
template from which other pages are derived from. In
the Webforms world, it has
its own code behind and can
conduct its own logic. It has most of the “outside”
HTML for the page, including the <head> and
<html> tags, leaving
placeholders that will fill
in the “inside” content from pages that use the master
page. These pages end with a .master extension.
User controls, typically files ending with
.ascx, are a bit of an opposite from
master pages, as
they’re fragments of markup and code that can dropped into a
page. Really old school developers might call them a
robust version of server-
side includes, although
these are much better since they can have awareness of
the page and can be loaded dynamically.
Master pages are still used in MVC, but in
keeping with the separation of
concerns, they don’t do
anything beyond simple display logic. If they need to
display data, the data should come from a controller.
Let’s go back to our cat
names. Imagine that we intend
to show those cat names on every page using our
master. Let’s work our way from the view backward,
starting with the master
page itself in Listing 1.8.
Listing 1.8: /Views/Shared/Site.master
<%@ Master Language="C#"
Inherits="System.Web.Mvc.ViewMasterPage" %>
<!DOCTYPE html PUBLIC "-//W3C//DTD XHTML 1.0
Transitional//EN"
"http://www.w3.org/TR/xhtml1/DTD/xhtml1-
transitional.dtd">
<html
xmlns="http://www.w3.org/1999/xhtml" >
<head
runat="server">
<title>Kittehs</title>
</head>
<body>
<div>
<p>
<% foreach (var name in
ViewData["AllKittehNames"] as
string[]) { %>
<%= name %><br />
<% } %>
</p>
</div>
<asp:ContentPlaceHolder ID="MainContent"
runat="server" />
</body>
</html>
If this reminds you of Listing 1.3, it
should! The new and changed parts are in
bold. First,
the directive was changed from Page to Master, and the
Inherits
attribute changed to ViewMasterPage. Second,
we’ve added a
ContentPlaceHolder, which is where pages
using the master will put their
goodies. This part
works just as it does in Webforms.
Next, let’s
build a sample page that uses the master, as in Listing 1.9.
Again, this
is fairly straight forward, and works
similar to the way Webforms masters work.
Listing 1.9: Some random page using our
master page
<%@ Page Title="" Language="C#"
MasterPageFile="~/Views/Shared/Site.Master"
Inherits="System.Web.Mvc.ViewPage" %>
<asp:Content ID="Content1"
ContentPlaceHolderID="MainContent" runat="server">
<p>Nothing exciting ever happens
here.</p>
</asp:Content>
If this page were our home page using
the default routing (“/home/index”), the
view would be
in “/Views/Home/Index.aspx” as expected. Countless other
views
would also use this master, and those views
would likely be called by any
number of controllers
and their actions. The trick is that we need a centralized
place to populate view data the master can use,
regardless of the view called
upon. Setting up this
data in every controller action would suck, and be a waste
of time.
Fortunately, your
object-oriented skills force you to write better code, and
do it
once. You know that all controllers inherit from
the Controller class, so it only
makes sense that you
extend Controller yourself, and have all of your
controllers derive from that class instead. Listing
1.10 shows us our new
improved controller base and a
skeleton of a home controller.
Listing 1.10: A
controller base class and a controller that inherits from it
namespace HelloKittehs.Controllers
{
public abstract class ControllerBase : Controller
{
public ControllerBase()
{
ViewData["AllKittehNames"] =
KittehNames.Get();
}
}
public class HomeController : ControllerBase
{
public ActionResult Index()
{
return View();
}
}
}
Now any controller
that inherits from the ControllerBase will get the names
of the cats and place them in the ViewData collection,
for use by the master
page. Note that we’ve marked the
base class as abstract so it’s not accidentally
used
as a controller directly.
The approximate
analog to user controls are called partial views. They live
in
.ascx files, and like master pages, they should not
contain any real logic beyond
display tactics. Instead
of registering them, as you would in Webforms, you drop
them in the page using a simple code block like this:
<% Html.RenderPartial("UserPartial"); %>
This is from a case we’ll show you later, where
we reuse components of a form
because they appear
exactly the same in more than one view. For example, the
form fields used to add a user and edit a user are
identical, so it’s easier to create
them once, and
keep maintenance down to one place. The line of code above
follows the same conventions as the View() method of
controllers, looking first
in the controller’s cousin
folder (like “/Views/Admin”), and if it can’t find it
there, it’ll check the “/Views/Shared” folder. Since
it’s a partial view, it’s looking
for UserPartial.ascx
instead of an .aspx file.
Getting data to these
partial views works the same way as it does for full views.
The data must be added to the ViewData in the
controller action. You won’t
likely need to do it in
some abstract base class, as you should know in most cases
that the partial view will be a part of the view
you’re instantiating. As such, make
sure you get the
partial view’s data set in the action method.