Contents tagged with SharePoint Foundation 2010
-
How to increase the timeout for a SharePoint 2010 website
The default timeout for an Http Request in SharePoint Foundation 2010 is 120 seconds*. Any Http Requests above this 120 seconds will be met with a “Request timed out” error as displayed in the SharePoint logs:
Unexpected System.Web.HttpException: Request timed out.
Note: The SharePoint logs can be found at:
C:\Program Files\Common Files\Microsoft Shared\Web Server Extensions\14\LOGSTo increase this timeout you will need to modify the web.config file for the SharePoint Website. If you are using the default SharePoint configuration, then the web.config file will be found at:
C:\inetpub\wwwroot\wss\VirtualDirectories\80\web.config
Open this file in Notepad and then scroll down to the system.web > httpRuntime element (about half way down the file). To increase the timeout, add the executionTimeout attribute to the httpRuntime element with a value of the number of seconds for the timeout. For example, to increase the timeout to 5 minutes, add an executionTimeout of 300 like this:
<httpRuntime maxRequestLength="51200" executionTimeout="300" />
In the default SharePoint Foundation 2010 web.config file it will look like this:
Save the web.config file and now the timeout for HttpRequests will have been increased (Of course you need to ask why a request is taking more than 2 minutes to justify increasing the timeout in the first place… increasing the timeout to make the error go away but yet your customers have a horrible user experience is not a valid solution).
*The ASP.NET MSDN reference indicates that the default setting for the executionTimeout property is 110 seconds: http://msdn.microsoft.com/en-us/library/e1f13641.aspx. But the SharePoint logs show a timeout occurring at exactly 120 seconds with the default executionTimeout setting. I am not sure where the extra 10 seconds are coming from but I used 120 seconds in this article since that is what someone will find when investigating the SharePoint logs.
-
How to troubleshoot a SharePoint 2010 error
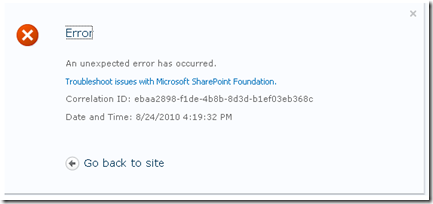
When an error occurs within Microsoft SharePoint Foundation 2010 a Correlation ID will be displayed in the error message:
This Correlation ID is logged within the SharePoint log files and you can use it to find out more details about the error that occurred.
The two pieces of information you will need from the error message above are the Correlation ID and the date and time of the error.
Once you have those two pieces of information, browse to the SharePoint log files on your SharePoint server located at:
C:\Program Files\Common Files\Microsoft Shared\Web Server Extensions\14\LOGS
The log files will be labeled with a date time stamp so find the one that corresponds to the time frame of the error and then open this log file in Notepad (or the text editor of your choice) and search for the Correlation ID.
You will probably find it listed in several places, from the beginning GET request to when the error occurred, and finally to when the logging of correlation data stops. Of course you are probably most interested in the error message but there will be more information in the log associated with the Correlation ID to help you find the root cause of the error.
-
SharePoint 2010 - The Security Token Service is not available
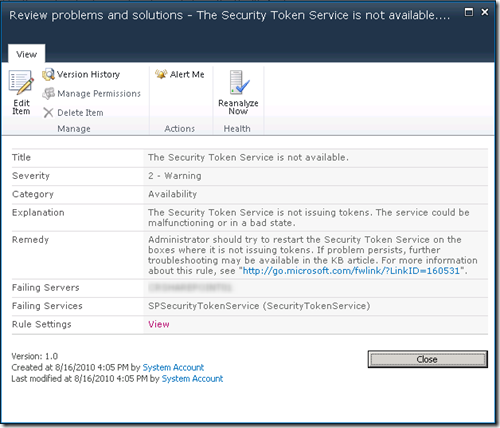
I am in the process of setting up a SharePoint Foundation 2010 machine. After installing SharePoint Foundation 2010 I noticed a warning in the Central Admin > Review problems and solutions report that the Security Token Service is not available.
The Security Token Service is not available.
The Security Token Service is not issuing tokens. The service could be malfunctioning or in a bad state.
SPSecurityTokenService (SecurityTokenService)The problem ended up being that the default configuration of the IIS Application Pools were set to 32-bit:
When SharePoint was installed all of the application pool accounts were added with 32-Bit enabled which prevented the SharePoint application pools from starting. I had corrected this for the Central Admin site and also the root SharePoint site but the application pools for the Security Token Service were still set to use the 32-Bit application which was preventing the service from starting.
Changing this setting in each of the application pools (there were several created so check them all) fixed the issue and then the warning went away.
-
Configuring Incoming Email for SharePoint 2010 Foundations
SharePoint sites can receive email and store incoming messages in lists. This allows a user to send an email to a particular email address and have the contents of the email show up in a SharePoint list. You can also email enable a calendar in SharePoint 2010 Foundations and then connect that calendar to Outlook to create a shared calendar for all of your users. Below are instructions on how to enable incoming email in SharePoint 2010 Foundations.
There are three places you will need to modify to get incoming email to show up in SharePoint lists and calendars. The first is in the SharePoint Central Administration, the second is within the IIS 6.0 Manager (for the SMTP settings), and the third is enabling it in the list itself.
Step 1 - SharePoint Central Administration
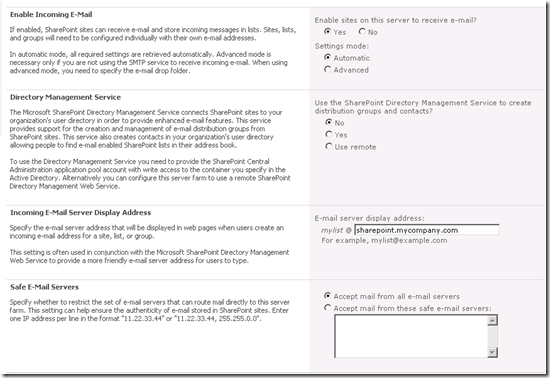
Go to SharePoint Central Administration on your SharePoint server and then browse to System Settings > Configure incoming e-mail settings:
Within the Configure incoming e-mail settings page you will need to select the “enable sites on this server to receive e-mail” option and then set the domain name of the e-mail server:
Step 2 - IIS 6.0 Manager for SMTP configuration
You will now use the IIS 6.0 Manager to add the domain name you are using to send mail to the email enabled lists to this server (so that it will accept email to this domain name).
Go to Administrative Tools > Internet Information Services (IIS) 6.0 Manager
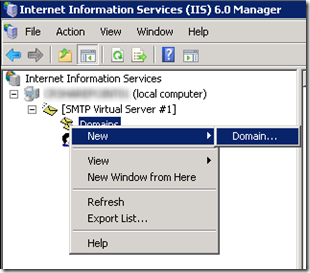
In the IIS6 MMC expand the local server and then expand the SMTP Virtual Server. You now need to add the domain name specified in the Central Admin configuration settings to the domains that will receive email on this SMTP Server.
Right click Domains and then choose New > Domain…
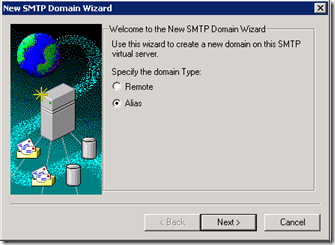
Choose the Alias option and then click Next
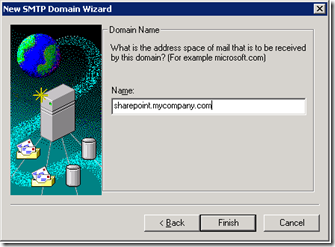
Then add the domain name where users will send email as an alias for the SMTP server. Note: Of course make sure the DNS MX records are set to point this domain name to the IP address of this server. Note2: Also make sure port 25 is open to your server so it can receive email.
Step 3 – Enabling incoming email in the SharePoint list
The final step is to enable incoming email on the lists that you want to accept email and also specify an email address for the list.
To do this, browse to the List Settings of the List:
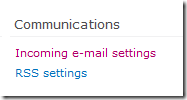
Then on the right-hand side will be the Communications section with the Incoming e-mail settings link.
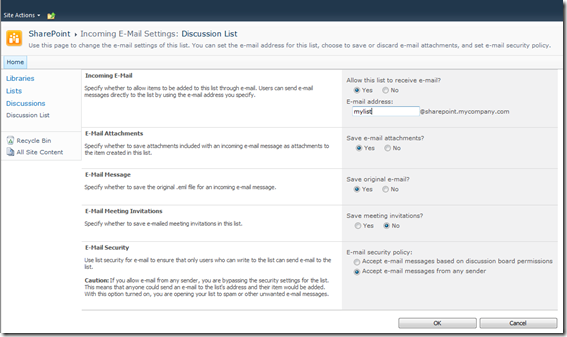
Click this link to bring up the Incoming E-mail Settings dialog for this list. Choose Yes to enable the list to receive email and then enter an email address for this list. (There are also other options to set to control what content from the email is added to the list and the permissions.) Click OK to save your settings.
Now you can send an email to this list email address (in the example above it would be mylist@sharepoint.mycompany.com) and the contents of the email will be automatically added to the discussion list.
Technorati Tags: Configuring Incoming Email for SharePoint 2010 Foundations -
SharePoint 2010 – SQL Server has an unsupported version 10.0.2531.0
I am trying to perform a database attach upgrade to SharePoint Foundation 2010.
At this point I am trying to attach the content database to a Web application by using Windows Powershell:
Mount-SPContentDatabase -Name <DatabaseName> -DatabaseServer <ServerName> -WebApplication <URL> [-Updateuserexperience]
I am following the directions from this TechNet article: Attach databases and upgrade to SharePoint Foundation 2010. When I go to mount the content database I am receiving this error:
Mount-SPContentDatabase : Could not connect to [DATABASE_SERVER] using integrated security: SQL server at [DATABASE_SERVER] has an unsupported version 10.0.2531.0. Please refer to “http://go.microsoft.com/fwlink/?LinkId=165761” for information on the minimum required SQL Server versions and how to download them.
At first this did not make sense because the default SharePoint Foundation 2010 website was running just fine. But then I realized that the default SharePoint Foundation site runs off of SQL Server Express and that I had just installed SQL Server Web Edition (since the database is greater than 4GB) and restored the database to this version of SQL Server.
Checking the documentation link above I see that SharePoint Server 2010 requires a 64-bit edition of SQL Server with the minimum required SQL Server versions as follows:
- SQL Server 2008 Express Edition Service Pack 1, version number 10.0.2531
- SQL Server 2005 Service Pack 3 cumulative update package 3, version number 9.00.4220.00
- SQL Server 2008 Service Pack 1 cumulative update package 2, version number 10.00.2714.00
The version of SQL Server 2008 Web Edition with Service Pack 1 (the version I installed on this machine) is 10.0.2531.0.
SELECT @@VERSION:
Microsoft SQL Server 2008 (SP1) - 10.0.2531.0 (X64) Mar 29 2009 10:11:52 Copyright (c) 1988-2008 Microsoft Corporation Web Edition (64-bit) on Windows NT 6.1 <X64> (Build 7600: ) (VM)But I had to read the article several times since the minimum version number for SQL Server Express is 10.0.2531.0. At first I thought I was good with the version of SQL Server 2008 Web that I had installed, also 10.0.2531.0. But then I read further to see that there is a cumulative update (hotfix) for SQL Server 2008 SP1 (NOT the Express edition) that is required for SharePoint 2010 and will bump the version number to 10.0.2714.00.
So the solution was to install the Cumulative update package 2 for SQL Server 2008 Service Pack 1 on my SQL Server 2008 Web Edition to allow SharePoint 2010 to work with SQL Server 2008 (other than the SQL Server 2008 Express version).
SELECT @@VERSION (After installing Cumulative update package 2):
Microsoft SQL Server 2008 (SP1) - 10.0.2714.0 (X64) May 14 2009 16:08:52 Copyright (c) 1988-2008 Microsoft Corporation Web Edition (64-bit) on Windows NT 6.1 <X64> (Build 7600: ) (VM) -
Configuring SharePoint Foundation 2010 for SharePoint Workspace 2010
SharePoint Workspace 2010 is the new version of Groove that will give you an offline copy of a SharePoint website and also allow you to work with a SharePoint site outside of a browser. SharePoint Workspace 2010 is especially nice for editing documents in a SharePoint Document library. SharePoint Workspace makes the SharePoint Document Library work just like a folder on your computer and will handle the synchronization of the documents back to the SharePoint server for you.
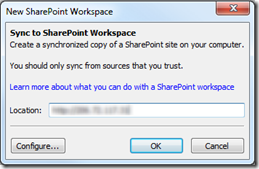
If you try connecting SharePoint Workspace 2010 to a default SharePoint Foundation 2010 installation you may get an error like this one:
---------------------------
Sync to SharePoint Workspace
---------------------------
SharePoint Workspace was unable to interpret the SharePoint location. Please check and ensure the location contains no typing errors.
---------------------------
OK Help
---------------------------This is because the default configuration of SharePoint Foundation 2010 requires two configuration changes to allow SharePoint Workspace 2010 to work.
The first is to enable the Remote Differential Compression feature on the server that is hosting SharePoint. This is used by SharePoint Workspace 2010 to send and receive the files for synchronization.
To enable Remote Differential Compression go to the Server Manager > Features and choose Add Features.
Check the box for the Remote Differential Compression feature and then click Install to enable this feature.
The second configuration change to allow SharePoint Workspace 2010 to work with your SharePoint Foundation 2010 server is to add an Alternate Access Mapping of the public facing DNS name (or IP address) to SharePoint using the SharePoint Central Admin. If you are connecting to your SharePoint site using the machine name then this is not necessary, but if you are connecting over the Internet through either an IP address or DNS name then you will need to add this alternate access mapping.
The reason is that when SharePoint is first installed, the only way it thinks users are connecting to the server is through the machine name: http://machine_name (as if on a local intranet). Since most likely SharePoint Workspace 2010 users will be connecting through a public facing DNS name (or IP address), you will need to add this DNS name (or IP address) as an alternate access mapping (indicating that this DNS name is the same as the machine_name and should map to the SharePoint site).
To add an Alternate Access Mapping to SharePoint Foundation 2010, visit the SharePoint Central Administration on the SharePoint Foundation 2010 server:
Once in the SharePoint Central Administration website, click on the Application Management link
Then under the Web Applications heading choose Configure alternate access mappings
Choose Edit Public URLs
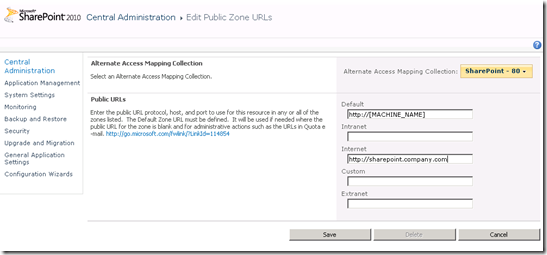
And then select the public facing SharePoint website that you want to add an access mapping to. You do this by changing the Alternate Access Mapping Collection (clicking on the “No selection” drop down button) to the website that is running on Port 80.
The default name of the public facing SharePoint site is “SharePoint – 80” but you may have changed that when you configured your SharePoint site.
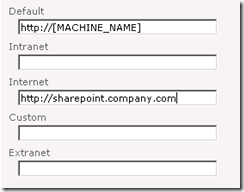
Once you have switched the Alternate Access Mapping Collection to the public SharePoint website (SharePoint – 80) then you can specify the Public URL by adding the publically accessible IP Address or DNS name to the Internet field:
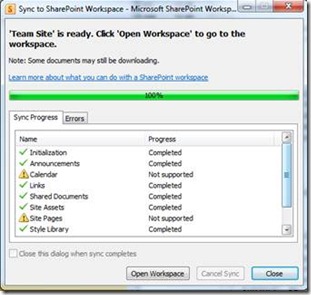
Click Save to apply the alternate access mapping and now you should be able to connect to your SharePoint Foundation 2010 site with SharePoint Workspace 2010:
SharePoint Foundation 2010 is the free version of SharePoint that installs on top of Windows Server 2008. With SharePoint Workspace 2010 you can get an offline copy of your SharePoint team site allowing you to add/edit your documents in any SharePoint document library easily and allow SharePoint Workspace 2010 to handle the file synchronization for you.
You can take a look at SharePoint Foundation 2010 quickly and easily by starting a preconfigured SharePoint Foundation 2010 Virtual Machine at Vaasnet.com. Vaasnet.com is a new Internet startup that provides preconfigured virtual machines (such as a virtual machine with SharePoint Foundation 2010 already installed) that are ready for you to start and begin using right away. Vaasnet.com takes the hassle out of downloading and installing the Windows Server 2008 operating system and SharePoint Foundation 2010 so that you can quickly log in and begin trying out the new features of SharePoint Foundation 2010.

