ASP.NET Ajax Preview 5 and UpdatePanel
Many of you have probably heard that we’ve released ASP.NET Ajax Preview 5 on Codeplex, and it’s available here. Aside from all the cool updates to the codebase, Preview 5 also includes some updated samples, as well as support for UpdatePanel when using ASP.NET 3.5 SP1.
Previously, this didn’t work because of updates to the scripts for compatibility with 4.0. Now, with this fixed, you can easily add Ajax Preview 5 functionality to existing sites and enjoy continued operation. There is a very simple example included with the Preview 5 samples that demonstrates this functionality (8_UpdatePanel.aspx under the 1_Basic_DataView folder). I’ll quickly cover here how to get your existing UpdatePanel working with the new Preview bits.
Basically, all you need to have is an additional ScriptReference to the included MicrosoftAjaxWebForms.js file for Preview 5 to work with the UpdatePanel. So your ScriptManager should look something like this:
<asp:ScriptManager ID="sm1" runat="server">
    <Scripts>
    <asp:ScriptReference Name="MicrosoftAjax.js" Path="~/MicrosoftAjax/MicrosoftAjax.js"/>
    <asp:ScriptReference Name="MicrosoftAjaxWebForms.js" Path="~/MicrosoftAjax/MicrosoftAjaxWebForms.js" />
    </Scripts>
</asp:ScriptManager>
This will allow you use any UpdatePanels that you have on the page in exactly the same way you did in 3.5 SP1, while providing the flexibility for you to include other Ajax Preview scripts and start using those features side-by-side.
I would argue one step further, however, and state that in many cases, where you were using an UpdatePanel before, you can now move to using ADO.NET web services coupled with the Preview 5 scripts.
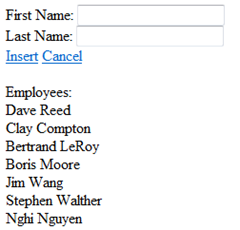
To illustrate this, let’s take a look at an old school sample using UpdatePanel and GridView. This sample illustrates using the UpdatePanel and GridViews to create a simple read-only employee name entry system. A screenshot is shown below:
We’re going to put this sample to shame using Preview 5.
There’s 146 lines of markup in this page, and every time you hit “Insert”, you’re looking at a partial-page postback, which has to hit the server to do processing, pull down the data for the new page, and then update the appropriate portions.
If instead we use a DataView hooked up to an ADO.NET data context, we can build a similar application which will be much more efficient (dealing with JSON instead of full sets of page data on the wire), much shorter, and much simpler. Let’s begin.
Since we already have the samples, let’s create a new .aspx page, Employees.aspx, under the 1_Basic_DataView folder. Let’s set up the following ScriptManager:
<asp:ScriptManager ID="sm1" runat="server">
    <Scripts>
    <asp:ScriptReference Name="MicrosoftAjax.js" Path="~/MicrosoftAjax/MicrosoftAjax.js"/>
    <asp:ScriptReference Name="MicrosoftAjaxWebForms.js" Path="~/MicrosoftAjax/MicrosoftAjaxWebForms.js" />
    <asp:ScriptReference Path="~/MicrosoftAjax/MicrosoftAjaxTemplates.js" ScriptMode="Inherit"  />
    <asp:ScriptReference Path="~/MicrosoftAjax/MicrosoftAjaxDataContext.js" ScriptMode="Inherit"  />
    <asp:ScriptReference Path="~/MicrosoftAjax/MicrosoftAjaxAdoNet.js" ScriptMode="Inherit"  />
    </Scripts>
</asp:ScriptManager>
Users of previous previews might recognize that there is a new file here, MicrosoftAjaxDataContext.js, which now contains the DataContext and AdoNetDataContext classes. Of course, these classes become more useful in read/write scenarios, but I’m going to use them in this read-only example for illustration purposes.
Let’s also take this opportunity to set up our <body> tag for DataView use by adding the appropriate namespaces.
<body xmlns:sys="javascript:Sys" xmlns:dv="javascript:Sys.UI.DataView">
Also remember to add the .sys-template style to your <head> section:
<style type="text/css">
    .sys-template {display:none}
</style>
So now we’re ready to add our AdoNetDataContext. Let’s set up our pointer to the service:
<script type="text/javascript">
        var myDC = new Sys.Data.AdoNetDataContext();
        myDC.set_serviceUri("../Services/ImagesDataService.svc");
</script>
So here I’ve created a new AdoNetDataContext and pointed its serviceUri to my ADO.NET Data Service. Now I’m going to set up a DataView to query this service for People so that I can get a list. So I enter the following markup:
<div id="inputTable">
    First Name: <input id="firstNameInput" type="text" /><br />
    Last Name: <input id="lastNameInput" type="text" /><br />
    <a href="#" onclick="insertPerson()">Insert</a>
    <a href="#" onclick="cancelPerson()">Cancel</a>
</div>
<br />Employees:<br />
<div id="employeeView" class="sys-template" sys:attach="dv"
                    dv:dataprovider="{{myDC}}" dv:autofetch="true" dv:fetchoperation="People">
    {{FirstName}} {{LastName}}<br />
</div>
So here I’m setting my DataView’s dataprovider to the AdoNetDataContext that I created, turning on autofetch, and specifying the fetchoperation to query for “People” from the database. I’ve also set up a simple UI which includes links to the insertPerson() and cancelPerson() JS functions, which I’m going to write now:
function insertPerson() {
    var firstName = $get("firstNameInput").value;
    var lastName = $get("lastNameInput").value;
    if (firstName != "" && lastName != "") {
        var myObject = {
            FirstName: firstName,
            LastName: lastName
        }
        myDC.insertEntity(myObject, "People");
        var data = $find("employeeView").get_data();
        Sys.Observer.insert(data, data.length, myObject);
        $get("firstNameInput").value = "";
        $get("lastNameInput").value = "";
    } else {
        alert("You must enter a first and last name!");
    }
}
function cancelPerson() {
    $get("firstNameInput").value = "";
    $get("lastNameInput").value = "";
}
So basically in insertPerson(), I’m creating a person object based on the first and last name that were entered by the user (assuming they weren’t blank), and inserting an entity into my AdoNetDataContext. For the purposes of this example, this isn’t strictly necessary, but I do it here for illustration purposes (in case you want to add read/write later). Then, I simply need to update the rendered data on the client, and I do so using the insert method of the Sys.Observer class, which allows me to insert the person object in a way that is recognized by the DataView. Then I clear the input fields for the next person to be entered. In cancelPerson(), I’m doing something similar, where I simply clear the input fields.
Of course, it’s easy to add read/write scenarios to this sample. I encourage you to check out the ImageOrganizer sample and associated code there for further examples.
So there you have it. Although it doesn’t do exactly what the UpdatePanel sample does, it’s essentially the same idea. Final line count: 67. Win :)

