ASP.NET MVC Release Candidate 2: I declare myself to be declarative!
Today is a happy day: we released ASP.NET MVC Release Candidate 2. We're getting ever-so-close to the final (RTM/RTW) release of ASP.NET MVC - it won't be long! We think we fixed all the highest priority issues so that everyone out there can build ASP.NET MVC applications without worrying that we're going to make some sudden changes that will break you. Please see Phil's blog post announcing the release.
In this blog post I'll introduce you to a feature that's not even part of the main ASP.NET MVC download. It's part of the separate MVC Futures download, which includes prototypes of features that we're thinking of including in a future version of ASP.NET MVC.
Introduction to the MVC Controls
Before we dig into the details, let's create a simple ASP.NET MVC application that uses the MVC Controls.
1. Download the MVC Futures binary from CodePlex.
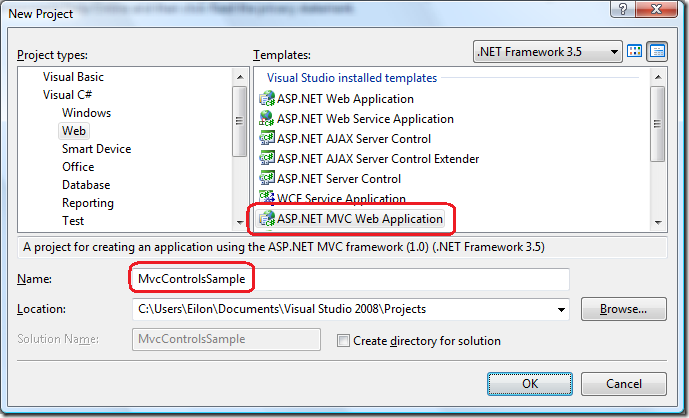
2. Create a new MVC Web Application Project (if asked, feel free to not create a unit test project). Please note that you must have Release Candidate 2 installed. Each release of ASP.NET MVC has a matching release of MVC Futures. Mixing releases is not supported and usually doesn't work.
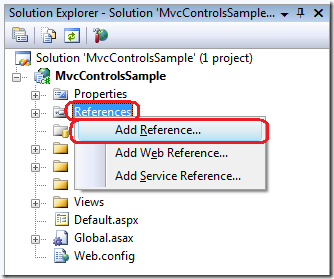
3. Add a reference to the MVC Futures binary. Right-click on the References node in Solution Explorer and choose "Add Reference". Select the "Browse" tab and navigate to the location to which you saved Microsoft.Web.Mvc.dll, select the file, and select OK.
4. Edit the web.config in the root of the application to include tag mappings to the MVC Futures namespace. This tells the ASP.NET parser where to locate the controls when you type in an <mvc:SomeControl> tag. There should already be some tag mappings listed - the only new tag mapping is the third one with "mvc" as the tag prefix.
<pages>
  <controls>
    <add tagPrefix="asp" namespace="System.Web.UI" assembly="System.Web.Extensions, Version=3.5.0.0, Culture=neutral, PublicKeyToken=31BF3856AD364E35"/>
    <add tagPrefix="asp" namespace="System.Web.UI.WebControls" assembly="System.Web.Extensions, Version=3.5.0.0, Culture=neutral, PublicKeyToken=31BF3856AD364E35"/>
    <add tagPrefix="mvc" namespace="Microsoft.Web.Mvc.Controls" assembly="Microsoft.Web.Mvc"/>
  </controls>
  ...
5. Start using the controls!
Let's start out with a simple scenario of updating some of the Account and Membership features of the default template to use the MVC Controls.
1. Open up the ~/Views/Account/LogOn.aspx view page. The markup there should include this text box:
<%= Html.TextBox("username") %>
2. Change the text box markup to use the MVC TextBox control:
<mvc:TextBox runat="server" Name="username" />
(Please note that it sometimes takes Visual Studio a few moments to recognize new tag mappings. If Intellisense doesn't show up, please just give it a minute.)
3. Run the application and click "Log On" at the top-right of the page.
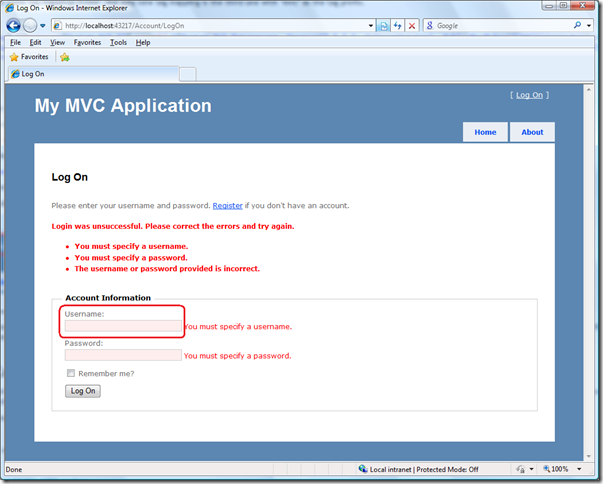
4. If all is well, the page should continue to have the exact same behavior as before. For example, if you immediately click "Log On" without typing in a username or password you should see the red highlight on the text box indicating an error.
The idea of the MVC Controls is that they are largely modeled after the HtmlHelpers, and thus try to preserve all their behavior. This includes naming conventions, the markup they render, and usage of model state.
Advanced MVC Controls
For a more advanced scenario involving the MVC Controls I'd like to introduce the MVC Repeater control. In many ways it is very similar to the ASP.NET Repeater control, but the main difference is of course that the MVC Repeater has specific knowledge of ViewData.
1. In the application you already created, open ~/Controllers/HomeController.cs (Sorry, I don't have a VB sample!) and add this new action method and two classes:
public ActionResult ProductList() {
    List<Distributor> distributors = new List<Distributor> {
        new Distributor { DistributorID = 501, Name = "Joe's Shop", Location = "Redmond, WA" },
        new Distributor { DistributorID = 502, Name = "Jill's Shop", Location = "Los Angeles, CA" },
        new Distributor { DistributorID = 503, Name = "Jeremy's Shop", Location = "Boston, MA" },
    };

    List<Product> products = new List<Product> {
        new Product {
            ProductID = 1001,
            Name = "LEGO Technic Off Roader",
            UnitPrice = 119.99m,
            Distributors = new List<Distributor> { distributors[0], distributors[1] } },
        new Product {
            ProductID = 1002,
            Name = "Ferrari F430",
            UnitPrice = 189000m,
            Distributors = new List<Distributor> { distributors[0], distributors[1], distributors[2] } },
        new Product {
            ProductID = 1003,
            Name = "Five bedroom house in Bellevue, WA",
            UnitPrice = 540000m,
            Distributors = new List<Distributor> { } },
        new Product {
            ProductID = 1004,
            Name = "Dell 2007FP LCD monitor",
            UnitPrice = 439m,
            Distributors = new List<Distributor> { distributors[2] } },
    };

    ViewData["products"] = products;

    return View();
}

public class Product {
    public int ProductID { get; set; }
    public string Name { get; set; }
    public decimal UnitPrice { get; set; }
    public IEnumerable<Distributor> Distributors { get; set; }
}

public class Distributor {
    public int DistributorID { get; set; }
    public string Name { get; set; }
    public string Location { get; set; }
}
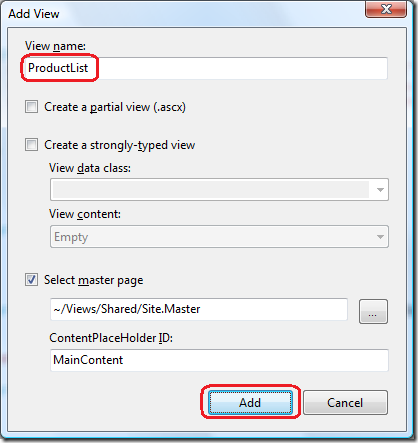
2. Right-click anywhere in the action method and choose Add View with the default options and select "Add":
3. In the newly created view add this ASPX markup to the second content placeholder (right below the <h2> tag):
<mvc:Repeater runat="server" Name="products">
    <ItemTemplate>
        <b><mvc:Label runat="server" Name="Name" /></b>
        (PID#<mvc:Label runat="server" Name="ProductID" />)
        $<mvc:Label runat="server" Name="UnitPrice" /><br />
        Distributors:<br />
        <mvc:Repeater runat="server" Name="distributors">
            <ItemTemplate>
                - <b><mvc:Label runat="server" Name="Name" /></b>
                (DID#<mvc:Label runat="server" Name="DistributorID" />),
                located in <mvc:Label runat="server" Name="Location" /><br />
            </ItemTemplate>
            <EmptyDataTemplate>
                - Sorry, there are no distributors for this item<br />
            </EmptyDataTemplate>
        </mvc:Repeater>
        <br />
    </ItemTemplate>
</mvc:Repeater>
Please note that when you paste in the code Visual Studio might add an "ID" attribute to every control tag. You can delete all those attributes if you don't want them - but it's fine to leave them.
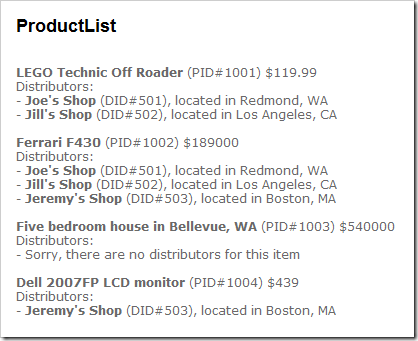
4. Run the page and you will get this nested databound rendering:
Advantages of MVC Controls Over Code Nuggets
If you've used the default WebFormViewEngine in ASP.NET MVC, you've certainly used this syntax somewhere in your views:
<%= Html.TextBox("FirstName") %>
What you might not know is that this syntax is called a "code nugget." While there is nothing inherently wrong with using code nuggets, one advantage of using MVC Controls is that they can provide a rich design-time experience. Many developers, even those who are familiar with the intricacies of HTML and CSS, like to get an accurate preview of what their page will look like without running the application.
If you've used ASP.NET Web Forms and controls such as the SqlDataSource and the GridView, you've seen how rich a design-time experience can be. Those controls include design time rendering previews, advanced template editing, and even wizards that walk you through the steps of configuring the controls.
The MVC Controls in the MVC Futures download are just a start: they certainly don't have the fit and finish that is seen in the SqlDataSource design-time experience. Like many rumors about ASP.NET MVC itself have stated, the beginnings of the MVC Controls were in fact written on an airplane!
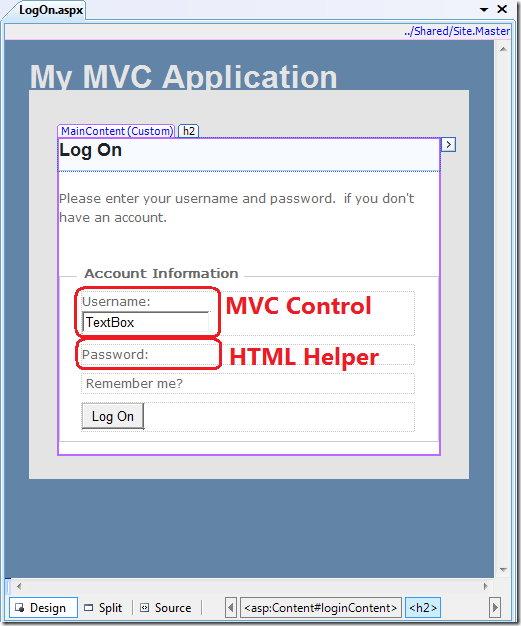
Compare the areas in the following screen shot of the text box we created earlier to see the difference. The MVC Control has a proper preview, whereas the HTML Helper doesn't render at all.
Disadvantages of MVC Controls
One of the biggest disadvantages of the MVC Controls is that there is a rather immediate limit to how you can use them. For example, take this relatively simple scenario with the regular TextBox HtmlHelper:
<%= Html.TextBox("FirstName", Model.FirstName.ToUpper()) %>
There is no simple way to do this with the MVC Controls because there is no place to add your own code to pre-process the values.
Another disadvantage is that the MVC Controls work only with the WebFormViewEngine. There are several other view engines out there that people have been using with ASP.NET MVC. Some of the popular third party view engines out there are Spark view engine, NHaml, and the view engines included in the MVC Contrib project, which are Brail, NVelocity, and XSLT.
For ASP.NET MVC 1.0 we decided on the MVC team to focus our efforts on features that have the widest possible benefit. In this case it meant writing helpers that worked with as many different view engines as possible.
As a slight bit of humor (though it's in fact serious), please refer to Eric Lippert's blog post How many Microsoft employees does it take to change a lightbulb?
The Future of the MVC Controls
As I mentioned in the top of the post, the MVC Controls are just a prototype. They are not complete; they are not set in stone; and there is no guarantee that they will ever be part of the main ASP.NET MVC download.
I already have a long list of improvements to make to the MVC Controls. I plan to add many more controls as well as more advanced features to existing controls.
If you have any feedback, comments, or suggestions on the MVC Controls feel free to post them here. We take all feedback seriously!
Some questions to think about:
- Do you see yourself using the MVC Controls?
- If so, why?
- If not, why not?
- What MVC Controls would you see yourself using the most? (Even ones that don't exist yet.)
