Creating a temperature web server using ESP8266
ESP8266 is a fantastic micro controller unit, with built-in Wifi and is programmable via the Arduino IDE (or LUA if you wish). By using this with a DS18B20 we are going to run a web server on it, with which we can use any browser to get the current temperature.
Getting started
Before we can start writing the code, we will need to have the following hardware:
- ESP8266 Micro controller unit (doesn’t matter which model)
- Breadboard
- 4k6 ohm resistor
- Cables
- DS18B20
There are different kinds of both ESP8266 and DS18B20. The ESP8266 I am going to use is NodeMCU, which has built-in USB and is breadboard-friendly. The DS18B20 I am going to use for now is the non-waterproof which comes without a cable and is much smaller. You could of course use other variants of both.
These are some of the ESP8266 that you could use:
.jpg)
And a picture with all of the hardware I am going to use (I’m not going to use the DS18B20 with a cable though):
.jpg)
Connecting everything
If you are using a ESP8266 with built-in USB, you shouldn’t have to do that much in this step. If you however are using a ESP8266 without it, you need to connect a couple of wires (I recommend using a USB to TTL cable), and remember to lower the voltage to 3.3 volts or you may destroy the ESP8266! You could use a power source with 3.3 volts for VCC and a Logic Level Converter between TX on the ESP8266 and RX on the USB to TTL cable. If you are using a NodeMCU or another ESP8266 with USB, you don’t have to care about that.
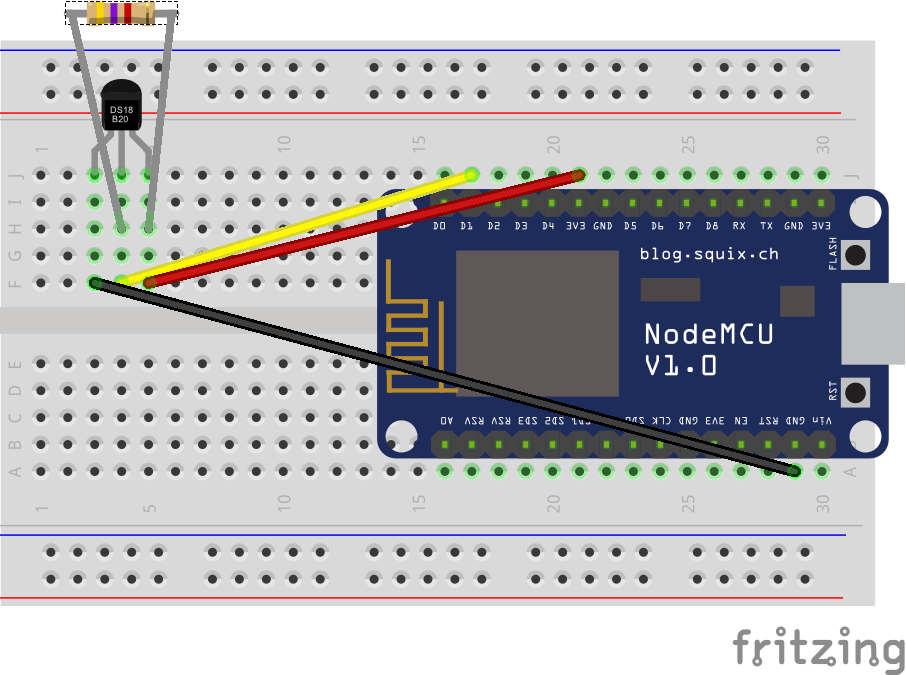
Now it’s time to connect the wires. This is how I did it:
ESP8266 -> DS18B20
VCC -> 3.3 volts
GND -> GND
Data -> D1
You also have to add a 4k7 ohm pull-up resistor between Data and VCC on the DS18B20.
And a picture of it:
Writing the software
Before we can start writing the software, you have to add ESP8266 in the board manager in Arduino IDE. You also have to add DallasTemperature and OneWire from the libraries manager.
I am attaching the full source code below:
| #include <OneWire.h> | |
| #include <ESP8266WiFi.h> | |
| #include <WiFiClient.h> | |
| #include <ESP8266WebServer.h> | |
| #include <DallasTemperature.h> | |
| #define ONE_WIRE_BUS D1 | |
| OneWire oneWire(ONE_WIRE_BUS); | |
| DallasTemperature DS18B20(&oneWire); | |
| const char* ssid = "YOUR SSID HERE"; | |
| const char* password = "YOUR PASSWORD HERE"; | |
| ESP8266WebServer server(80); | |
| char temperatureString[6]; | |
| const int led = 13; | |
| float getTemperature() { | |
| float temp; | |
| do { | |
| DS18B20.requestTemperatures(); | |
| temp = DS18B20.getTempCByIndex(0); | |
| delay(100); | |
| } while (temp == 85.0 || temp == (-127.0)); | |
| return temp; | |
| } | |
| void setup(void){ | |
| Serial.begin(115200); | |
| WiFi.begin(ssid, password); | |
| Serial.println(""); | |
| while (WiFi.status() != WL_CONNECTED) { | |
| delay(500); | |
| Serial.print("."); | |
| } | |
| Serial.println(""); | |
| Serial.print("Connected to "); | |
| Serial.println(ssid); | |
| Serial.print("IP address: "); | |
| Serial.println(WiFi.localIP()); | |
| server.on("/", []() { | |
| float temperature = getTemperature(); | |
| dtostrf(temperature, 2, 2, temperatureString); | |
| String title = "Temperature"; | |
| String cssClass = "mediumhot"; | |
| if (temperature < 0) | |
| cssClass = "cold"; | |
| else if (temperature > 20) | |
| cssClass = "hot"; | |
| String message = "<!DOCTYPE html><html><head><title>" + title + "</title><meta charset=\"utf-8\" /><meta name=\"viewport\" content=\"width=device-width\" /><link href='https://fonts.googleapis.com/css?family=Advent+Pro' rel=\"stylesheet\" type=\"text/css\"><style>\n"; | |
| message += "html {height: 100%;}"; | |
| message += "div {color: #fff;font-family: 'Advent Pro';font-weight: 400;left: 50%;position: absolute;text-align: center;top: 50%;transform: translateX(-50%) translateY(-50%);}"; | |
| message += "h2 {font-size: 90px;font-weight: 400; margin: 0}"; | |
| message += "body {height: 100%;}"; | |
| message += ".cold {background: linear-gradient(to bottom, #7abcff, #0665e0 );}"; | |
| message += ".mediumhot {background: linear-gradient(to bottom, #81ef85,#057003);}"; | |
| message += ".hot {background: linear-gradient(to bottom, #fcdb88,#d32106);}"; | |
| message += "</style></head><body class=\"" + cssClass + "\"><div><h1>" + title + "</h1><h2>" + temperatureString + " <small>°C</small></h2></div></body></html>"; | |
| server.send(200, "text/html", message); | |
| }); | |
| server.begin(); | |
| Serial.println("Temperature web server started!"); | |
| } | |
| void loop(void){ | |
| server.handleClient(); | |
| } |
Before you build it, make sure you change the Wifi SSID and password to your own. You should also open the Serial Monitor to get the IP Address used by the ESP8266.
As you can see in the source code, we have three different levels on temperature (cold, mediumhot and hot). Depending on the temperature, the background colors will change automatically. You could also change that to background images (for example a beach when it’s hot, and a snow man when it’s really cold J).
When it’s built and I navigate to the IP address on my phone, this is what I get:

Next step
When this is up and running, there are some things we could do. We could for example send the temperature to a Raspberry Pi with a database which is logging the temperature, once per hour. We could also try to get the ESP8266 to sleep mode, which means it will draw much less current, and thereby be able to run on two AA batteries.
Or maybe add another sensor, such as the DHT22 which is able to measure both temperature and humidity.
Please let me know in the comments if you have made any improvements! :)