How to send MQTT messages to an Azure IotHub by MQTT.fx client
As clearly stated in the documentation, “IoT Hub is not a full-featured MQTT broker and does not support all the behaviors specified in the MQTT v3.1.1 standard". If you need to send MQTT messages to an IotHub and for whatever reason cannot use IotHub standard SDK, then the whole process could be a bit tricky.
In this post, I am going to be talking about how to use MQTT.fx client to send messages to an IotHub. MQTT.fx is a client written by Java in order to interact with MQTT message brokers. It could be used for debugging and troubleshooting purposes.
First of all, you need to
install the proper MQTT.fx client applications for your operating
system.
Then run the client and press the settings button.
Here you can see the first form view. I will explain
the values I have changed.
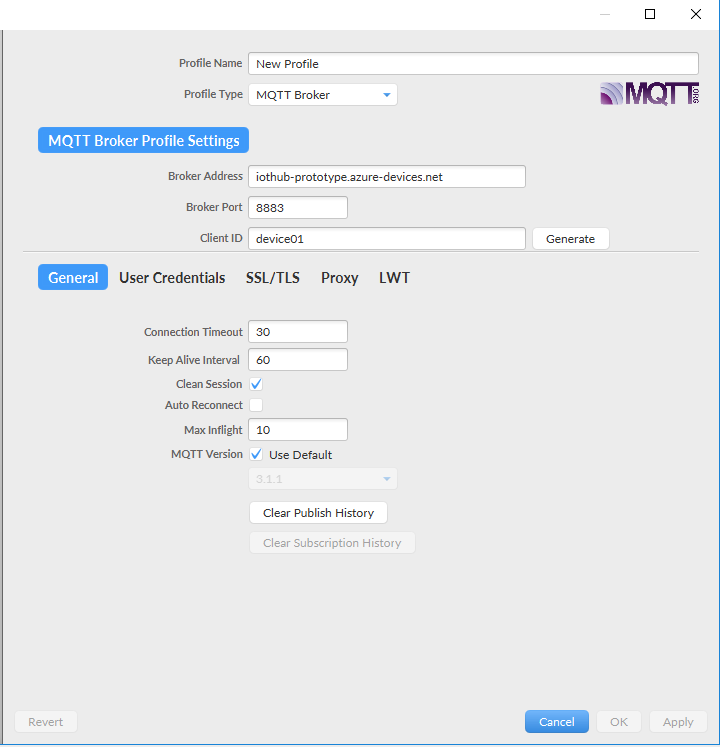
Broker Address: This is IotHub host
name. My IotHub is called iothub-prototype so the
host name is iothub-prototype.azure-devices.net.
Broker Port: The default port number
is 8883.
Client ID: Name of the device. My
device is called device01.
Now move to the User Credentials tab.

User Name: If your device is using
Symmetric key for authentication (default option),
you need to enter the Username and Password here.
Again, according to the
documentation, username is composed with the following format:
{iothubhostname}/{device_id}/?api-version=2018-06-30
Therefore, in my case it is:
iothub-prototype.azure-devices.net/device01/?api-version=2018-06-30
Side note: Pay attention that there is no http or
https at beginning!
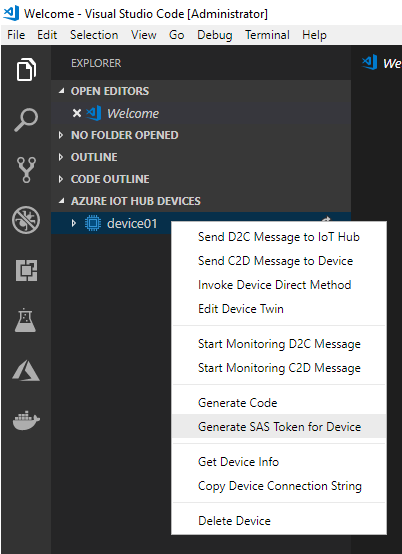
Password: we need a Shared Access
Signature (SAS) for this device. There are different ways to
generate SAS for an IotHub device but the easiest way I
guess is to use Visual Studio Code for the same purpose. If
you have Azure IoT Hub Toolkit
installed (I would definitely recommend if you have not
yet), simply right-click on the device and select Generate
SAS Token for Device. Then you will need to associate the
life time the SAS and it will be generated and copied into
clipboard!
This is an example of a SAS or Password for the
device.
SharedAccessSignature sr=iothub-prototype.azure-devices.net%2Fdevices%2Fdevice01&sig=8E%2BL%2FVwM5K%2FRA4fZjUF36Pa2xnoPOqwhWe4ukXrrQE%3D&se=1562457833
So, we need to move to the SSL/TLS tab.
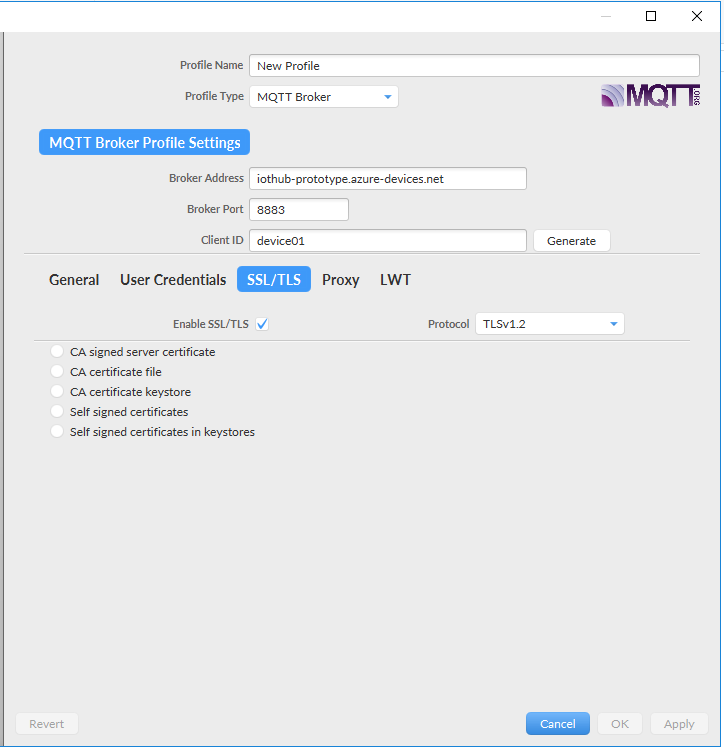
Just check Enable SSL/TLS checkbox and
leave everything else as they are.
Now save and close the form and click on Connect button.
If you have entered the correct information, then it should successfully connect to the IotHub.
To publish a message, you need to go to Publish tab. Enter the topic name there. The format of the topic is as follow:
devices/{device name}/messages/events/
In our case it is:
devices/device01/messages/events/
Then write your message and press the Publish button

If everything goes smoothly, on Log tab you should see something similar to the this.

And of course the message should also appear in your IotHub.