COM Automation with OpenOffice – Silverlight 4
Another article in the ‘– Silverlight 4’ series. I don’t have an extra license for Office suite, but I did want to play with COM Automation feature in Silverlight 4. I said to myself ‘lemme try OpenOffice’. This is a close match to Microsoft’s Office package and it’s FREE. It definitely is compatible with files created in MS Office. So, I installed OpenOffice on my virtual machine and I was able to build a small application (an OOB with elevated permissions).
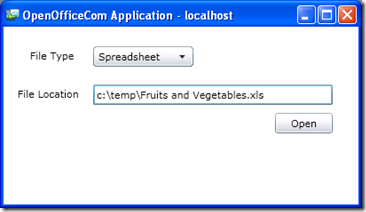
Here’s a screenshot:
Select a file type – Document (.doc), Spreadsheet (.xls) or Presentation (.ppt) and type in the path of the file. Click ‘Open’ and viola.. the file is opened in the selected application. You can also leave the file location field as a blank and when you click on the ‘Open’ button, the application is started opening an new file (just like when you open an Office application). Now, in OpenOffice, these apps have been named – Writer, Calc and Impress corresponding to Word, Excel and PowerPoint.. just some trivia!!
The UI is real simple, a combo box, a text box, a button and a couple of text blocks.
The OpenOffice application paths are declared as constant members in the class. The extra double quotes allow us to pass the path even if there are white spaces in them.
1: const string writerApp = @"""C:\Program Files\OpenOffice.org 3\program\swriter.exe"" ""{0}""";
2: const string calcApp = @"""C:\Program Files\OpenOffice.org 3\program\scalc.exe"" ""{0}""";
3: const string impressApp = @"""C:\Program Files\OpenOffice.org 3\program\simpress.exe"" ""{0}""";
In the Loaded event, I check if the app is running OOB and has elevated permissions. If not, all the controls get hidden and a message is displayed. I also add the file types to the combo box – Document, Spreadsheet and Presentation.
1: void MainPageLoaded(object sender, RoutedEventArgs e)
2: {
3: if (!Application.Current.IsRunningOutOfBrowser
4: || !Application.Current.HasElevatedPermissions)
5: {
6: FileTypeBlock.Visibility = Visibility.Collapsed;
7: FileTypeComboBox.Visibility = Visibility.Collapsed;
8: OpenButton.Visibility = Visibility.Collapsed;
9: FileLocationTextBlock.Visibility = Visibility.Collapsed;
10: ArgumentFileBox.Visibility = Visibility.Collapsed;
11: RunAsOobTextBlock.Visibility = Visibility.Visible;
12: return;
13: }
14:
15: RunAsOobTextBlock.Visibility = Visibility.Collapsed;
16: FileTypeComboBox.Items.Add("Document");
17: FileTypeComboBox.Items.Add("Spreadsheet");
18: FileTypeComboBox.Items.Add("Presentation");
19: FileTypeComboBox.SelectedIndex = 0;
20: }
The user selects the file type and then the file’s location. Initially, I had it so that there’s a Browse button that shows the Open File Dialog window where the user can browse through the folder structure and select the file. I would then display the full name of the selected file in the ArgumentFileBox field. There seems to be an issue in doing it that way. This post on stackoverflow.com basically tells that showing the full name of the file’s location is a security issue and that’s why I modified the code to where the user needs to type-in the full path of the file. Sorry peeps, and please let me know if there’s a better way of doing this.
When the user clicks on the Open button, the application checks the file type, creates an instance of the WScript.Shell COM object and passes the right parameters to run the application.
1: private void OpenButton_Click(object sender, RoutedEventArgs e)
2: {
3: string selectedType = FileTypeComboBox.SelectedValue.ToString();
4: if (selectedType == "Document")
5: {
6: dynamic cmd = ComAutomationFactory.CreateObject("WScript.Shell");
7:
8: cmd.Run(string.Format(writerApp, @ArgumentFileBox.Text),
9: 1, true);
10: }
11: else if(selectedType == "Spreadsheet")
12: {
13: dynamic cmd = ComAutomationFactory.CreateObject("WScript.Shell");
14:
15: cmd.Run(string.Format(calcApp, @ArgumentFileBox.Text),
16: 1, true);
17: }
18: else if (selectedType == "Presentation")
19: {
20: dynamic cmd = ComAutomationFactory.CreateObject("WScript.Shell");
21:
22: cmd.Run(string.Format(impressApp, @ArgumentFileBox.Text),
23: 1, true);
24: }
25: }
The app uses Windows Scripting Host to run the OpenOffice application requested by the user. This way you can pass the OpenOffice application’s path and the file to be opened. To know what the other parameters are in the Run command, read this.
That’s mostly it. This way you can run almost any application on your machine.
Now, I did bump into some ‘issues’ that I want to share here.
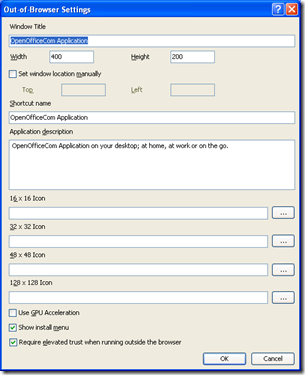
By default an OOB application’s window is 800x600 pixels (or somewhere there). I’m not sure where it gets this number from, but it would be great if the Width and Height properties get defaulted to the Silverlight objects’ size. As for now, you’ll have to set it manually in the Out of Browser Settings window:
The other issue is that once you change these values and run the application, the ‘CheckAndDownloadUpdateAsync()’ method in the App.xaml.cs file that checks for updates in the Silverlight application, does not recognize this as a ‘change’ and hence the e.UpdateAvailable property is false. So you’ll have to run the old OOB, remove it from your machine, install it again from the webpage and that’s when you’ll see the changes. Here’s what the AppManifest.xaml file looks like after I’ve set the Width and the Height of the OOB application (lines 14 and 15):
1: <Deployment xmlns="http://schemas.microsoft.com/client/2007/deployment"
2: xmlns:x="http://schemas.microsoft.com/winfx/2006/xaml"
3: EntryPointAssembly="OpenOfficeCom" EntryPointType="OpenOfficeCom.App"
4: RuntimeVersion="4.0.41108.0">
5: <Deployment.OutOfBrowserSettings>
6: <OutOfBrowserSettings ShortName="OpenOfficeCom Application"
7: EnableGPUAcceleration="False"
8: ShowInstallMenuItem="True">
9: <OutOfBrowserSettings.Blurb>
10: OpenOfficeCom Application on your desktop; at home, at work or on the go.
11: </OutOfBrowserSettings.Blurb>
12: <OutOfBrowserSettings.WindowSettings>
13: <WindowSettings Title="OpenOfficeCom Application"
14: Height="200"
15: Width="400" />
16: </OutOfBrowserSettings.WindowSettings>
17: <OutOfBrowserSettings.SecuritySettings>
18: <SecuritySettings ElevatedPermissions="Required" />
19: </OutOfBrowserSettings.SecuritySettings>
20: <OutOfBrowserSettings.Icons />
21: </OutOfBrowserSettings>
22: </Deployment.OutOfBrowserSettings>
23: <Deployment.Parts>
24: <AssemblyPart x:Name="OpenOfficeCom" Source="OpenOfficeCom.dll" />
25: <AssemblyPart x:Name="Microsoft.CSharp" Source="Microsoft.CSharp.dll" />
26: </Deployment.Parts>
27: </Deployment>
Again, it would be great if the process could also check for changes in the file sizes and mark e.UpdateAvailable as true, but I’m not sure how easy or difficult this would be.
Disclaimer: The app is given without any guarantees. So please go through the article/code before you download/run it.

