Windows Azure: New Virtual Machine, Active Directory, Multi-Factor Auth, Storage, Web Site and Spending Limit Improvements
This week we released some great updates to Windows Azure. These new capabilities include:
- Compute: New 2-CPU Core 14 GB RAM instance option
- Virtual Machines: Support for Oracle Software Images, Management Operations on Stopped VMs
- Active Directory: Richer Directory Management and General Availability of Multi-Factor Authentication Support
- Spending Limit: Reset your Spending Limit, Virtual Machines are no longer deleted if it is hit
- Storage: New Storage Client Library 2.1 Released
- Web Sites: IP and Domain Restriction Now Supported
All of these improvements are now available to use immediately. Below are more details about them.
Compute: New 2-CPU Core 14 GB RAM instance
This week we released a new memory-intensive instance for Windows Azure. This new instance, called A5, has two CPU cores and 14 gigabytes (GB) of RAM and can be used with Virtual Machines (both Windows and Linux) and Cloud Services:
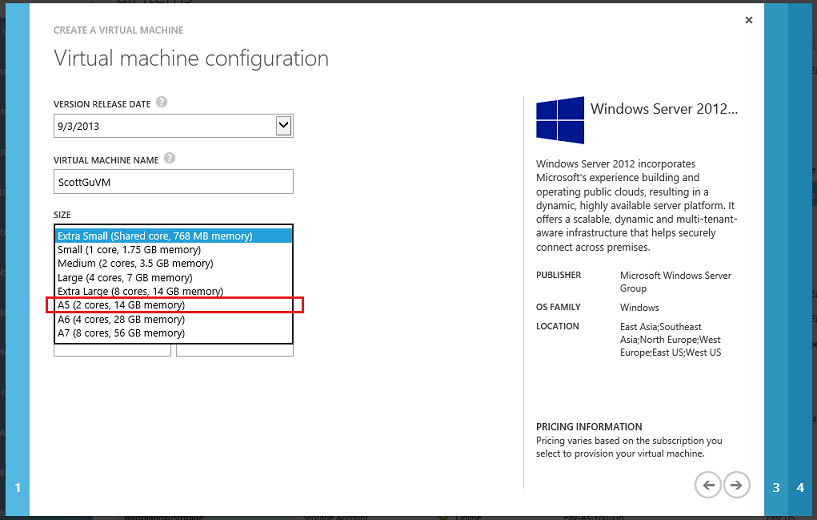
You can begin using this new A5 compute option immediately. Additional information on pricing can be found in the Cloud Services and Virtual Machines sections of our pricing details pages on the Windows Azure website.
Virtual Machines: Support for Oracle Software Images
Earlier this summer we announced a strategic partnership between Microsoft and Oracle, and that we would enable support for running Oracle software in Windows Azure Virtual Machines.
Starting today, you can now deploy pre-configured virtual machine images running various combinations of Oracle Database, Oracle WebLogic Server, and Java Platform SE on Windows, with licenses for the Oracle software included. These ready-to-deploy Oracle software images enable rapid provisioning of cost-effective cloud environments for development, testing, deployment, and easy scaling of enterprise applications. The images can now be easily selected in the standard “Create Virtual Machine” wizard within the Windows Azure Management Portal:
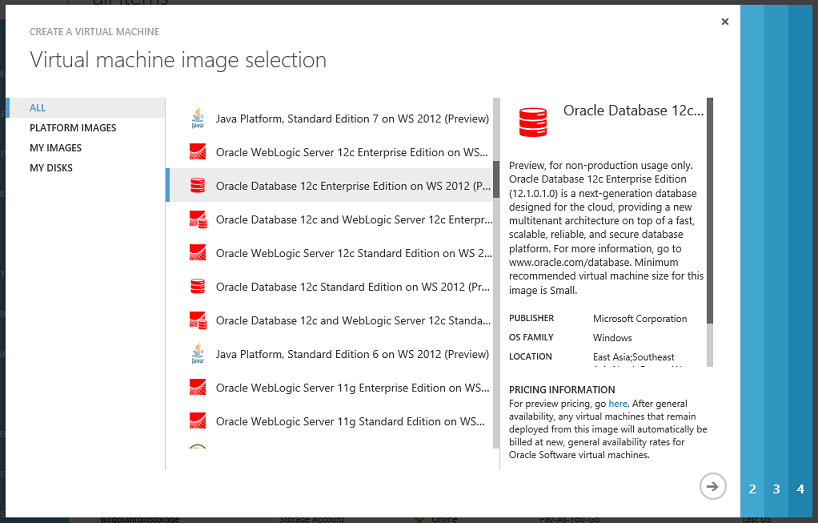
During preview, these images are offered for no additional charge on top of the standard Windows Server VM rate. After the preview period ends, these Oracle images will be billed based on the total number of minutes the VMs run in a month. With Oracle license mobility, existing Oracle customers that are already licensed on Oracle software also have the flexibility to deploy them on Windows Azure.
To learn more about Oracle on Windows Azure, visit windowsazure.com/oracle and read the technical walk-through documentation for the Oracle Images.
Virtual Machines: Management Operations on Stopped VMs
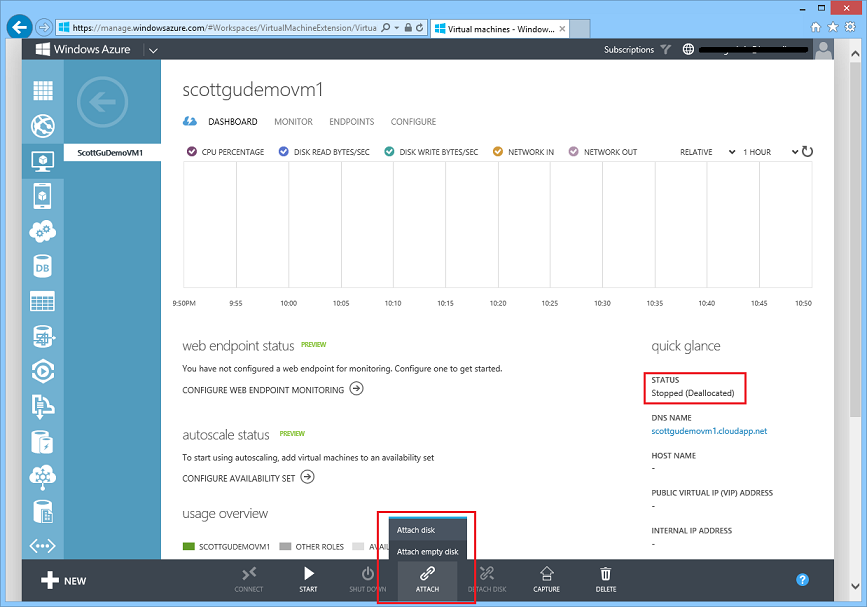
Starting with this week’s release, it is now possible to perform management operations on stopped/de-allocated Virtual Machines. Previously a VM had to be running in order to do operations like change the VM size, attach and detach disks, configure endpoints and load balancer/availability settings. Now it is possible to do all of these on stopped VMs without having to boot them:
Active Directory: Create and Manage Multiple Active Directories
Starting with this week’s release it is now possible to create and manage multiple Windows Azure Active Directories in a single Windows Azure subscription (previously only one directory was supported and once created you couldn’t delete it). This is useful both for development/test scenarios as well as for cases where you want to have separate directory tenants or synchronize with different on-premises domains or forests.
Creating a New Active Directory
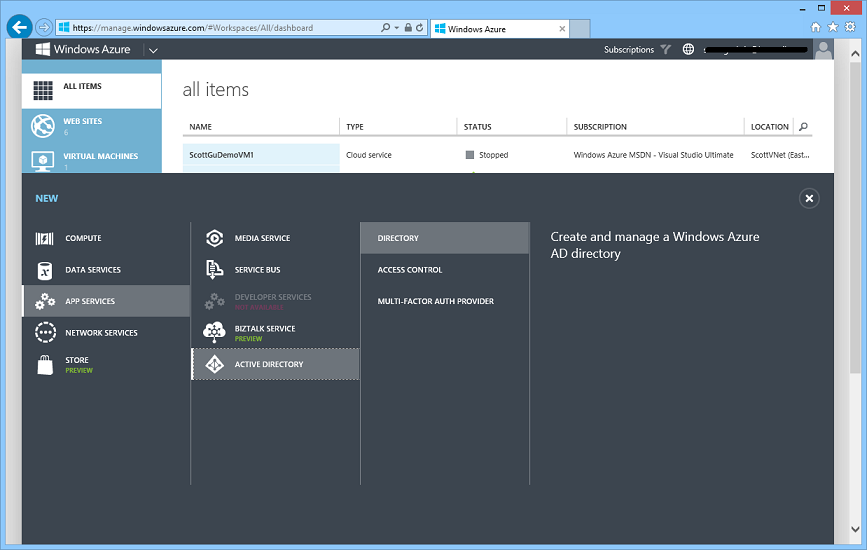
Creating a new Active Directory is now really easy. Simply select New->Application Services->Active Directory->Directory within the management portal:
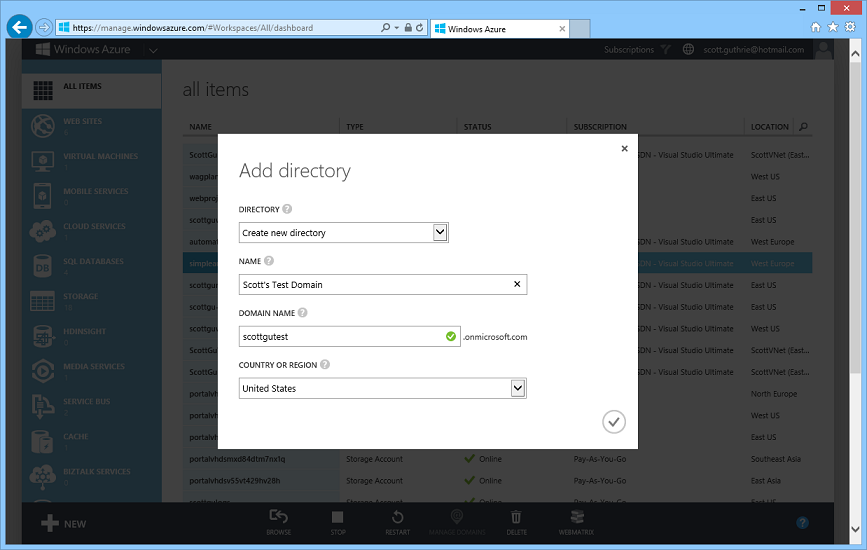
When prompted configure the directory name, default domain name (you can later change this to any custom domain you want – e.g. yourcompanyname.com), and the country or region to use:
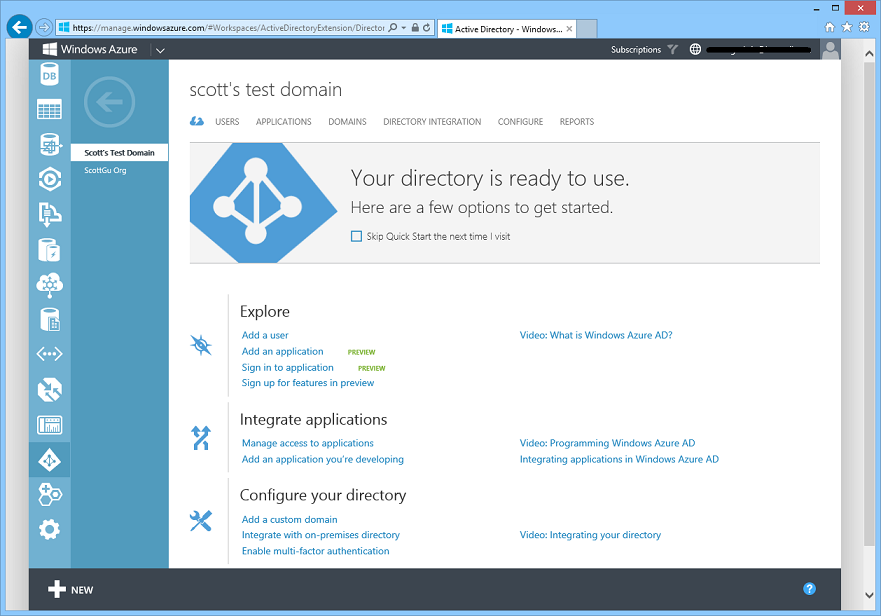
In a few seconds you’ll have a new Active Directory hosted within Windows Azure that is ready to use for free:
You can run and manage your Windows Azure Active Directories entirely in the cloud, or alternatively sync them with an on-premises Active Directory deployment - which allows you to automatically synchronize all of your on-premises users into your Active Directory in the cloud. This later option is very powerful, and ensures that any time you add or remove a user in your on-premises directory it is automatically reflected in the cloud as well.
You can use your Windows Azure Active Directory to manage identity access to custom applications you run and host in the cloud (and there is new support within ASP.NET in the VS 2013 release that makes building these SSO apps on Windows Azure really easy). You can also use Windows Azure Active Directory to securely manage the identity access of cloud based applications like Office 365, SalesForce.com, and other popular SaaS solutions.
Additional New Features
In addition to enabling the ability to create multiple directories in a single Windows Azure subscription, this week’s release also includes several additional usability enhancements to the Windows Azure Active Directory management experience:
- With this week’s release, we have added the ability to change the name of a directory after its created (previously it was fixed at creation time).
- As an administrator of a directory, you can now add users from another directory of which you’re a member. This is useful, for example, in the scenario where there are other members of your production directory who will need to collaborate on an application that is under development or testing in a non-production environment. A user can be a member of up to 20 directories.
- If you use a Microsoft account to access Windows Azure, and you use a different organizational account to manage another directory, you may find it convenient to manage that second directory with your Microsoft account. With this release, we’ve made it easier to configure a Microsoft account to manage an existing Active Directory. Now you can configure this even if the Microsoft account already manages a directory, and even if the administrator account for the other directory doesn’t have a subscription to Windows Azure. This is a common scenario when the administrator account for the other directory was created during signup for Office 365 or another Microsoft service.
- In this release, we’ve also added support to enable developers to delete single tenant applications that they’ve added to their Windows Azure AD. To delete an application, open the directory in which the application was added, click on the Applications tab, and click Delete on the command bar. An application can be deleted only when External Access is set to ‘Off’ on the configure tab.
As always, if there are aspects of these new Azure AD experiences that you think are great, or things that drive you crazy, let us know by posting in our forum on TechNet.
Active Directory: General Availability of Multi-Factor Authentication Service
With this week’s release we are excited to ship the general availability release of a great new service: the Windows Azure Multi-Factor Authentication (MFA) Service. Windows Azure Multi-Factor Authentication is a managed service that makes it easy to securely manage user access to Windows Azure, Office 365, Intune, Dynamics CRM and any third party cloud service that supports Windows Azure Active Directory. You can also use it to securely control access to your own custom applications that you develop and host within the cloud.
Windows Azure Multi-Factor Authentication can also be used with on-premise scenarios. You can optionally download our new Multi-Factor Authentication Server for Windows Server Active Directory and use it to protect on-premise applications as well.
Getting Started
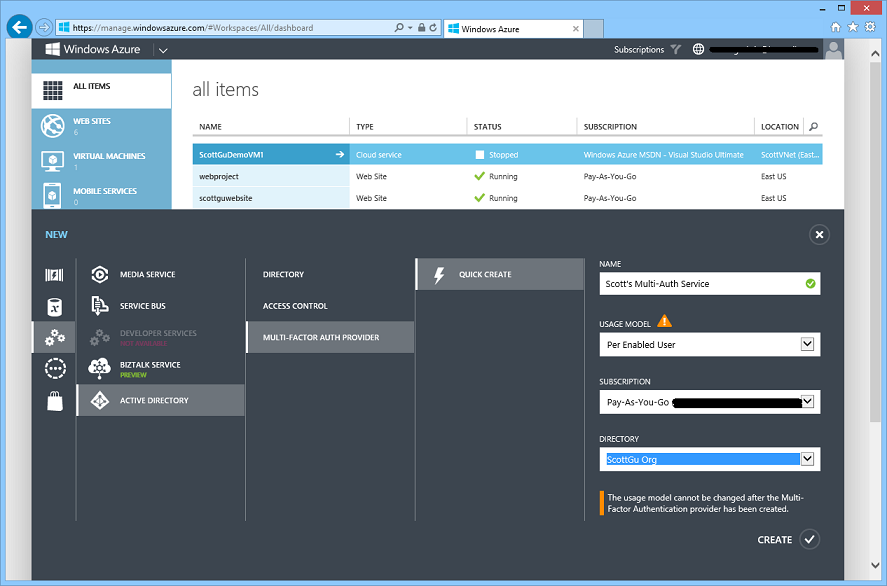
To enable multi-factor authentication, sign-in to the Windows Azure Management Portal and select New->Application Services->Active Directory->Multi-Factor Auth Provider and choose the “Quick Create” option. When you create the service you can point it at your Windows Azure Active Directory and choose from one of two billing models (per user pricing, or per authentication pricing):
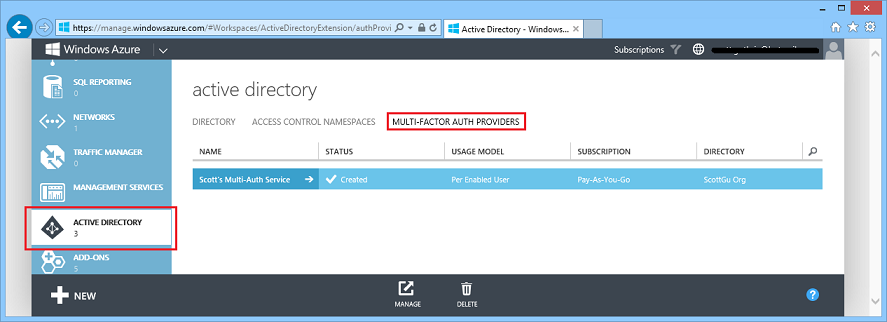
Once created the Windows Azure Multi-Factor Authentication service will show up within the “Multi-Factor Auth Providers” section of the Active Directory extension:
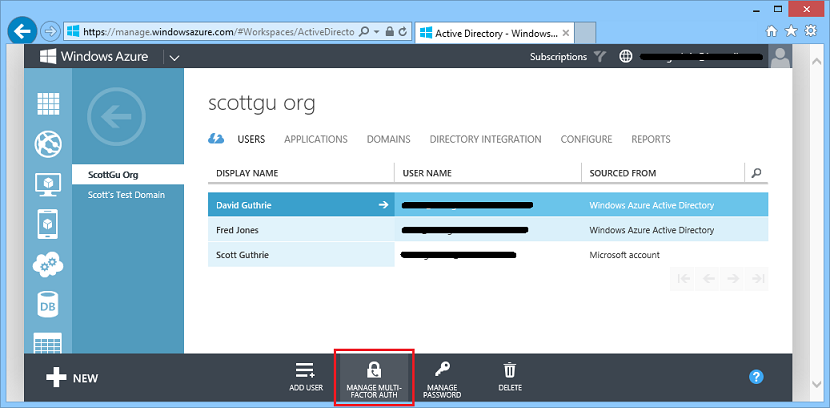
You can then manage which users in your directory have multi-factor authentication enabled by drilling into the “Users” tab of your Active Directory and then click the “Manage Multi-Factor Auth” button:
Once multi-factor authentication is enabled for a user within your directory they will be able to use a variety of secondary authentication techniques including verification via a mobile app, phone call, or text message to provide additional verification when they login to an app or service. The management and tracking of this is handled automatically for you by the Windows Azure Multi-Factor Authentication Service.
Learn More
You can learn more about today’s release from this 6 minute video on Windows Azure Multi-Factor Authentication.
Here are some additional videos and tutorials to learn even more:
- Turn Multi-Factor Authentication on for Windows Azure Active Directory and Office365 – view video
- Add Multi-Factor Authentication to on-premises applications – view video
- Build Multi-Factor Authentication into your applications – view video
- Alex & Steve’s blog post Building Multi-Factor Authentication to Your Applications using the SDK
Start making your applications and systems more secure with multi-factor authentication today! And give us your feedback and feature requests via the MFA forum.
Billing: Reset your Spending Limit on MSDN subscriptions
When you sign-up for Windows Azure as a MSDN customer you automatically get a MSDN subscription created for you that enables deeply discounted prices and free “MSDN credits” (up to $150 each month) that you can spend on any resources within Windows Azure. I blogged some details about this last week.
By default MSDN subscriptions in Windows Azure are created with what is called a “Spending Limit” which ensures that if you ever use up all of the MSDN credits you still don’t get billed – as the subscription will automatically suspend when all of the free credits are gone (ensuring your bill is never more than $0).
You can optionally remove the spending limit if you want to use more than the free credits and pay any overage on top of them. Prior to this week, though, once the spending limit was removed there was no way to re-instate it for the next billing cycle.
Starting with this week’s release you can now:
- Remove the spending limit only for the current billing cycle (ideal if you know that it is a one time spike)
- Remove the spending limit indefinitely if you expect to continue to have higher usage in future
- Reset/Turn back on the spending limit from the next billing cycle forward in case you’ve already turned it off
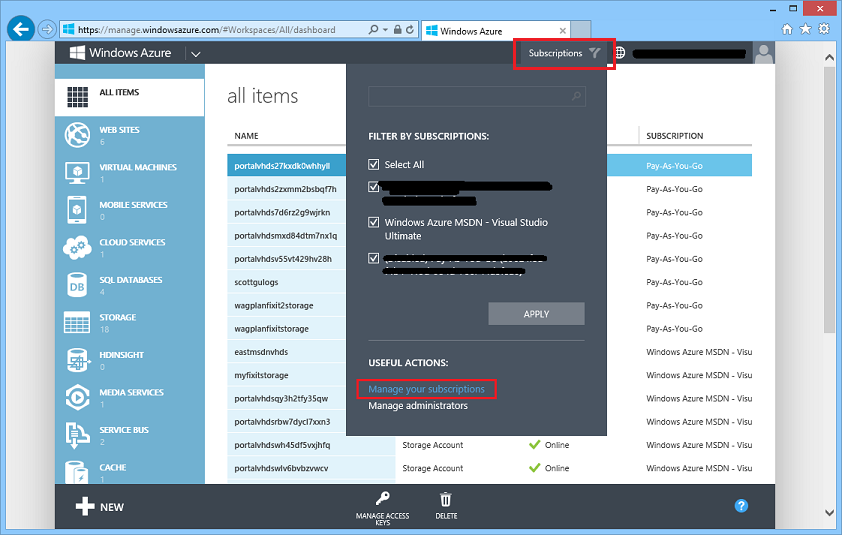
To enable or reset your spending limit, click the “Subscription” button in the top of the Windows Azure Management Portal and the click the “Manage your subscriptions” link within it:
This will take you to the Windows Azure subscription management page (which lists all of the Windows Azure subscriptions you have active). Click your MSDN subscription to see details on your account – including usage data on how much services you’ve used on it:
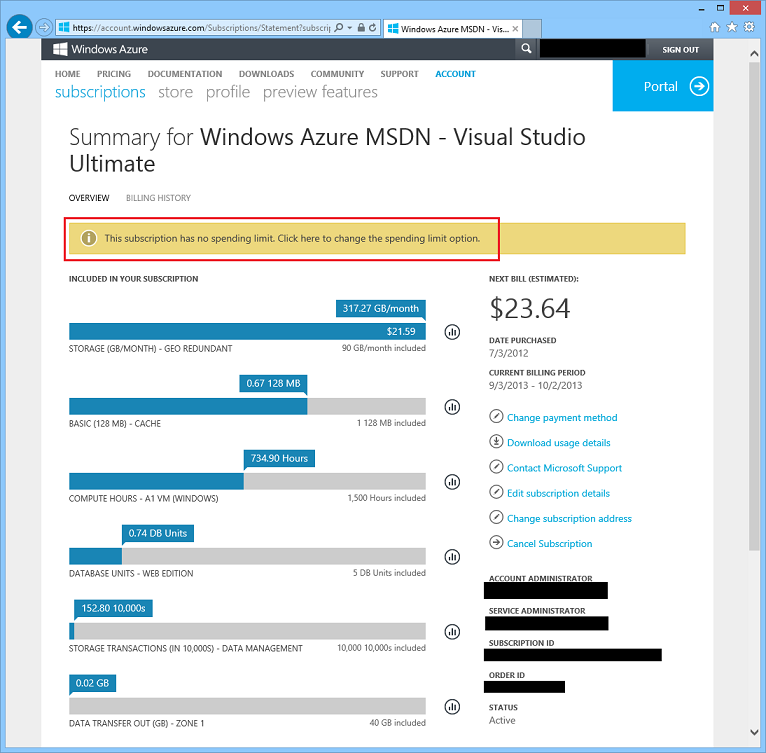
Above you can see usage data on my personal MSDN subscription. I’ve done a lot of talks recently and have used up my free $150 credits for the month and have $23.64 in overages. I was able to go above $0 on the subscription because I’ve turned off my spending limit (this is indicated in the text I’ve highlighted in red above).
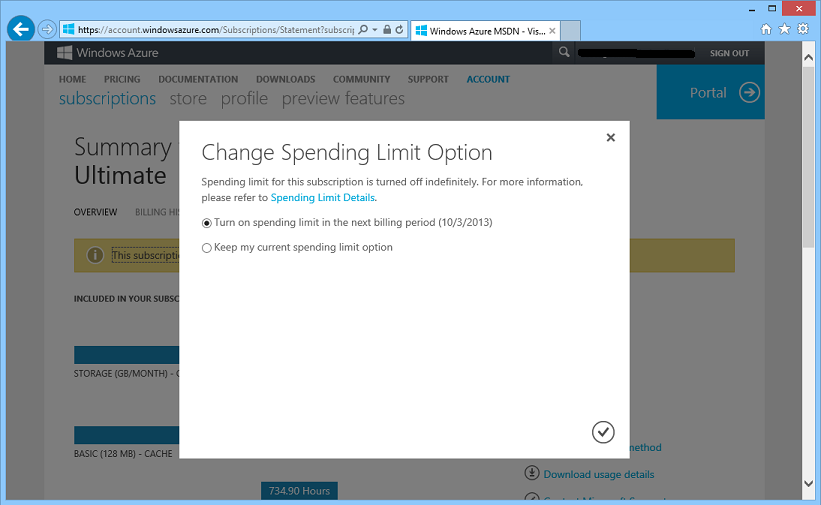
If I want to reapply the spending limit for the next billing cycle (which starts on October 3rd) I can now do so by clicking the “Click here to change the spending limit option” link. This will bring up a dialog that makes it really easy for me to re-active the spending limit starting the next billing cycle:
We hope this new flexibility to turn the spending limit on and off enables you to use your MSDN benefits even more, and provides you with confidence that you won’t inadvertently do something that causes you to have to pay for something you weren’t expecting to.
Billing: Subscription suspension no longer deletes Virtual Machines
In addition to supporting the re-enablement of the spending limit, we also made an improvement this week so that if your MSDN (or BizSpark or Free trial) subscription does trigger the spending limit we no longer delete the Virtual Machines you have running.
Previously, Virtual Machines deployed in suspended subscriptions would be deleted when the spending limit was passed (the data drives would be preserved – but the VM instances themselves would be deleted). Now when a subscription is disabled, VMs deployed inside it will simply move into the stopped de-provision state we recently introduced (which allows a VM to stop without incurring any billing).
This allows the Virtual Machines to be quickly restarted with all the previously attached disks and endpoints when a fresh monetary credit is applied or the subscription is converted into a paid subscription. As a result, customers don’t have to worry about losing their Virtual Machines when spending limits are reached, and they can quickly return back to business by re-starting their VMs immediately.
Storage: New .NET Storage Client Library 2.1 Release
Earlier this month we released a major update of our Windows Azure Storage Client Library for .NET. The new 2.1 release includes a ton of awesome new features and capabilities:
- Improved Performance
- Async Task<T> support
- IQueryably<T> Support for Tables
- Buffer Pooling Support
- .NET Tracing Integration
- Blob Stream Improvements
- And a lot more…
Read this detailed blog post about the Storage Client Library 2.1 Release from the Windows Azure Storage Team to learn more. You can install the Storage Client Library 2.1 release and start using it immediately using NuGet.
Web Sites: IP and Domain Restriction Now Supported
This month we have also enabled the IP and Domain Restrictions feature of IIS to be used with Windows Azure Web Sites. This provides an additional security option that can also be used in combination with the recently enabled dynamic IP address restriction (DIPR) feature (http://blogs.msdn.com/b/windowsazure/archive/2013/08/27/confirming-dynamic-ip-address-restrictions-in-windows-azure-web-sites.aspx).
Developers can use IP and Domain Restrictions to control the set of IP addresses, and address ranges, that are either allowed or denied access to their websites. With Windows Azure Web Sites developers can enable/disable the feature, as well as customize its behavior, using web.config files located in their website.
There is an overview of the IP and Domain Restrictions feature from IIS available here: http://www.iis.net/configreference/system.webserver/security/ipsecurity. A full description of individual configuration elements and attributes is available here: http://msdn.microsoft.com/en-us/library/ms691353(v=vs.90).aspx
The example configuration snippet below shows an ipSecurity configuration that only allows access to addresses originating from the range specified by the combination of the ipAddress and subnetMask attributes. Setting allowUnlisted to false means that only those individual addresses, or address ranges, explicitly specified by a developer will be allowed to make HTTP requests to the website. Setting the allowed attribute to true in the child add element indicates that the address and subnet together define an address range that is allowed to access the website.
<system.webServer>
<security>
<ipSecurity allowUnlisted="false" denyAction="NotFound">
<add allowed="true" ipAddress="123.456.0.0" subnetMask="255.255.0.0"/>
</ipSecurity>
</security>
</system.webServer>
If a request is made to a website from an address outside of the allowed IP address range, then an HTTP 404 not found error is returned as defined in the denyAction attribute.
One final note, just like the companion DIPR feature, Windows Azure Web Sites ensures that the client IP addresses “seen” by the IP and Domain Restrictions module are the actual IP addresses of Internet clients making HTTP requests.
Summary
Today’s release includes a bunch of great features that enable you to build even better cloud solutions. If you don’t already have a Windows Azure account, you can sign-up for a free trial and start using all of the above features today. Then visit the Windows Azure Developer Center to learn more about how to build apps with it.
Hope this helps,
Scott
P.S. In addition to blogging, I am also now using Twitter for quick updates and to share links. Follow me at: twitter.com/scottgu
