Azure Updates: Web Sites, VMs, Mobile Services, Notification Hubs, Storage, VNets, Scheduler, AutoScale and More
It has been a really busy last 10 days for the Azure team. This blog post quickly recaps a few of the significant enhancements we’ve made. These include:
- Web Sites: SSL included, Traffic Manager, Java Support, Basic Tier
- Virtual Machines: Support for Chef and Puppet extensions, Basic Pricing tier for Compute Instances
- Virtual Network: General Availability of DynamicRouting VPN Gateways and Point-to-Site VPN
- Mobile Services: Preview of Visual Studio support for .NET, Azure Active Directory integration and Offline support;
- Notification Hubs: Support for Kindle Fire devices and Visual Studio Server Explorer integration
- Autoscale: General Availability release
- Storage: General Availability release of Read Access Geo Redundant Storage
- Active Directory Premium: General Availability release
- Scheduler service: General Availability release
- Automation: Preview release of new Azure Automation service
All of these improvements are now available to use immediately (note that some features are still in preview). Below are more details about them:
Web Sites: SSL now included at no additional charge in Standard Tiers
With Azure Web Sites you can host up to 500 web-sites in a single standard tier hosting plan. Azure web-sites run in VMs isolated to host only your web applications (giving you predictable performance and security isolation), and you can scale-up/down the number of VMs either manually or using our built-in AutoScale functionality. The pricing for standard tier web-sites is based on the number of VMs you run – if you host all 500 web-sites in a single VM then all you pay for is for that single VM, if you scale up your web site plan to run across two VMs then you’d pay for two VMs, etc.
Prior to this month we charged an additional fee if you wanted to enable SSL for the sites. Starting this month, we now include the ability to use 5 SNI based SSL certificates and 1 IP based SSL certificate with each standard tier web site hosting plan at no additional charge. This helps make it even easier (and cheaper) to SSL enable your web-sites.
Web Sites: Traffic Manager Support
I’ve blogged in the past about the Traffic Manager service we have built-into Azure.
The Azure Traffic Manager service allows you to control the distribution of user traffic to applications that you host within Azure. This enables you to run instances of your applications across different azure regions all over the world. Traffic Manager works by applying an intelligent routing policy engine to the Domain Name Service (DNS) queries on your domain names, and maps the DNS routes to the appropriate instances of your applications (e.g. you can setup Traffic Manager to route customers in Europe to a European instance of your app, and customers in North America to a US instance of your app).
You can use Traffic Manager to improve application availability - by enabling automatic customer traffic fail-over scenarios in the event of issues with one of your application instances. You can also use Traffic Manager to improve application performance - by automatically routing your customers to the closet application instance nearest them.
We are excited to now provide general availability support of Traffic Manager with Azure Web Sites. This enables you to both improve the performance and availability of your web-sites. You can learn more about how to take advantage of this new support here.
Web Sites: Java Support
This past week we added support for an additional server language with Azure Web Sites – Java. It is now easy to deploy and run Java web applications written using a variety of frameworks and containers including:
- Java 1.7.0_51 – this is the default supported Java runtime
- Tomcat 7.0.50 – the default Java container
- Jetty 9.1.0
You can manage which Java runtime you use, as well as which container hosts your applications using the Azure management portal or our management APIs. This blog post provides more detail on the new support and options.
With this announcement, Azure Web Sites now provides first class support for building web applications and sites using .NET, PHP, Node.js, Python and Java. This enables you to use a wide variety of language + frameworks to build your applications, and take advantage of all the great capabilities that Web Sites provide (Easy Deployment, Continuous Deployment, AutoScale, Staging Support, Traffic Manager, outside-in monitoring, Backup, etc).
Web Sites: Support for Wildcard DNS and SSL Certificates
Azure Web Sites now supports the ability to map wildcard DNS and SSL Certficates to web-sites. This enables a variety of scenarios – including the ability to map wildcard vanity domains (e.g. *.myapp.com – for example: scottgu.myapp.com) to a single backend web site. This can be particularly useful for SaaS based scenarios.
Scott Cate has an excellent video that walks through how to easily set this support up.
Web Sites: New Basic Tier Pricing Option
Earlier in this post I talked about how we are now including the ability to use 5 SNI and 1 IP based SSL certificate at no additional cost with each standard tier azure web site hosting plan. We have also recently announced that we are also including the auto-scale, traffic management, backup, staging and web jobs features at no additional cost as part of each standard tier azure web site hosting plan as well. We think the combination of these features provides an incredibly compelling way to securely host and run any web application.
New Basic Tier Pricing Option
Starting this month we are also introducing a new “basic tier” option for Azure web sites which enables you to run web applications without some of these additional features – and at 25% less cost. We think the basic tier is great for smaller/less-sophisticated web applications, and enables you to be successful while paying even less.
For additional details about the Basic tier pricing, visit the Azure Web sites pricing page. You can select which tier your web-site hosting plan uses by clicking the Scale tab within the Web Site extension of the Azure management portal.
Virtual Machines: Create from Visual Studio
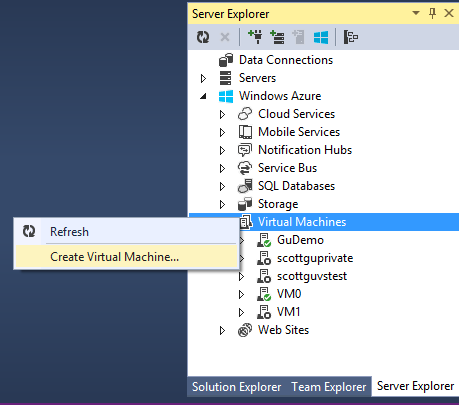
With the most recent Azure SDK 2.3 release, it is now possible to create Virtual Machines from directly inside Visual Studio’s Server Explorer. Simply right-click on the Azure node within it, and choose the “Create Virtual Machine” menu option:
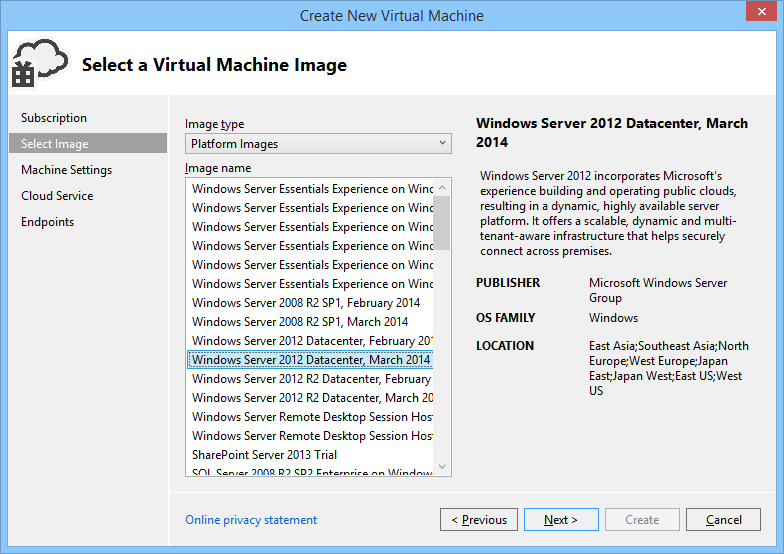
This will bring up a “Create New Virtual Machine” wizard that enables you to walkthrough creating a Virtual Machine, picking an image to run in it, attaching it to a virtual network, and open up firewall ports all from within Visual Studio:
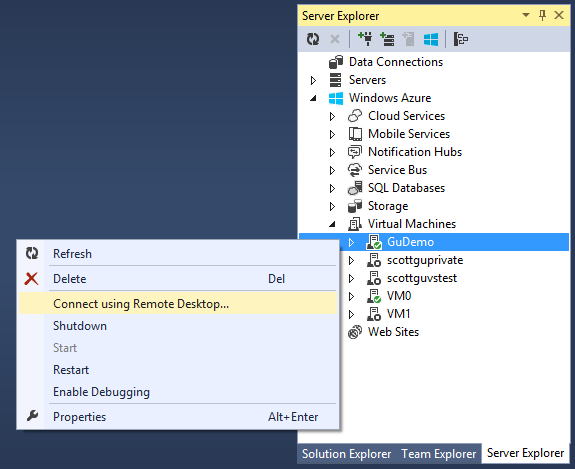
Once created you can then manage the VM (shutdown, restart, start, remote desktop, enable debugging, attach debugger) all from within Visual Studio:
This makes it incredibly easy to start taking advantage of Azure without having to leave the Visual Studio IDE.
Virtual Machines: Integrated Puppet and Chef support
In a previous blog post I talked about the new VM Agent we introduced as an optional extension to Virtual Machines hosted on Azure. The VM Agent is a lightweight and unobtrusive process that you can optionally enable to run inside your Windows and Linux VMs. The VM Agent can then be used to install and manage extensions, which are software modules that extend the functionality of a VM and help make common management scenarios easier.
At last week’s Build conference we announced built-in support for several new extensions – including extensions that enable easy support for Puppet and Chef. Puppet and Chef allow developers and IT administrators to define and automate the desired state of infrastructure configuration, making it effortless to manage 1000s of VMs in Azure.
Enabling Puppet Support
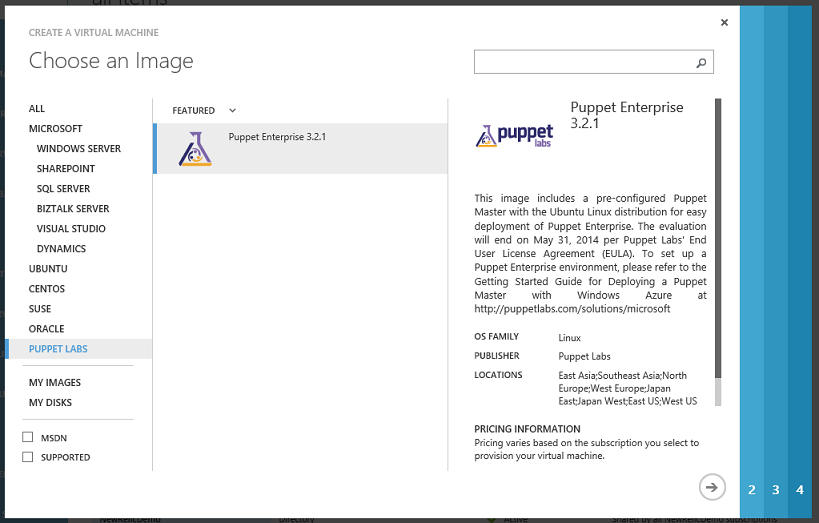
We now have a built-in VM image within the Azure VM gallery that enables you to easily stand up a puppet-master server that you can use to store and manage your infrastructure using Puppet. Creating a Puppet Master in Azure is now easy – simply select the “Puppet Enterprise” template within the VM gallery:
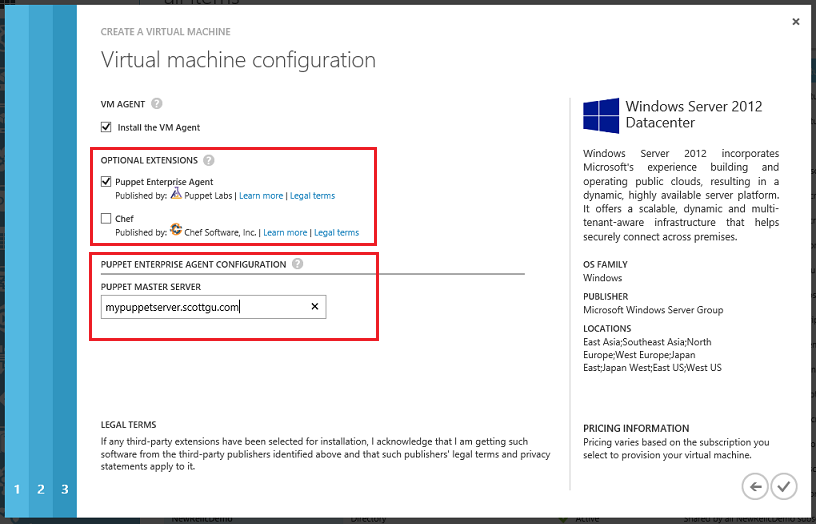
You can then create new Azure virtual machines that connect to this Puppet Master. Enabling this with VMs created using the Azure management portal is easy (we also make it easy to do with VMs created with the command-line). To enable the Puppet extension within a VM you create using the Azure portal simply navigate to the last page of the Create VM from gallery experience and check the “Puppet Enterprise Agent” extension within it:
Specify the URL of the Puppet master server to get started. Once you deploy the VM, the extension will configure the puppet agent to connect to this Puppet master server and pull down the initial configuration that should be used to configure the machine.
This new support makes it incredibly easy to get started with both Puppet and Chef and enable even richer configuration management of your IaaS infrastructure within Azure.
Virtual Machines: Basic Tier
Earlier in this blog post I discussed how we are introducing a new “Basic Tier” option for Azure Web Sites. Starting this month we are also introducing a “Basic Tier” for Virtual Machines as well.
The Basic Tier option provides VM options with similar CPU + memory configuration options as our existing VMs (which are now called “Standard Tier” VMs) but do not include the built-in load balancing and AutoScale capabilities. They also cost up to 27% less. These instances are well-suited for production applications that do not require a built-in load balancer (you can optionally bring your own load balancer), batch processing scenarios, as well as for dev/test workloads. Our new Basic tier VMs also have similar performance characteristics to AWS’s equivalent VM instances (which are less powerful than the Standard tier VMs we have today).
Comprehensive pricing information is now available on the Virtual Machines Pricing Details page.
Networking: General Availability of Azure Virtual Network Dynamic Routing VPN Gateways and Point-to-Site VPN
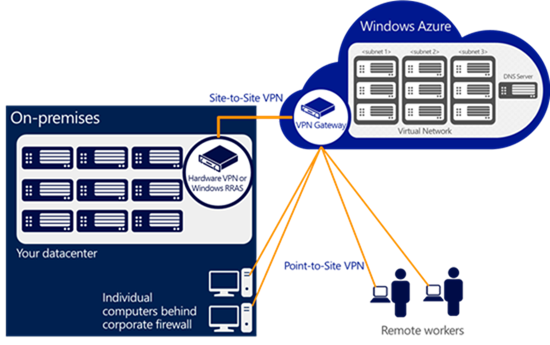
Last year, we previewed a feature called DynamicRouting Gateway and Point-to-Site VPN that supports Route-based VPNs and allows you to connect individual computers to a Virtual Network in Azure. Earlier this month we announced that the feature is now generally available. The DynamicRouting VPN Gateway in a Virtual Network will now carry the same 99.9% SLA as the StaticRouting VPN Gateway.
Now that we’re in General Availability mode, DynamicRouting Gateway will automatically incur standard Gateway charges which will take effect starting May 1, 2014.
For further details on the service, please visit the Virtual Network website.
Mobile Services: Visual Studio Support for Mobile Services .NET Backend
With Visual Studio 2013 Update 2, you can now create your backend Mobile Service logic using .NET and the ASP.NET Web API framework in Visual Studio, using Mobile Services templates and scaffolds. Mobile Services support for .NET on the backend offers the following benefits:
- You can use ASP.NET Web API and Visual Studio together with Mobile Services to add a backend to your mobile app in minutes
- You can publish any existing Web API to Mobile Services and benefit from authentication, push notifications and other capabilities that Mobile Services provides. You can also take advantage of any Web API features like OData controllers, or 3rd party Web API-based frameworks like Breeze.
- You can debug your Mobile Services .NET backend using Visual Studio running locally on your machine or remotely in Azure.
- With Mobile Services we run, manage and monitor your Web API for you. Azure will automatically notify you if we discover you have a problem with your app.
- With Mobile Services .NET support you can store your data securely using any data backend of your choice: SQL Azure, SQL on Virtual Machine, Azure Table storage, Mongo, et al.
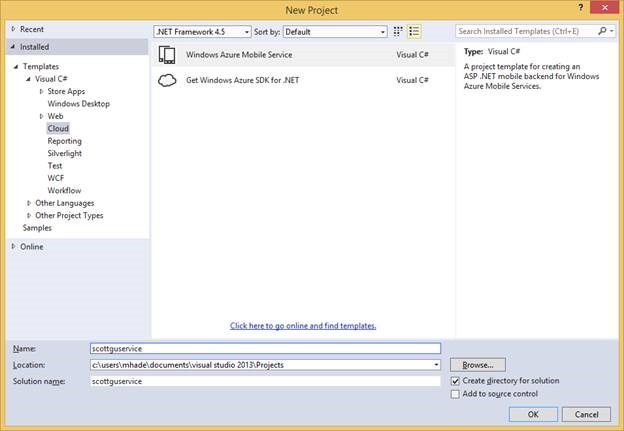
It’s easy to get started with Mobile Services .NET support in Visual Studio. Simply use the File-New Project dialog and select the Windows Azure Mobile Service project template under the Cloud node.
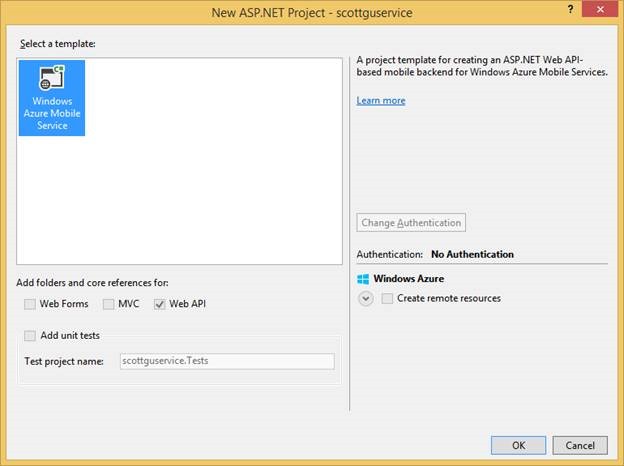
Choose Windows Azure Mobile Service in the New ASP .NET Project dialog.
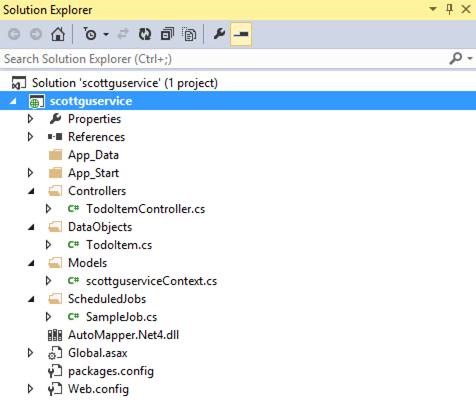
You will see a Mobile Services .NET project, notice this is a customized ASP .NET Web API project with additional Mobile Service NuGet packages and sample controllers automatically included:
Running the Mobile Service Locally
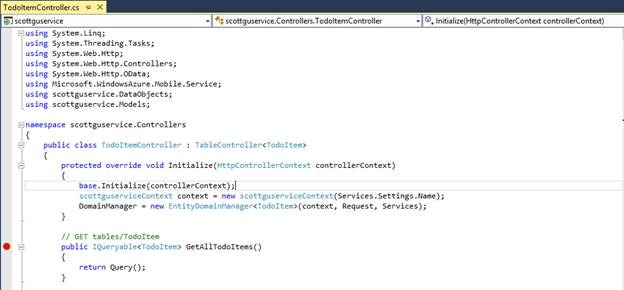
You can now test your .Net Mobile Service project locally. Open the sample TodoItemController.cs in the project. The controller shows you how you can use the built-in TableController<T> .NET class we provide with Mobile Services. Set a breakpoint inside the GetAllTodoItems() method and hit F5 within Visual Studio to run the Mobile Service locally.
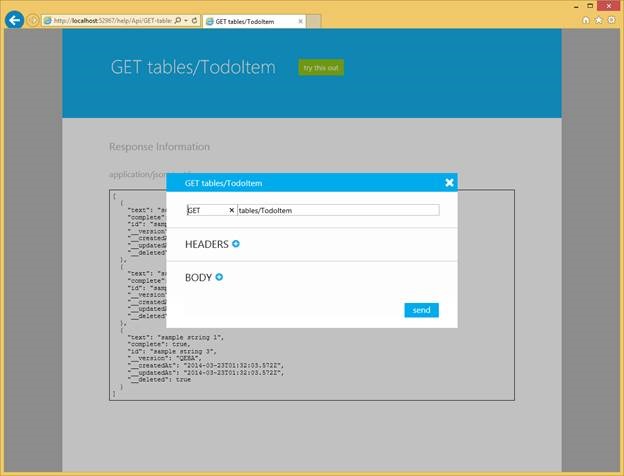
Mobile Services includes a help page to view and test your APIs. On the help page, click on the try it out link and then click the GET tables/TodoItem link. Then click try this out and send on the GET tables/TodoItem page. As you might expect, you will hit the breakpoint you set earlier.
Add APIs to your Mobile Service using Scaffolds
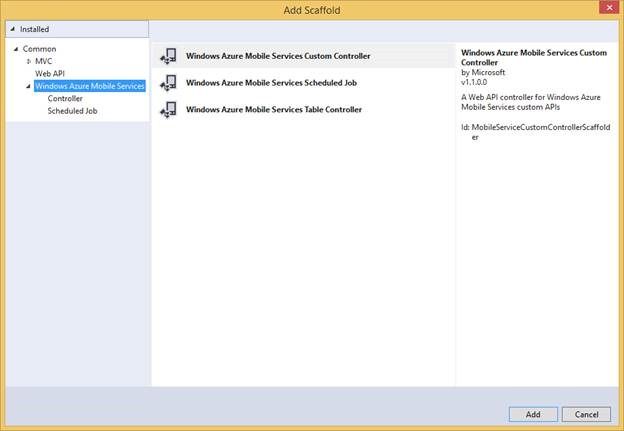
You can add additional functionality to your Mobile Service using Mobile Service or generic Web API controller scaffolds through the Add Scaffold dialog (right click on your project and choose Add -> New Scaffolded Item… command)
Publish your Mobile Services project to Azure
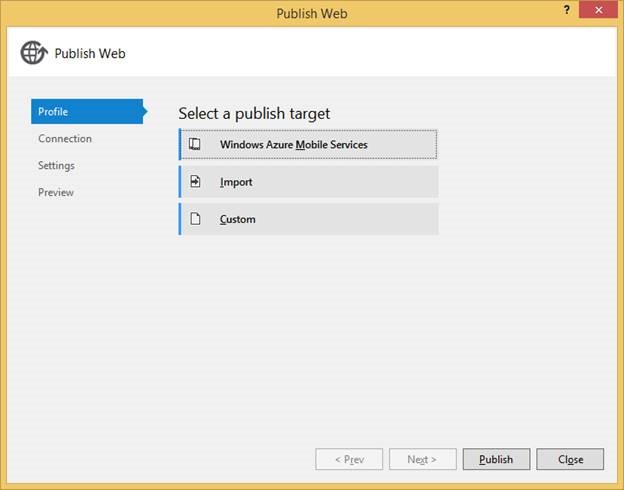
Once you are done developing your Mobile Service locally, you can publish it to Azure. Simply right click on your project and choose the Publish command. Using the publish wizard, you can publish to a new or existing Azure Mobile Service:
Remote debugging
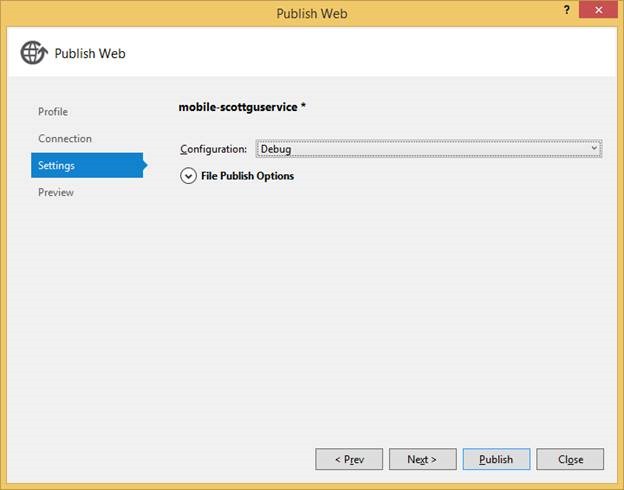
Just like Cloud Services and Websites, you can now remote debug your Mobile Service to get more visibility into how your code is operating live in Azure. To enable remote debugging for a Mobile Service, publish your Mobile Service again and set the Configuration to Debug in the Publish wizard.
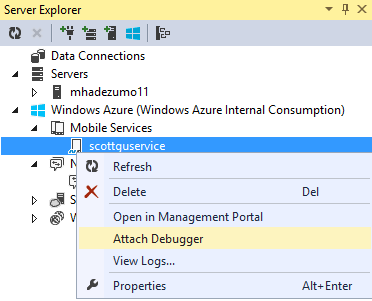
Once your Mobile Service is published and running live in the cloud, simply set a breakpoint in local source code. Then use Visual Studio’s Server Explorer to select the Mobile Service instance deployed in the cloud, right click and choose the Attach Debugger command.
Once the debugger attaches to the mobile service, you can use the debugging capabilities of Visual Studio to instantly and in-real time debug your app running in the cloud.
To learn more about Visual Studio Support for Mobile Services .NET backend follow tutorials at:
- Quickstart: Add a mobile service (.NET backend)
- How to use controllers to access data in mobile services (.NET backend)
- How to create custom APIs and scheduled jobs in a mobile service (.NET backend)
This new .NET backend supports makes it easy to create even better mobile applications than ever before.
Mobile Services: Offline Support
In addition to the above support, we are also introducing a preview of a new Mobile Services Offline capability with client SDK support for Windows Phone and Windows Store apps.
With this functionality, mobile applications can create and modify data even when they are offline/disconnected from a network. When the app is back online, it can synchronize local changes with the Mobile Services Table APIs. The feature also includes support for detecting conflicts when the same record is changed on both the client and the backend.
To use the new Mobile Services offline functionality, set up a local sync store. You can define your own sync store or use the provided SQLite-based implementation. The Mobile Services SDK provides a new local table API for the sync store, with a symmetrical programming model to the existing Mobile Services Table API. You can use Optimistic Concurrency along with the offline feature to detect conflicting changes between the client and backend.
The preview of the Mobile Services Offline feature is available now as part of the Mobile Services SDK for Windows Store and Windows Phone apps. In the future, we will support all client platforms supported by Mobile Services, including iOS, Android, Xamarin, etc.
Mobile Services: Support for Azure Active Directory Sign On
We now support Azure Active Directory Single Sign On for Mobile Services. Azure Active Directory authentication is available for both the .NET and Node.js backend options of Mobile Services.
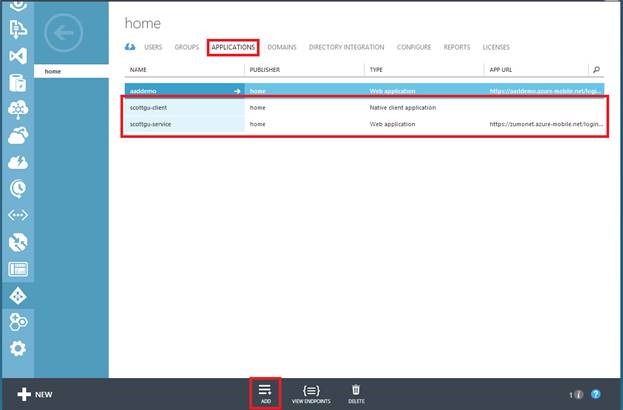
To take advantage of the feature, first register your client app and your Mobile Service with your Azure Active Directory tenant using the Applications tab in the Azure Active Directory management portal.
In your client project, you will need to add the Active Directory Authentication Library (ADAL), currently available for Windows Store, iOS, and Android clients.
From there on, the token retrieved from ADAL library can be used to authenticate and access Mobile Services. The single sign-on features of ADAL also enables your mobile service to make calls to other resources (such as SharePoint and Office 365) on behalf of the user. You can read more about the new ADAL functionality here.
These new updates make Mobile Services an even more attractive platform for building powerful employee facing apps.
Notification Hub: Kindle Support and Visual Studio Integration
I’ve previously blogged about Azure Notification Hubs, a high scale cross platform push notification service that allows you to instantly send personalized push notifications to segments of your audience or individuals containing millions of iOS, Android, Windows, Widows Phone devices with a single API call.
Today we’ve made two important updates to Azure Notification Hubs: adding support for Amazon Kindle Fire devices, and Visual Studio support for Notification Hubs.
Support for Amazon’s Kindle
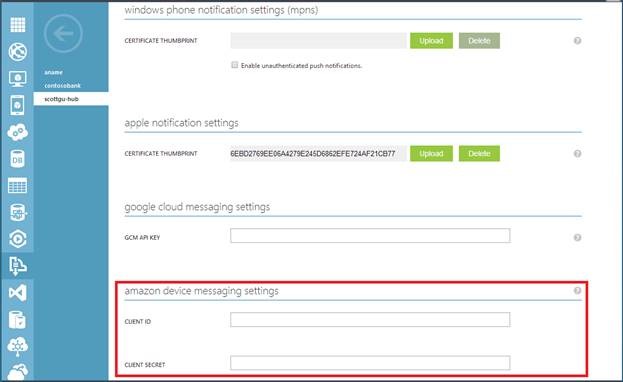
With today’s addition you can now configure your Notification Hubs with Amazon Device Messaging (ADM) service credentials on the configuration page for your Notification Hub in the Azure Management portal, and start sending push notifications to your app on Amazon’s Kindle device, in addition to iOS, Android, or Windows.
Testing Push Notifications with Visual Studio
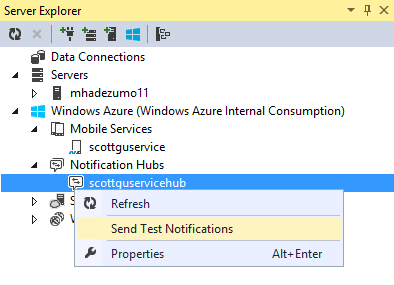
Earlier I blogged about how we enabled debugging push notifications using the Azure Management Portal. With today’s Visual Studio update, you can now browse your notification hubs and send test push notifications directly from Visual Studio Server Explorer as well.
Simply select your notification hub in the Server Explorer of Visual Studio under the Notifications Hubs node. Then right click, and choose the Send Test Notifications command:
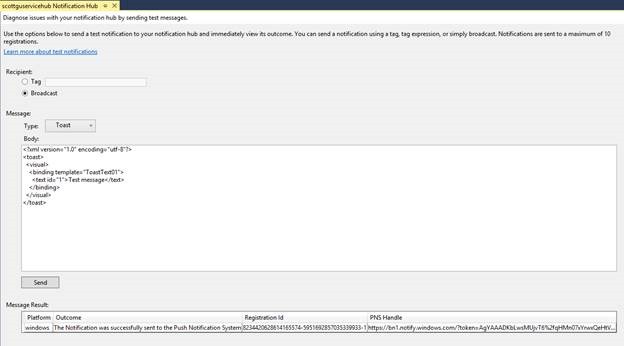
In the notification hub window, you can then send a message either to a particular tag or all registered devices (broadcast). You can select from a variety of templates - Windows Store, Windows Phone, Android, iOS, or even a cross platform message using the Custom Template. After you hit Send, you’ll receive the message result instantly to help you diagnose if your message was successfully sent or not.
To learn more about Azure Notification Hubs, read tutorials here.
AutoScale: Announcing General Availability of Autoscale Service
Last summer we announced the preview release of our Autoscale service. I’m happy to announce that Autoscale is now generally available! Better yet, there's no additional charge for using Autoscale.
We've added new features since we first released it as a preview version: support for both performance-and schedule-based autoscaling, along with an API and .NET SDK so you can programmatically scale using any performance counters that you define.
Autoscale supports all four Azure compute services: Cloud Services, Virtual Machines, Mobile Services and Web Sites. For Virtual Machines and Web Sites, Autoscale is included as a feature in the Standard pricing tiers, and for Mobile Services, it's included as a part of both Basic and Standard pricing tiers.
Storage: Announcing General Availability of Read Access Geo Redundant Storage (RA-GRS)
In December, we added the ability to allow customers to achieve higher read availability for their data. This feature called Read Access - Geo Redundant Storage (RA-GRS) allows you to read an eventually consistent copy of your geo-replicated data from the storage account’s secondary region in case of any unavailability to the storage account’s primary region.
Last week we announced that RA-GRS feature is now out of preview mode, and generally available. It is available to all Azure customers across all regions including the users in China.
RA-GRS SLA and Pricing
The benefit of using RA-GRS is that it provides a higher read availability (99.99+%) for a storage account over GRS (99.9+%). When using RA-GRS, the write availability continues to be 99.9+% (same as GRS today) and read availability for RA-GRS is 99.99+%, where the data is expected to be read from secondary if primary is unavailable. In terms of pricing, the capacity (GB) charge is slightly higher for RA-GRS than GRS, whereas the transaction and bandwidth charges are the same for GRS and RA-GRS. See the Windows Azure Storage pricing page here for more details about the SLA and pricing.
You can find more information on the storage blog here.
Active Directory: General Availability of Azure AD Premium
Earlier this month we announced the general availability of Azure Active Directory Premium, which provides additional identity and access management capabilities for enterprises. Building upon the capabilities of Azure AD, Azure AD Premium provides these capabilities with a guaranteed SLA and no limit on directory size. Additional capabilities include:
- Group-based access assignment enables administrators to use groups in AD to assign access for end users to over 1200 cloud applications in the AD Application Gallery. End users can get single-sign on access to their applications from their Access Panel at https://myapps.microsoft.com or from our iOS application.
- Self-service password reset that enables end users to reset forgotten passwords without calling your help desk.
- Delegated group management that enables end users to create security groups and manage membership in security groups they own.
- Multi-Factor Authentication that lets you easily deploy a Multi-Factor Authentication solution for your business without deploying new software or hardware.
- Customized branding that lets you include your organization’s branding elements in the experiences that users see when signing in to AD or accessing their Access Panel.
- Reporting, alerting, and analytics that increase your visibility into application usage in your organization, and potential security concerns with user accounts.
Azure AD Premium also includes usage rights for Forefront Identity Manager Server and Client Access Licenses.
To read more about AD Premium, including how to acquire it, read the Active Directory Team blog.
Active Directory: Public Preview of Azure Rights Management Service
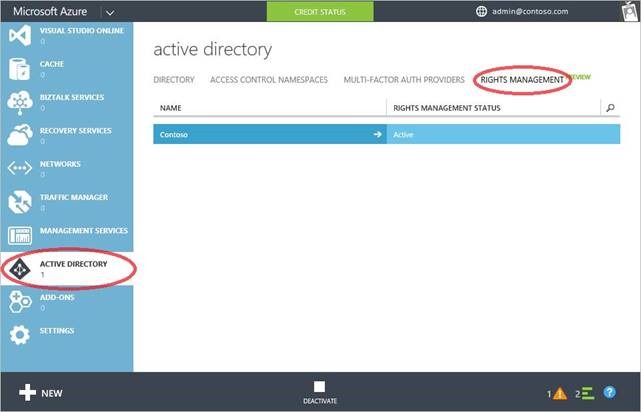
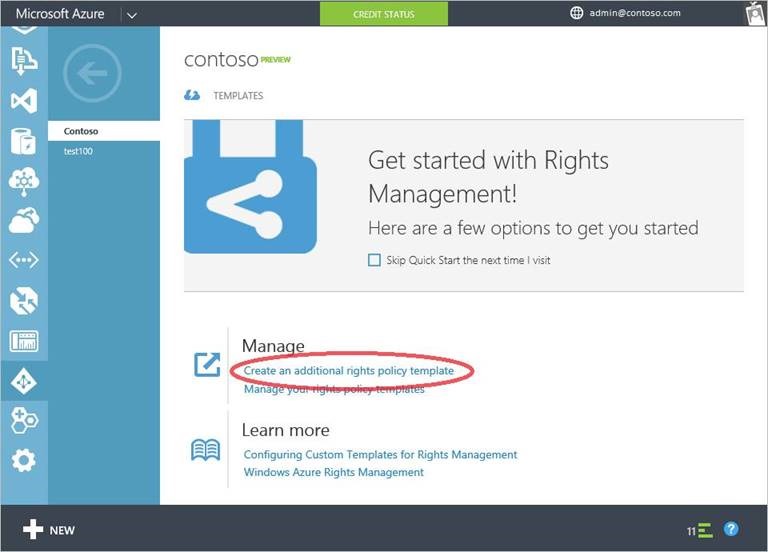
Earlier this month we announced the public preview of the ability to manage your Azure Rights Management service within the Azure Management Portal. If your organization has Azure Rights Management either as a stand-alone service or as part of your Office 365 or EMS subscriptions you can now manage it by signing into the Azure Management Portal. Once in the Portal, select ACTIVE DIRECTORY in the left navigation bar, navigate to the RIGHTS MANAGEMENT tab, then click on the name of your directory.
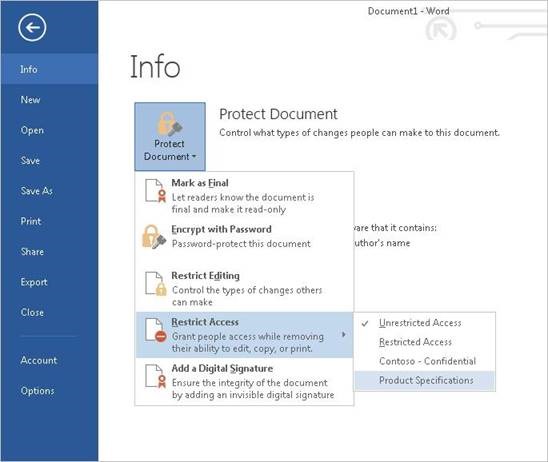
With this preview you can now create custom rights policy templates that let you define who can access sensitive documents, and what permissions (view, edit, save, print, and more) users can have on those documents. To begin creating a rights policy template, in the Quick Start page, click on Create an additional rights policy template option and follow the instructions on the page to define a name and description for the template, add users and rights and define other restrictions.
Once your template has been created and published, it will become available to users in your organization in their favorite applications.
To learn more managing Azure Rights Management and the benefits it offers to organizations, see the Information Protection group’s blog.
Scheduler: General Availability Release Scheduler Service
This month we’ve also delivered the General Availability release of the Azure Scheduler service. Scheduler allows you to run jobs on simple or complex recurring schedules that can invoke HTTP/S endpoints or post messages to storage queues. Scheduler has built-in high availability and can reliably call services inside or outside of Azure.
During preview customers have used it for a wide set of scenarios including for invoking services in their backend for Hadoop workloads, triggering diagnostics cleanup, and periodically checking that partners have submitted content on time. ISVs have used it to empower their applications to add scheduling capabilities such as report generation and sending reminders.
In the Scheduler portal extension you can easily create and manage your scheduler jobs. Since the initial release, Scheduler has also added the ability to update HTTP jobs with custom headers and basic authentication. It has also exposed the ability to change the recurrence schedule which will allow you to also choose to limit the execution of a job or allow the job to run infinitely.
With the general availability, new Azure Scheduler cmdlets have been released with Azure PowerShell and the Scheduler .NET API has been included in WAML 1.0.
I highly encourage you to try out the Scheduler today. You might find the following links helpful:
- Azure Scheduler documentation
- Download Azure PowerShell
- .NET API NuGet Package
- MSDN forum to find answers to all your Scheduler questions
- Scheduler Pricing Details page
It makes scheduling recurring tasks really easy.
Automation: Announcing Microsoft Azure Automation Preview
Last week we announced the preview of a new Microsoft Azure service: Automation.
Automation allows you to automate the creation, deployment, monitoring, and maintenance of resources in your Azure environment using a highly scalable and reliable workflow execution engine. The service can be used to orchestrate the time-consuming, error-prone, and frequently repeated tasks you’d otherwise accomplish manually across Microsoft Azure and third-party systems to decrease operational expense for your cloud operations.
To get started with Automation, you first need to sign-up for the preview on the Azure Preview page. Once you have been approved for the preview, you can sign in to the Management Portal and start using it. Automation is currently only available in the East-US data center, but we will add the ability to deploy to additional data centers in the future.
Authoring a Runbook
Once you have the Automation preview enabled on your subscription, you can easily get started automating by following a few simple steps:
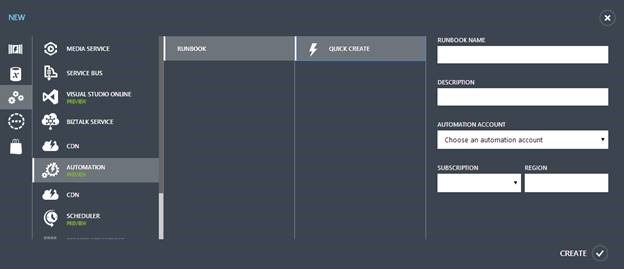
Step 1: In the Microsoft Azure management portal, click New->App Services->Automation->Runbook->Quick Create to create a new runbook. Runbooks are collections of activities that provide an environment for automating everything from diagnostic logging to applying updates to all instances of a virtual machine or web role to renewing certificates to cleaning storage accounts. Enter a name and description for the runbook, and create a new Automation account which will store your Runbooks, Assets, and Jobs.
Next time you create a runbook you can either use the same Automation account as you just created or create a separate one to if you’d like to maintain separation between a few different collections of runbooks / assets.
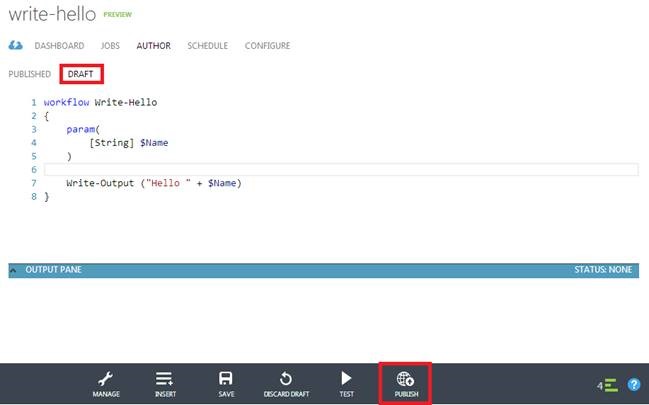
Step 2: Click on your runbook, then click Author->Draft. Type some PowerShell commands in the editor, then hit ‘Publish’ to make this runbook draft available for production execution.
Starting a Runbook and Viewing the Job
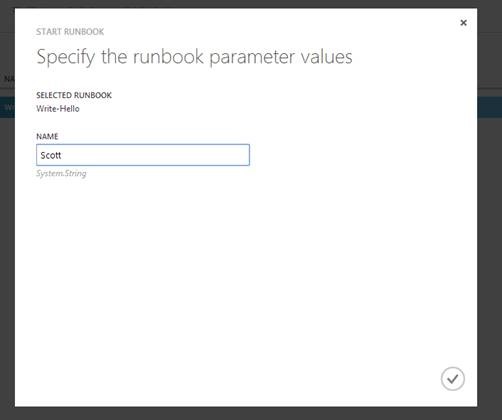
1. To start the runbook you just published, go back to the ‘Runbooks’ tab, click on your newly-published runbook, and hit ‘Start.’ Enter any required parameters for the runbook, then click the checkmark button.
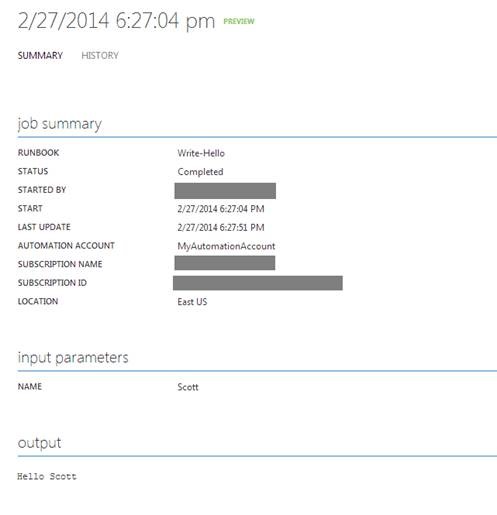
2. Click on your runbook, then click on the ‘Jobs’ tab for this runbook. Here you can view all the instances of a runbook that have run, called jobs. You should see the job you just started.
3. Click on the job you just started to view more details about its execution. Here you can see the job output, as well as any exceptions that may have occurred while the job was executing.
Once you get familiar with the service, you’ll be able to create more sophisticated runbooks to automate your scenarios. I encourage you to try out Microsoft Azure Automation today.
For more information, click through the following links:
- Service Overview
- Documentation
- Getting Started guide
- Runbook Authoring guide
- Pricing Details
- MSDN forum for answers to all your Automation questions
Summary
This most recent release of Azure includes a bunch of great features that enable you to build even better cloud solutions. If you don’t already have a Azure account, you can sign-up for a free trial and start using all of the above features today. Then visit the Azure Developer Center to learn more about how to build apps with it.
Hope this helps,
Scott
P.S. In addition to blogging, I am also now using Twitter for quick updates and to share links. Follow me at: twitter.com/scottgu
