Publishing to Windows Azure using Windows Azure Service Management API.
In many cases publishing to the Windows Azure is fairly straight forward and has become even more so with the completely integrated Windows Azure Service Management API. Prior to the API being enabled you had to create a package and deploy the package manually to the Cloud by selecting your Package and Configuration file. This is no longer the case with the Windows Azure Services Management API.
In addition, the Windows Services API seems to be a bit more integrated into Windows Azure. This could just be my perception of the services, but it seems that when I “cancel” or want to stop an already existing publish that it work faster using the API. I have also seen cases were the Cloud Services dashboard appears to be a bit behind with the status of the deployment.
In this post I will provide the information you will need in order to setup the Windows Azure Service Management API as this service requires the registration of a client side certificate and subscription ID. Below you will find screenshots of each step and the final result of a publish using the Management API.
Note:
- When publishing with the Management API it also provides an automatic label so that you can easily track your deployments.
- Before you being the following steps below, please either open your Windows Azure project or Create a New One and then follow the steps below.
Figure 1.00 – Publish to Azure using the Management API – Publish
Right click on your Cloud Project and Click Publish
Figure 1.01 – Publish to Azure using the Management API – Add New Hosted Service Credential
In the publish Cloud Service Dialog click on the Credentials Dropdown and Click “Add”
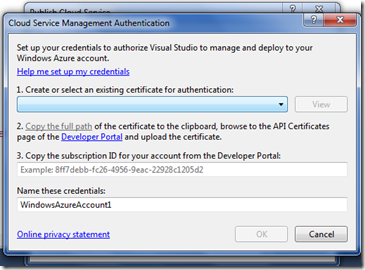
Figure 1.02 – Publish to Azure using the Management API – Add New Hosted Service Credential
An authentication dialog will be shown prompting you “Select” or “Create” a certificate that will be used for authentication of the Management API. I suggest you create a “New” certificate.
Figure 1.03 – Publish to Azure using the Management API – Create New Authentication Certificate
In the Authentication certificate dropdown click on “Create”
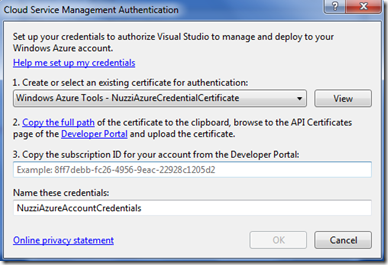
Figure 1.04 – Publish to Azure using the Management API – Enter a Friendly Name for your Authentication Certificate
Enter a Friendly Name for your Authentication Certificate
Figure 1.05 – Publish to Azure using the Management API – Certificate Created.
Now that you have created the certificate the next step will be to upload the certificate to the Cloud and associate it with your Subscription.
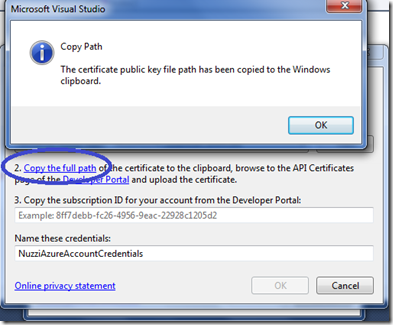
Figure 1.06 – Publish to Azure using the Management API – Copy Certificate Path
To save time click on the Copy Certificate Path link as shown below.
NOTE:
For these next steps you will need to login to your Windows Azure Account.
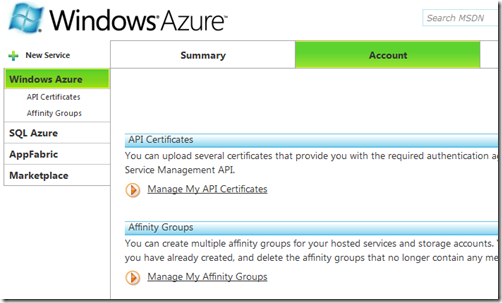
Figure 1.07 – Publish to Azure using the Management API – Managing My API Certificates
- Login to Windows Azure
- Click on your Azure Services
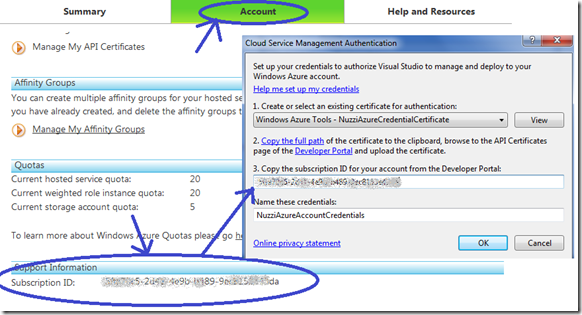
- Click on the Account Tab
- Click on the “Manage My API Certificates” Link
Figure 1.08 – Publish to Azure using the Management API – Paste the Copied Certificate Path
- Click in the Textbox Area or Click on the Browse button
- Paste in the path to the certificate your generated earlier.
Figure 1.09 – Publish to Azure using the Management API – Certificate Verification
Once you have uploaded your certificate you are just about finished. Verify that your certificate was installed as shown below.
Figure 1.10 – Publish to Azure using the Management API – Certificate Verification
- Next click back on the Account Tab
- Then locate and select your Subscription ID
- Once you have selected your Subscription ID navigate back to your Visual Studio 2010 Windows Azure Project where the dialog is still shown and paste in the Subscription ID as shown below.
Figure 1.11 – Publish to Azure using the Management API – Management API Services Enabled
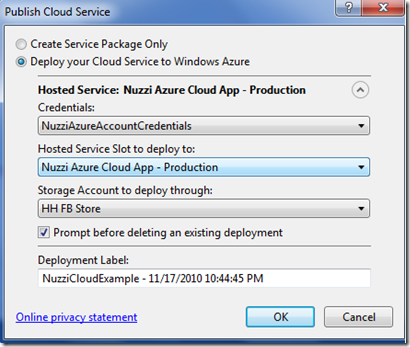
Once you have completed the steps above the Management API Deployment Services should be connected to your Windows Azure Cloud Services and show you a list of available deployment options.
Note: When using the API by default the Deployment Wizard will add a Label so that you are able to track your deployments.
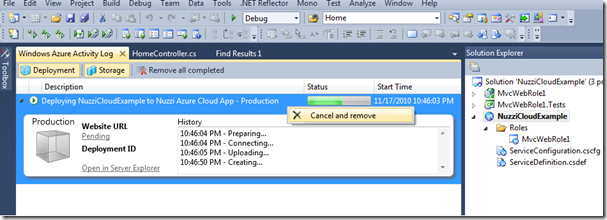
Figure 1.12 – Publish to Azure using the Management API – Deployment – Cancel
At this point you should be all set to use the Management API to publish your Cloud Application. One of the nice features with using the Management API is the ability to Cancel/Stop or a deployment process. While you can do this using the Azure Dashboard, I have found that using the API seems to be a bit more integrated or simply just work faster. Judge for yourself, but this is a very nice feature that is completely seamless.
Figure 1.13 – Publish to Azure using the Management API – Deployment Successful
At this point everything should be setup and enabled so that you can deployment you Cloud Application using the Windows Azure Management API.
Enjoy…..


