Windows Azure–Windows Azure Cloud Project Deployment and Remote Connections
Overview
There are several options when deploying your solution to Windows Azure and based on the types of updates required it may be best for you to leverage each of the deployment options in different ways and at different times. In this blog post I am going to focus on the most common deployment options available and then discuss when and why to use one deployment method versus another. For the purposes of keeping this post as simple as possible, I am not going to focus on a multi region deployment and am only going to focus on a single region deployment.
The Quick Read for this Post
The quick and easy read on this post is to look at the “Quick Deployment Options Benefit List” and determine what types are more common in your organization or for your project. In most cases, it should be pretty clear what Deployment Option would be most appropriate for your needs. Based on the Option that seems best, refer to that section of the post.
Option 1: Publish Locally – With Manual Service Package Deployment
Option 1 entails creating the Windows Azure Service Package files locally and then manually uploading them to the Windows Azure.
Option 2: Publish Remotely – With Automated Package Deployment
Option 2 automatically will publish the “service configuration” and “package” files to Windows Azure based on the credentials, environment, and storage account selected.
Option 3: Publish Remotely – Remote Desktop Session
Option 3 automatically will publish the “service configuration” and “package” files to Windows Azure based on the credentials, environment, and storage account selected and will also allow you to connect to your Windows Azure Cloud instance remotely. The remote connection will provide benefits for IIS Administration, File Explorer, Copy/Paste, quick file updates, and Remote Server Administration.
Quick Deployment Options Benefit List
| Option 1 – Manual | Option 2 – Publish Remote | Option 3 – Publish Remote with Remote Desktop Session | |
| Initial Setup for Deployment | average | easy | involved |
| Create New Instances | X | X | X |
| Update Instances | X | X | X |
| IIS Administration | X | ||
| Support IIS Recycle | X | ||
| Supports Copy/Paste | X | ||
| Support File Explorer | X | ||
| File Updates | (requires instance updates) | (requires instance updates) | X – very easy |
| Projected Update Time | 15m – 2 hours | 15m – 2 hours | as fast as it take to copy files |
| Ease of Updates | Very time consuming | Very time consuming | easy and convenient |
| Knowledge of IIS Needed (app pools, etc) | No | No | Yes (true remote desktop session) |
| Server Knowledge Needed | No | No | Yes (true remote desktop session) |
| Restart Instance | partially - (in dashboard only) | partially - (in dashboard only) | Yes |
| Experience Level | Novice to Expert | Novice to Expert | Intermediate to Export |
| Risk Level | Medium | Low | High |
Note:
There are many more features and benefits to each of these options, but hopefully this chart is found helpful when deciding what deployment method to use for your Windows Azure Cloud Deployments.
Summary
Based on these options you may be wondering why you would need to use one deployment option versus another or how this could impact you on a project. The simple answer is fairly straight forward. If you decide to publish your application after each change, it is likely that you are going to have to wait for your instances to be recreated. This process of Windows Azure stopping the instances, and recreating them is very time consuming and definitely not preferred if you are use to deploying your applications internally. With Windows Azure this initial process could take as short as 15 minutes or several hours. Rest assure if you have not reviewed the chart above you are spending way too much time deploying your solution to the Cloud, especially for simple updates.
Preliminary Setup
With that said, let’s get started by creating a Windows Azure Cloud Project.
Cloud Project Setup: New Windows Azure Project Setup
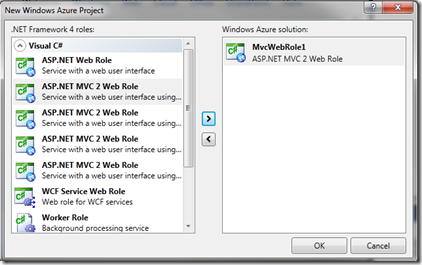
Let’s start by creating a new Cloud Project. For this sample I just titled my project “AzurePublishingBestPractices”
For the role selection you can select either a MVC Role or a Web Role. For this example I selected a MVC 2 Web Role.
Once the project wizard is complete we are ready to setup the cloud for our deployment.
New Hosted Service: Windows Azure New Hosted Service Setup
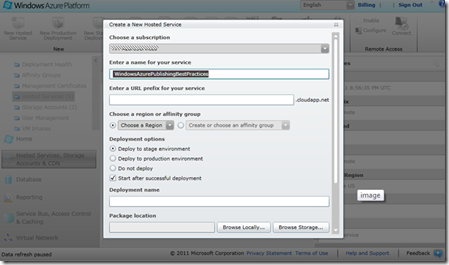
Now that we have created our .Net Cloud Project, login to Windows Azure and navigate to your Hosted Services and click on the “New Hosted Service” menu item.
“Name” the service, set the “URL Prefix”, set your “Region” and then select “Do Not Deploy”. For this blog I named the service “ WindowsAzurePublishingBestPractices”.
Once the service is created you are ready to publish your Cloud Project to Windows Azure.
Option 1: Publish Locally – With Manual Service Package Deployment
The first option we will explore is deploying your cloud project by publishing your project locally and then uploading the package and service configuration files manually.
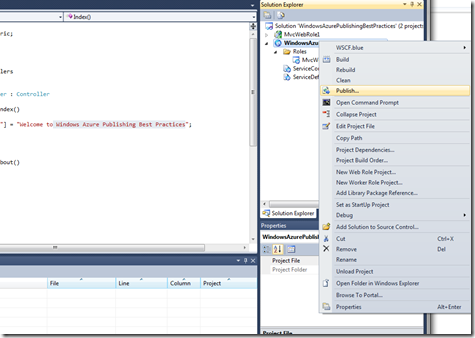
Step 1: Right Click on Your Project and Click “Publish”
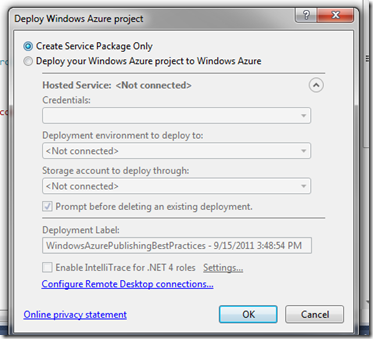
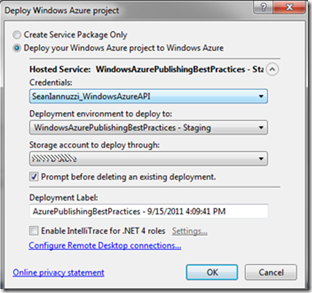
Step2: On the Deployment Screen select “Create Service Package Only” and Click “OK”
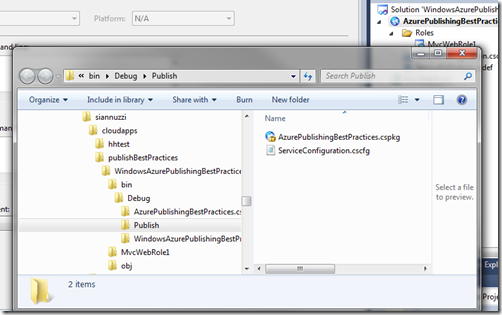
Once the package is created, Windows Explorer will open to the location where the files were created. In that directory you should see two files:
“[yourproject].cspkg”
“ServiceConfiguration.cscfg”
Note:
For the convenience of this example, copy the full path into the clipboard as we are going to need that for the Windows Azure Platform Dashboard in the next step.
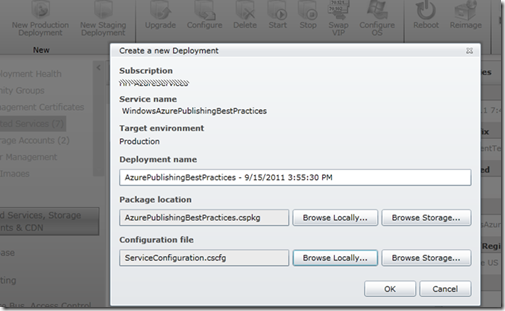
Step 3: Go back to your Windows Azure Platform Dashboard and Click on “New Production Deployment”
On the “Create a New Deployment Screen”, add a “Deployment Name” and then browse to the files that you published locally. Once you are finished click on “OK”.
Note:
If you receive a warning indicating that you only have 1 instance configuration please adjust your instance count to 2. For this example I am only going to configure 1 instance.
Once the instance(s) have been created, your site should be operational and deployed to the cloud.
Option 1 – Updates and Summary
In this case your initial setup may take a bit of time for Windows Azure to create the Role, create the Instance(s), etc. and at this point you may be thinking this is what is required or normal for this type of deployment. For the most part you are correct. However, if you take this approach with every update, Windows Azure will delete the existing instance and recreate a new instance for each deployment. This surely is not ideal, and based on the fact that the initial deployment is likely to take 15 minutes to an hour+, this option is not very optimal at all. In addition, given all of the manually steps we needed to follow in this case this option it is not preferred and could introduce error if you accidently select the wrong files. Even worse would be if you waited an hour for a deployment only to find that you have a spelling error or a minor CSS issue. You surely would not want to wait another hour for this update.
This brings up to Option 2. Could this be better?????
Option 2: Publish Remotely – With Automated Package Deployment
Our second option we will review is Deploying to the Cloud using the Automated Deployment. Well to start this one sounds better then the first one based on the fact that it is automated. :)
Step 1: Right Click on Your Project and Click “Publish”
Step 2: On the Deployment Screen select “Deploy your Windows Azure Project to Windows Azure” and Click “OK”
Note:
You will need to select your credentials, deployment target, storage account, and deployment label. For more information on how to create your credentials please refer to the Windows Azure Help Topic.
http://msdn.microsoft.com/en-us/library/windowsazure/ff683676.aspx
In this case if you followed this tutorial and completed Option 1, then Click “OK” the delete the existing deployment when prompted.
Step 3: Monitoring the Automated Deployment
So far this approach seems much easier then publishing the files locally, logging into the Windows Azure Platform Dashboard and then uploading your files manually. So far so good correct?????
Option 2 – Updates and Summary
With Option 2 the deployment is likely to still take a bit of time for Windows Azure to create the Role, create the Instance(s) etc. You surely saved some time not having to manually upload files to the Windows Azure Platform Dashboard. However, the issues still exist around updates. If you needed to update a spelling error or CSS file you are still in the same boat with Option 2 as with Option 1.
Which brings up to Option 3.
Option 3: Publish Remote– Remote Desktop Session
Option 3 is going to require is little bit of setup up front setup in order to provide the ability to save time later. I am not going to go into a lot of detail on how to setup Azure Connect as that information can be found here: http://msdn.microsoft.com/en-us/library/gg433026.aspx.
Step 1: Windows Azure – Virtual Network - Install Local Endpoint
In order to allow a remote desktop session to be established you first must install a local endpoint from the Windows Azure Platform Dashboard under the “Virtual Network” Menu Item.
Click on the Install “Local Endpoint”
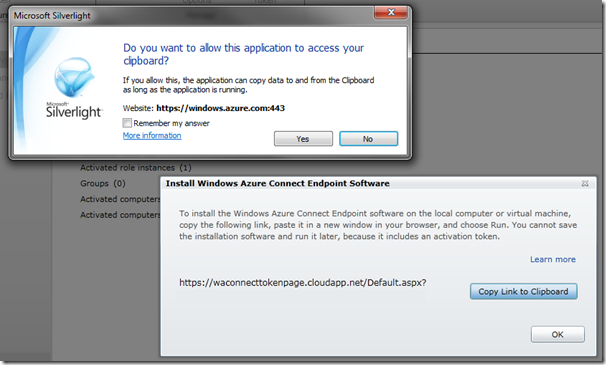
Step 2: Install Local Endpoint – Copy the link to the Clipboard and then begin your installation
Step 3: Download Azure Connect and Complete the Installation Wizard
There are many options available for setting up and configuring Windows Azure Connect.
- Checklist for Configuring Connections for Windows Azure Roles
- Checklist for Joining a Windows Azure Role to Your Domain
- How to Activate Windows Azure Roles for Windows Azure Connect
- How to Install Local Endpoints with Windows Azure Connect
- How to Create and Configure a Group of Endpoints in Windows Azure Connect
- How to Configure Relay Regions in Windows Azure Connect
- How to Configure Certificate-based Activation in Windows Azure Connect
For this blog I am going to try to keep this very simple and straight forward.
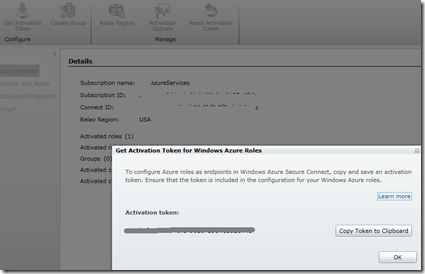
Step 4: Get an Activation Token
Click on the Get Activation Token Button and Copy the Activation Token to your clipboard.
Good news we are almost done. :)
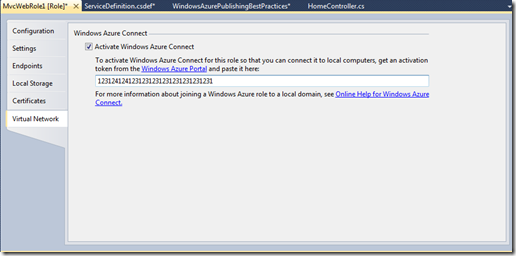
Step 5: Activate your Local Endpoint with the Activation Token
Note:
- To get to the Windows Azure Connect Activation Area, right click on your Web Role and click on “Properties”.
- Then click on the Virtual Network Tab.
- As shown in the screenshot above, click on the Activate Windows Azure Connect.
- Now paste your activation token into the text box.
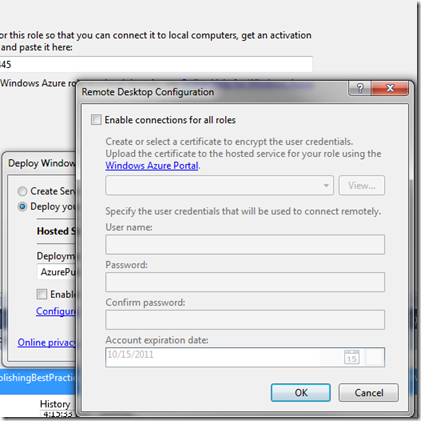
Step 6: Configure Remote Desktop Roles and Connections
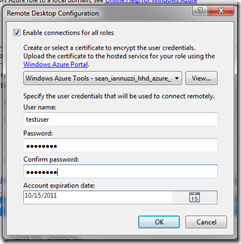
To configure you Remote Desktop Roles and Connection. Right Click on the Cloud Project and Select Publish. From the Publish Screen Click on “Configure Remote Desktop Connections”
Note:
A best practice would be to lock these connections down by role, but for the simplicity of this blog we are going to allow connections for all roles. Please refer to the links above on setup for Remote Connections and some of the advanced options available. You can always disable the remote connection by unchecking the Remote Access “Enabled” checkbox from the Windows Azure Dashboard.
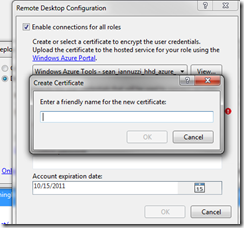
Step 7: Create the Remote Desktop Connection Certificate and Set Login Credentials
The next step is to create a new certificate that will be used to ensure that you are the only person able to connect to the server.
After you create the certificate, select the certificate in the list and then provide a user name and password to login to the Cloud instance.
Then click on “OK”
Note:
If you attempt to deploy your project now you will receive an error as shown below.
This error is caused by not having the certificate in the Windows Azure Service.
Step 8: Upload your Certificate to your Hosted Service Instance
Navigate back into the Windows Azure Platform Dashboard and select your service. Once you have selected your service click in the Certificates Folder.
Then Click on “Add Certificate” and browse to the appropriate exported certificate file.
Enter your password and click on “OK”.
The end result will look as follows:
Now you are ready to publish your application to the cloud.
Note:
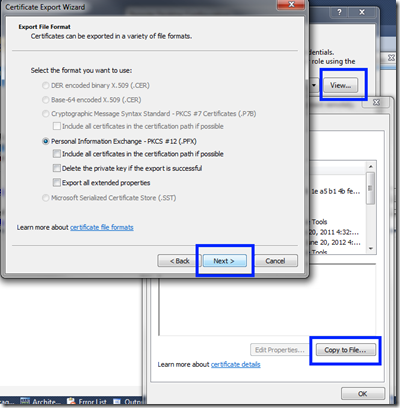
If you are not sure where the certificate is located or have not exported the certificate. Please click on the “View ” and then Export your certificate.
Step 9: Connect to your instance using Remote Desktop
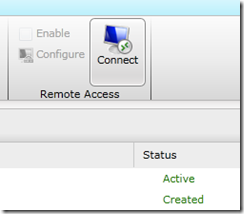
To connect to your instance, navigate back into the Windows Azure Platform Dashboard and select your service. From your service expand the instance and click on the particular instance for which you would like to connect.
Then click on the connect Menu Icon.
When prompted enter in the credentials you setup in the previous steps.
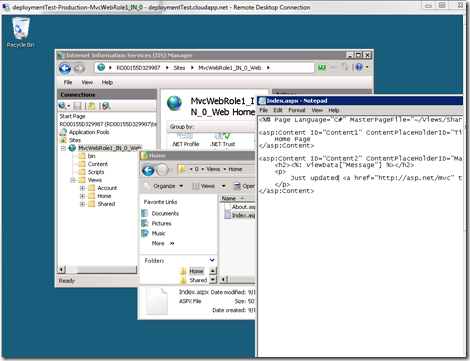
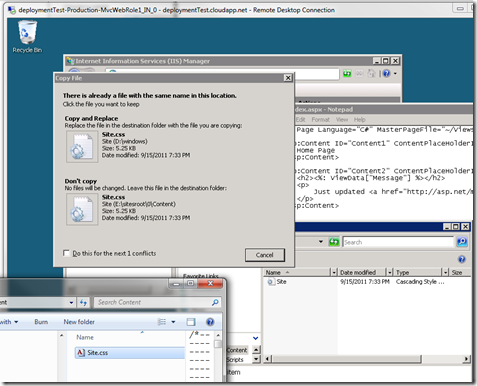
Once connected you now have access to the cloud instance as if it were located in your own data center. Now that you are connected remotely you can restart IIS, recycle the application pool, make file updates, copy and paste files from explorer to your remote desktop connection and many other options. Surely you could use cloud storage for your images, and css files as another option as well to save time on your deployment, but this blog was to demonstrate the deployment options and leveraging remote connections to the cloud.
Option 3 – Updates and Summary
With Option 3 there obviously some overhead with setting up the remote connection, but hopefully by logging directly into the cloud instance via Remote Desktop you can truly see this value. Especially if you need to perform a quick CSS update, replace an image or update a file. You surely would not want to wait 15m or 2 hours to make this update by tearing down your cloud instances and redeploying.
There are some downsides to this approach, one being if you have a lot of instances you will have a lot of updates to make. Another downside is knowledge of IIS and Web Server Setup. With the other deployment options you do not need to understand IIS much at all other then deploying the package.
The key benefit with this Option is to save you time in a pinch where you do not need to reestablish all of the instances and only need to make minor updates.
Quick Deployment Options Benefit List
| Option 1 – Manual | Option 2 – Publish Remote | Option 3 – Publish Remote with Remote Desktop Session | |
| Initial Setup for Deployment | average | easy | involved |
| Create New Instances | X | X | X |
| Update Instances | X | X | X |
| IIS Administration | X | ||
| Support IIS Recycle | X | ||
| Supports Copy/Paste | X | ||
| Support File Explorer | X | ||
| File Updates | (requires instance updates) | (requires instance updates) | X – very easy |
| Projected Update Time | 15m – 2 hours | 15m – 2 hours | as fast as it take to copy files |
| Ease of Updates | Very time consuming | Very time consuming | easy and convenient |
| Knowledge of IIS Needed (app pools, etc) | No | No | Yes (true remote desktop session) |
| Server Knowledge Needed | No | No | Yes (true remote desktop session) |
| Restart Instance | partially - (in dashboard only) | partially - (in dashboard only) | Yes |
| Experience Level | Novice to Expert | Novice to Expert | Intermediate to Export |
| Risk Level | Medium | Low | High |
I hope that you find this post helpful and enjoy.
Comments and/or questions are always welcome.

