CI Deployment Of Azure Web Roles Using TeamCity
After recently migrating an important new website to use Windows Azure “Web Roles” I wanted an easier way to deploy new versions to the Azure Staging environment as well as a reliable process to rollback deployments to a certain “known good” source control commit checkpoint. By configuring our JetBrains’ TeamCity CI server to utilize Windows Azure PowerShell cmdlets to create new automated deployments, I’ll show you how to take control of your Azure publish process.
Step 0: Configuring your Azure Project in Visual Studio
Before we can start looking at automating the deployment, we should make sure manual deployments from Visual Studio are working properly. Detailed information for setting up deployments can be found at http://msdn.microsoft.com/en-us/library/windowsazure/ff683672.aspx#PublishAzure or by doing some quick Googling, but the basics are as follows:
- Install the prerequisite Windows Azure SDK
- Create an Azure project by right-clicking on your web project and choosing “Add Windows Azure Cloud Service Project” (or by manually adding that project type)
- Configure your Role and Service Configuration/Definition as desired
- Right-click on your azure project and choose “Publish,” create a publish profile, and push to your web role
You don’t actually have to do step #4 and create a publish profile, but it’s a good exercise to make sure everything is working properly. Once your Windows Azure project is setup correctly, we are ready to move on to understanding the Azure Publish process.
Understanding the Azure Publish Process
The actual Windows Azure project is fairly simple at its core—it builds your dependent roles (in our case, a web role) against a specific service and build configuration, and outputs two files:
- ServiceConfiguration.Cloud.cscfg: This is just the file containing your package configuration info, for example Instance Count, OsFamily, ConnectionString and other Setting information.
- ProjectName.Azure.cspkg: This is the package file that contains the guts of your deployment, including all deployable files.
When you package your Azure project, these two files will be created within the directory ./[ProjectName].Azure/bin/[ConfigName]/app.publish/. If you want to build your Azure Project from the command line, it’s as simple as calling MSBuild on the “Publish” target:
msbuild.exe /target:Publish
Windows Azure PowerShell Cmdlets
The last pieces of the puzzle that make CI automation possible are the Azure PowerShell Cmdlets (http://msdn.microsoft.com/en-us/library/windowsazure/jj156055.aspx). These cmdlets are what will let us create deployments without Visual Studio or other user intervention.
Preparing TeamCity for Azure Deployments
Now we are ready to get our TeamCity server setup so it can build and deploy Windows Azure projects, which we now know requires the Azure SDK and the Windows Azure PowerShell Cmdlets.
- Installing the Azure SDK is easy enough, just go to https://www.windowsazure.com/en-us/develop/net/ and click “Install”
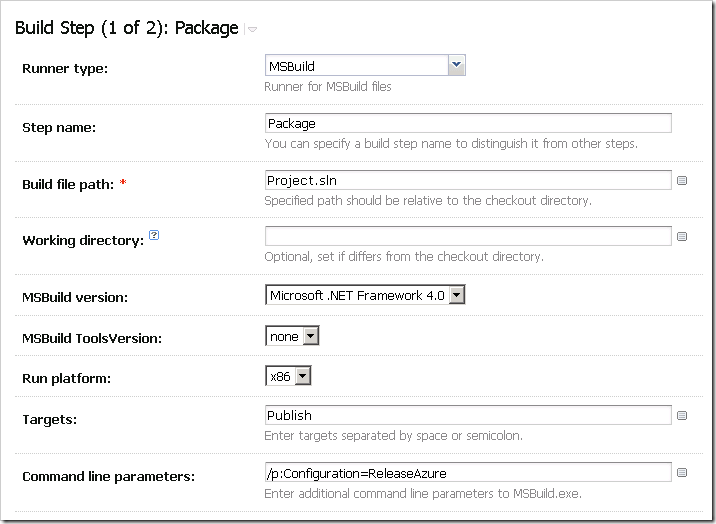
Once this SDK is installed, I recommend running a test build to make sure your project is building correctly. You’ll want to setup your build step using MSBuild with the “Publish” target against your solution file. Mine looks like this:
Assuming the build was successful, you will now have the two *.cspkg and *cscfg files within your build directory. If the build was red (failed), take a look at the build logs and keep an eye out for “unsupported project type” or other build errors, which will need to be addressed before the CI deployment can be completed.
With a successful build we are now ready to install and configure the Windows Azure PowerShell Cmdlets:
- Follow the instructions at http://msdn.microsoft.com/en-us/library/windowsazure/jj554332 to install the Cmdlets and configure PowerShell
- After installing the Cmdlets, you’ll need to get your Azure Subscription Info using the Get-AzurePublishSettingsFile command. Store the resulting *.publishsettings file somewhere you can get to easily, like C:\TeamCity, because you will need to reference it later from your deploy script.
Scripting the CI Deploy Process
Now that the cmdlets are installed on our TeamCity server, we are ready to script the actual deployment using a TeamCity “PowerShell” build runner. Before we look at any code, here’s a breakdown of our deployment algorithm:
- Setup your variables, including the location of the *.cspkg and *cscfg files produced in the earlier MSBuild step (remember, the folder is something like [ProjectName].Azure/bin/[ConfigName]/app.publish/
- Import the Windows Azure PowerShell Cmdlets
- Import and set your Azure Subscription information (this is basically your authentication/authorization step, so protect your settings file
- Now look for a current deployment, and if you find one Upgrade it, else Create a new deployment
Pretty simple and straightforward. Now let’s look at the code (also available as a gist here: https://gist.github.com/3694398):
$subscription = "[Your Subscription Name]"
$service = "[Your Azure Service Name]"
$slot = "staging" #staging or production
$package = "[ProjectName]\bin\[BuildConfigName]\app.publish\[ProjectName].cspkg"
$configuration = "[ProjectName]\bin\[BuildConfigName]\app.publish\ServiceConfiguration.Cloud.cscfg"
$timeStampFormat = "g"
$deploymentLabel = "ContinuousDeploy to $service v%build.number%"
Write-Output "Running Azure Imports"
Import-Module "C:\Program Files (x86)\Microsoft SDKs\Windows Azure\PowerShell\Azure\*.psd1"
Import-AzurePublishSettingsFile "C:\TeamCity\[PSFileName].publishsettings"
Set-AzureSubscription -CurrentStorageAccount $service -SubscriptionName $subscription
function Publish(){
$deployment = Get-AzureDeployment -ServiceName $service -Slot $slot -ErrorVariable a -ErrorAction silentlycontinue
if ($a[0] -ne $null) {
Write-Output "$(Get-Date -f $timeStampFormat) - No deployment is detected. Creating a new deployment. "
}
if ($deployment.Name -ne $null) {
#Update deployment inplace (usually faster, cheaper, won't destroy VIP)
Write-Output "$(Get-Date -f $timeStampFormat) - Deployment exists in $servicename. Upgrading deployment."
UpgradeDeployment
} else {
CreateNewDeployment
}
}
function CreateNewDeployment()
{
write-progress -id 3 -activity "Creating New Deployment" -Status "In progress"
Write-Output "$(Get-Date -f $timeStampFormat) - Creating New Deployment: In progress"
$opstat = New-AzureDeployment -Slot $slot -Package $package -Configuration $configuration -label $deploymentLabel -ServiceName $service
$completeDeployment = Get-AzureDeployment -ServiceName $service -Slot $slot
$completeDeploymentID = $completeDeployment.deploymentid
write-progress -id 3 -activity "Creating New Deployment" -completed -Status "Complete"
Write-Output "$(Get-Date -f $timeStampFormat) - Creating New Deployment: Complete, Deployment ID: $completeDeploymentID"
}
function UpgradeDeployment()
{
write-progress -id 3 -activity "Upgrading Deployment" -Status "In progress"
Write-Output "$(Get-Date -f $timeStampFormat) - Upgrading Deployment: In progress"
# perform Update-Deployment
$setdeployment = Set-AzureDeployment -Upgrade -Slot $slot -Package $package -Configuration $configuration -label $deploymentLabel -ServiceName $service -Force
$completeDeployment = Get-AzureDeployment -ServiceName $service -Slot $slot
$completeDeploymentID = $completeDeployment.deploymentid
write-progress -id 3 -activity "Upgrading Deployment" -completed -Status "Complete"
Write-Output "$(Get-Date -f $timeStampFormat) - Upgrading Deployment: Complete, Deployment ID: $completeDeploymentID"
}
Write-Output "Create Azure Deployment"
Publish
Creating the TeamCity Build Step
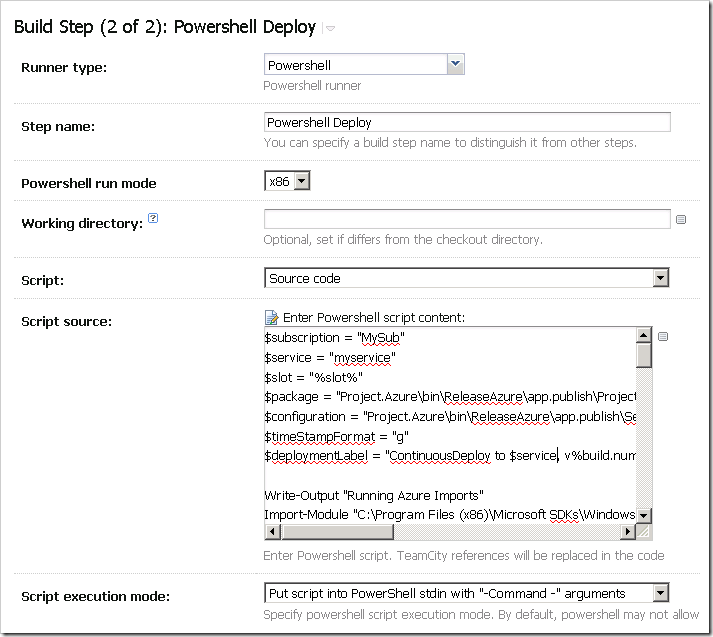
The only thing left is to create a second build step, after your MSBuild “Publish” step, with the build runner type “PowerShell”. Then set your script to “Source Code,” the script execution mode to “Put script into PowerShell stdin with “-Command” arguments” and then copy/paste in the above script (replacing the placeholder sections with your values). This should look like the following:
Wrap Up
After combining the MSBuild /target:Publish step (which creates the necessary Windows Azure *.cspkg and *.cscfg files) and a PowerShell script step which utilizes the Azure PowerShell Cmdlets, we have a fully deployable build configuration in TeamCity. You can configure this step to run whenever you’d like using build triggers – for example, you could even deploy whenever a new master branch deploy comes in and passes all required tests.
In the script I’ve hardcoded that every deployment goes to the Staging environment on Azure, but you could deploy straight to Production if you want to, or even setup a deployment configuration variable and set it as desired.
After your TeamCity Build Configuration is complete, you’ll see something that looks like this:
Whenever you click the “Run” button, all of your code will be compiled, published, and deployed to Windows Azure!
One additional enormous benefit of automating the process this way is that you can easily deploy any specific source control changeset by clicking the little ellipsis button next to "Run.” This will bring up a dialog like the one below, where you can select the last change to use for your deployment. Since Azure Web Role deployments don’t have any rollback functionality, this is a critical feature.
Enjoy!


