ASP.NET MVC Tip #26 – Create a Lightweight Control View Engine
In this tip, I show you how to create a custom ASP.NET MVC view engine that supports lightweight, declarative controls. I show you how to create both simple controls and controls that display database data. I also show you how to test the rendered output of the lightweight controls.
One of the beautiful things about the ASP.NET MVC framework is that a view can look like anything that you want. Don't like inline scripts? You can build a new view engine. Don't like anything that looks like a tag in your views? Build your own view engine. You always have the option of replacing the default Web Forms view engine with your own custom view engine.
In this tutorial, I explain how you can replace the default ASP.NET MVC Web Forms view engine with a custom view engine that supports lightweight, declarative controls. I demonstrate the Control View Engine and show you how to create lightweight controls that work with this custom view engine.
Using the Control View Engine
Let me start by providing you with a walk-through of how the Control View Engine works. To use the Control View Engine, you must set a controller’s ViewEngine property. The HomeController in Listing 1 is configured to use the Control View Engine (take a look at its constructor).
Listing 1 – HomeController.cs
using System.Web.Mvc;
using MvcViewEngines;
namespace Tip26.Controllers
{
[HandleError]
public class HomeController : Controller
{
public HomeController()
{
this.ViewEngine = new ControlViewEngine();
}
public ActionResult Index()
{
return View("Index");
}
}
}
Instead of setting the ViewEngine on a control by control basis, you also could create a new ControllerFactory and set the ViewEngine for every control automatically. To learn how to do this, see ASP.NET MVC Tip #19:
The Control View Engine returns .htm files for its views. The Index.htm view is contained in Listing 2.
Listing 2 – Index.htm
<!DOCTYPE html PUBLIC "-//W3C//DTD XHTML 1.0 Transitional//EN" "http://www.w3.org/TR/xhtml1/DTD/xhtml1-transitional.dtd">
<html xmlns="http://www.w3.org/1999/xhtml" xmlns:my="Tip26.Controls" >
<head>
<title>Lightweight Control View Engine</title>
</head>
<body>
<h1>The SimpleControl says:</h1>
<my:SimpleControl />
<h1>The ColorControl displays:</h1>
<my:ColorControl color="red">
Here is some text
</my:ColorControl>
<hr />
<a href="/Data">Grid Control</a>
</body>
</html>
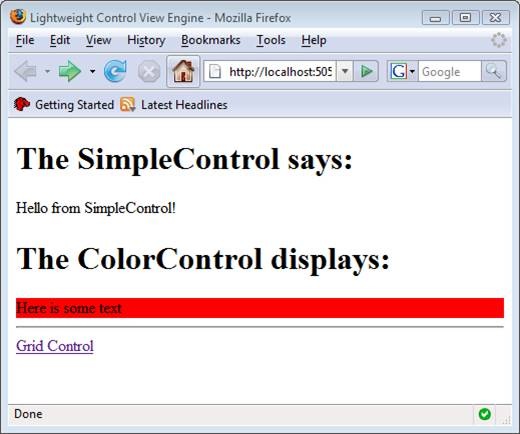
Notice that the HTML document in Listing 2 does not contain any inline script. Instead, it contains two declarative controls named SimpleControl and ColorControl. When the HomeController returns the Index view, you get the page in Figure 1.
Figure 1 – The Index view
.NET Namespace = XHTML Namespace
If you look closely at the Index view in Listing 2 then you will notice that a custom XML namespace is declared on the opening <html> tag. The opening <html> tag looks like this:
<html xmlns="http://www.w3.org/1999/xhtml" xmlns:my="Tip26.Controls" >
The default namespace is the standard XHTML namespace for XHTML documents. The second namespace corresponds to a .NET namespace. The second xmlns attribute associates the SimpleControl and ColorControl controls with the Tip26.Controls namespace. When the page is parsed, the class Tip26.Controls.SimpleControl and the class Tip26.Controls.ColorColor are instantiated automatically. There is no other configuration for the custom controls.
Creating Lightweight Controls
The Control View Engine uses extremely lightweight controls. The SimpleControl is contained in Listing 3.
Listing 3 – SimpleControl.cs
using System;
using System.Web.Mvc;
using MvcViewEngines;
using System.Xml;
namespace Tip26.Controls
{
public class SimpleControl : IControl
{
public XmlNode Render(ViewContext context, XmlDocument document, XmlElement controlElement)
{
return document.CreateTextNode("Hello from SimpleControl!");
}
}
}
The SimpleControl implements the IControl interface. This interface requires you to implement a single method: Render(). In Listing 3, the Render() method simply returns a new XmlElement that represents the text “Hello from SimpleControl!”. The <my:Simple> control is replaced in the Index view with this rendered text.
Notice that the SimpleControl does not derive from the base System.Web.UI.Control class or the System.Web.UI.WebControls.WebControl class. This lightweight control does not use view state. It has none of the standard properties, methods, and events of a WebForm control.
This lightweight control does not participate in the ASP.NET page lifecycle. That would be impossible since the SimpleControl is instantiated in an HTML page instead of an ASP.NET page. The only thing that the SimpleControl does is to create a new XML node.
A lightweight control can have attributes. For example, the ColorControl has a color attribute. Here’s how the ColorControl is declared in the Index.htm view:
<my:ColorControl color="red">
Here is some text
</my:ColorControl>
The code for the ColorControl is contained in Listing 4.
Listing 4 – ColorControl.cs
using System;
using System.Web.Mvc;
using MvcViewEngines;
using System.Xml;
namespace Tip26.Controls
{
public class ColorControl : IControl
{
public XmlNode Render(ViewContext context, XmlDocument document, XmlElement controlElement)
{
// Get color attribute
var color = controlElement.GetAttribute("color");
// Get inner text
var text = controlElement.InnerText;
// Create div node
var div = document.CreateElement("div");
div.InnerText = text;
div.SetAttribute("style", "background-color:" + color);
// Return replacement node
return div;
}
}
}
The ColorControl in Listing 4 first grabs the value of the color attribute. The control then gets the inner text of the control. Finally, the control constructs a new XML element that represents an XHTML div element.
Displaying Database Data
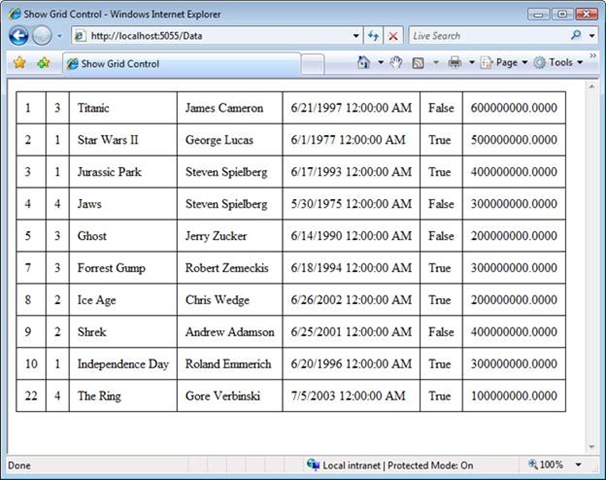
One more sample of a declarative, lightweight control. The view in Listing 5 contains a lightweight control named the Grid control. This control displays an HTML table of database data (see Figure 2).
Figure 2 – Rendered by the Grid Control
Listing 5 – Index.htm
<!DOCTYPE html PUBLIC "-//W3C//DTD XHTML 1.0 Transitional//EN" "http://www.w3.org/TR/xhtml1/DTD/xhtml1-transitional.dtd">
<html xmlns="http://www.w3.org/1999/xhtml" xmlns:custom="Tip26.Controls" >
<head>
<title>Show Grid Control</title>
<style type="text/css">
table
{
border-collapse:collapse;
}
table td
{
padding: 10px;
border: black solid 1px;
}
</style>
</head>
<body>
<custom:Grid controller="Tip26.Controllers.MovieController" action="ListAll" />
</body>
</html>
Notice, once again, that the HTML page in Listing 5 does not contain any inline script. It is a valid XHTML page with no content except XHTML elements.
The view does contain a Grid element that renders the HTML table of database data. Notice that the element has two attributes: controller and action. The Grid control uses these attributes to determine where to get the database data.
The lightweight Grid control is contained in Listing 6.
Listing 6 – Grid.cs
using System;
using System.Collections;
using System.Reflection;
using System.Web.Mvc;
using System.Xml;
using MvcViewEngines;
namespace Tip26.Controls
{
public class Grid : IControl
{
public XmlNode Render(ViewContext context, XmlDocument document, XmlElement controlElement)
{
// Check for required control attributes
string controllerName = controlElement.GetAttribute("controller");
if (String.IsNullOrEmpty(controllerName))
throw new Exception("Grid is missing controller attribute.");
string actionName = controlElement.GetAttribute("action");
if (String.IsNullOrEmpty(actionName))
throw new Exception("Grid is missing action attribute.");
// Instantiate controller
Type controllerType = Type.GetType(controllerName, true, true);
var controller = (IController)Activator.CreateInstance(controllerType);
// Call action (not using Action Invoker)
MethodInfo method = controllerType.GetMethod(actionName, BindingFlags.IgnoreCase | BindingFlags.Public | BindingFlags.Instance);
IEnumerable data = (IEnumerable)method.Invoke(controller, null);
// Create table
XmlElement table = document.CreateElement("table");
foreach (object item in data)
{
var row = document.CreateElement("tr");
var props = item.GetType().GetProperties();
foreach (PropertyInfo prop in props)
{
var cell = document.CreateElement("td");
cell.InnerText = prop.GetValue(item, null).ToString();
row.AppendChild(cell);
}
table.AppendChild(row);
}
return table;
}
}
}
The Grid control instantiates the controller represented by its controller attribute. Next, it invokes the action on the controller represented by its action attribute. The Grid control assumes that the controller action returns an IEnumerable. The control enumerates the data and displays the data in an HTML table.
The Grid control uses the controller in Listing 7.
Listing 7 – MovieController.cs
using System.Linq;
using System.Web.Mvc;
using Tip26.Models;
namespace Tip26.Controllers
{
public class MovieController : Controller
{
public object ListAll()
{
var dataContext = new MovieDataContext();
return dataContext.Movies.ToList();
}
}
}
The MovieController.ListAll() action uses a LINQ to SQL DataContext to retrieve all of the movies from the movies database table. Nothing fancy here.
How the Control View Engine Works
You implement a custom View Engine by implementing the IViewEngine interface. This interface has one required method: RenderView().
The Control View Engine’s RenderView() method is contained in Listing 8.
Listing 8 – ControlViewEngine.RenderView().
public void RenderView(ViewContext viewContext)
{
// Get path of view
string viewPath = ViewLocator.GetViewLocation(viewContext, viewContext.ViewName);
// Get XHTML Document
var document = GetDOMFromViewPath(viewPath);
// Find all non-XHTML elements
var controlElements = GetControlElements(document);
// Instantiate controls
foreach (XmlElement controlElement in controlElements)
RenderControl(viewContext, document, controlElement);
// Write XHTML to response
document.Save(viewContext.HttpContext.Response.Output);
}
The RenderView() method in Listing 8 assumes that the view is an XML (XHTML) compatible view. The view is loaded with the help of the XmlDocument class. Next, all of the non-xhtml elements are retrieved from the view. Anything contained in the view that is not an XHTML element is assumed to be a potential control. The RenderControl() method is used to render the control (see Listing 9).
Listing 9 – ControlViewEngine.RenderControl()
protected virtual void RenderControl(ViewContext context, XmlDocument document, XmlElement element)
{
var controlName = String.Format("{0}.{1}", element.NamespaceURI, element.LocalName);
var controlType = _applicationAssembly.GetType(controlName, false, true);
if (controlType != null)
{
var control = (IControl)Activator.CreateInstance(controlType);
XmlNode resultNode = control.Render(context, document, element);
element.ParentNode.ReplaceChild(resultNode, element);
}
}
The RenderControl() method uses the .NET framework Activator.CreateInstance() method to create an instance of a class that corresponds to the control element. Next, the Render() method is called on the instantiated class to get an XML element. Finally, the original element is swapped for the new XML element.
You can view the entire source code of the Control View Engine by clicking the download link at the end of this tip.
What is Good about the Control View Engine
The Control View Engine is very lightweight. It does not introduce view state, postbacks, or any framework overhead. The Control View Engine simply renders some text.
Some people find working with declarative views more natural than working with inline scripts. If you like inline scripts then the Control View Engine won’t offer much value to you. If you like to build your views with declarative controls, on the other hand, then a view engine like the Control View Engine might be an appealing alternative to the default Web Forms view engine.
Another nice thing about the Control View Engine is that it is very testable. For example, Listing 10 contains a test for the HomeController.Index() action.
Listing 10 – HomeControllerTest.cs
using System;
using System.Collections.Generic;
using System.Linq;
using System.Reflection;
using System.Text;
using System.Web.Mvc;
using Microsoft.VisualStudio.TestTools.UnitTesting;
using MvcViewEngines;
using Tip26;
using Tip26.Controllers;
using MvcFakes;
using System.Web.Routing;
namespace Tip26Tests.Controllers
{
/// <summary>
/// Summary description for HomeControllerTest
/// </summary>
[TestClass]
public class HomeControllerTest
{
private const string appFolder = @"C:\Users\swalther\Documents\Common Content\Blog\Tip26 Create Lightweight Control View Engine\CS\Tip26\Tip26\";
[TestMethod]
public void Index()
{
// Setup Controller
HomeController controller = new HomeController();
// Setup View Engine
var appAssembly = Assembly.GetAssembly(typeof (HomeController));
controller.ViewEngine = new ControlViewEngine(appFolder, appAssembly);
// Fake the Controller Context
var context = new FakeControllerContext(controller);
context.RouteData.Values["controller"] = "home";
context.RouteData.Values["action"] = "index";
// Execute
ViewResult result = controller.Index() as ViewResult;
result.ExecuteResult(context);
// Verify
var page = context.HttpContext.Response.ToString();
StringAssert.Contains(page, "Hello from SimpleControl!");
}
}
}
The test in Listing 10 checks whether the view returned by the HomeController.Index() method contains the text “Hello from SimpleControl!”. This text is rendered by the SimpleControl. When you use the Control View Engine, you can test the view for particular strings that are rendered by controls.
What is Bad about the Control View Engine
The performance of the Control View Engine is bad. I’m not quite sure how bad, but I suspect that it is very, very bad. Each and every time that you render a view with the Control View Engine, the View Engine re-executes each Control class’s Render() method.
I’ve done a little bit of caching. The view is cached in memory after the first request (with a file dependency on the view file). You’ll notice that the first time you request a particular view, it takes a really long time for the view to appear in your web browser.
Summary
The real goal of this post was to convince you that inline scripts are not an essential part of the ASP.NET MVC framework. If you find ASP.NET MVC views hard to read (tag soup) then it is good to know that you always have the option of swapping out the default view engine with a custom view engine. In this tip, I’ve shown you how to go as far in the opposite direction of inline script as possible. I demonstrated how you can create a declarative view engine instead of an inline script view engine.
Download the Code