Starting with LLBLGenPro in your Project
LLBLGenPro is an object relational mapper which generates code for the data access layer from the database, in the coming releases it’s been planned to engineer from LLBL Project to create database. I am using v2.6 in my current project and happy with it so far. One of the strong points of v2.6 is it has good Linq support.
You can also look into other ORMs with Linq support including Entity framework (Microsoft), Linq to SQL (Microsoft) and Subsonic. Entity framework is going through a major overhaul in version 4.0 and can also expect some improvements in Linq to SQL. Subsonic is an open source project maintained by Rob Connery, the MVC-Storefront dude.
And keep in mind that the following article uses LLBLGenPro Professional edition, and checkout their website for more on licensing, etc.
I have arranged the article into the following sections
- Project types: SelfServicing or Adapter paradigm
- Configure the Project using LLBLGenPro Editor
- Generate the Code using Adapter paradigm
- Your VS.Net Solution
- Writing your first test
- Debugging and catalog name overwrites
- Conclusion
1. Project types: SelfServicing or Adapter paradigm
You can create a SelfServicing or Adapter paradigm. In SelfServicing objects are lazy loaded from the database, and once loaded they don’t load again. Adapter pattern doesn’t support lazy loading, and you need to fetch all your objects and save them by yourself. Adapter is best suited if you are providing a service and you don’t expect your client to load them. We will generate project with Adapter paradigm in this write up.
2. Configure the Project using LLBLGenPro Editor
LLBLGenPro comes with an easy to use editor to generate the project from database. Open the LLBLGenPro editor from Programs and create a new project. Provide your project information, choose the appropriate driver and select the catalog to work with.
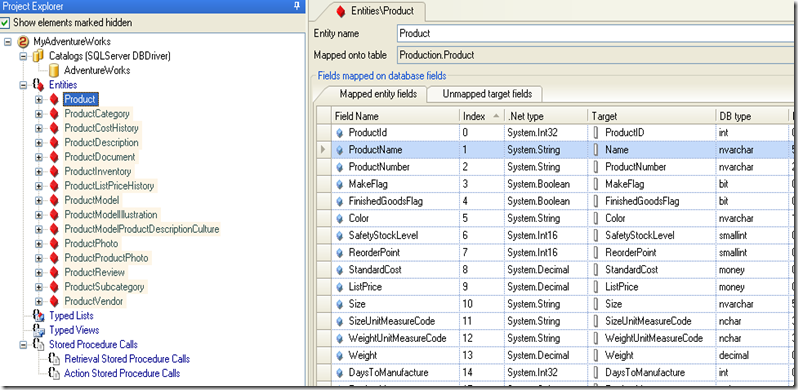
Once you create the project, you will notice your project explorer being updated with the Catalog, gives a skeleton for your entities, views and stored procedures.
You can add entities by choosing ‘Add new entities mapped on tables from Catalog’ on the context menu when you right click on Entities which pops a modal box with the available tables to choose from.
I am interested in Product and it’s related tables, lets add them to the Project. Once you add to the project you can notice your Entities in Project Explorer being updated. And you can also change the Field Names to more meaningful.
On the bottom if you notice the ‘Fields on relations’ tab, the editor has generated the table relations for you by looking at your database Primary/Foreign Key relationships.
The editor is not clever enough to pluralize the relationships, so change them by editing the Field Name.
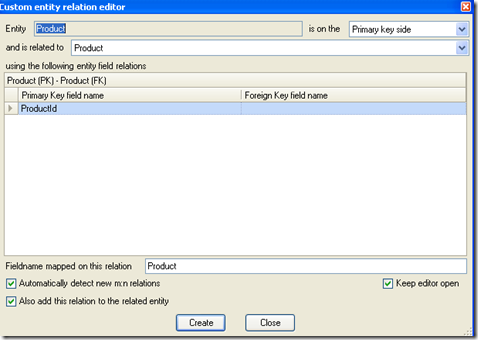
If you feel you need relations that are not provided in the database, you can create them easily using ‘Add new custom 1:1//1:n/m:1 relation’ on the ‘Relations’ tab
Select the tables and fields on which you want to create the relations and you are good to go.
From the Project menu select the Properties and customize the generated code.
I usually set the following properties to my needs:
- CatalogRefresher:-
Add NewElementsAfterRefresh: False (Don’t want to get new tables added automatically to my project) - Name construction:-
EnforcePascalCasingAlways: False
MakeElementNamePascalCasing: False - Output settings:-
RootNamespace: AdventureWorks - Task performers:-
FailCodeGenerationOnWriteError: True (If you use TFS, and the projects are not checked out, you need to enable this option) - CleanUpVsNetProjects: False
Have also changed the Project file suffix names to more meaningful as you can see under ‘Task performers’ in the above image.
3. Generate the Code using Adapter paradigm
Lets jump on and generate the code using Generate on the Project menu.
Make sure select the correct template group, your target platform, language, and location.
4. Your VS.Net Solution
I have Adventureworks solution with 3 projects and lgp.
- Generated projects
- Adventureworks.DAL.Adapter
- Adventureworks.DAL.Domain
- Adventureworks.Tests: Add the project reference to the above projects
For each of the Entities selected through the editor, a separate entity class is generated. Since these classes are generated you don’t want to manually edit them, the editor has template support to customize the code generation, and you can also partial classes to add additional behavior.
5. Writing your first test
With the solution in place, we can write some test cases, finally :)
using System.Linq;
using AdventureWorks.DAL.Adapter;
using AdventureWorks.DAL.Linq;
using NUnit.Framework;
namespace Adventureworks.Tests
{
[TestFixture]
public class GetProductsTestFixture
{
[Test]
public void GetAllProductsTest()
{
DataAccessAdapter adapter = new DataAccessAdapter();
var linq = new LinqMetaData(adapter);
var productQeury = (from p in linq.Product
select p);
var product = productQeury.FirstOrDefault();
Assert.AreNotEqual(product, null);
Assert.AreNotEqual(product.ProductName,null);
}
}
}
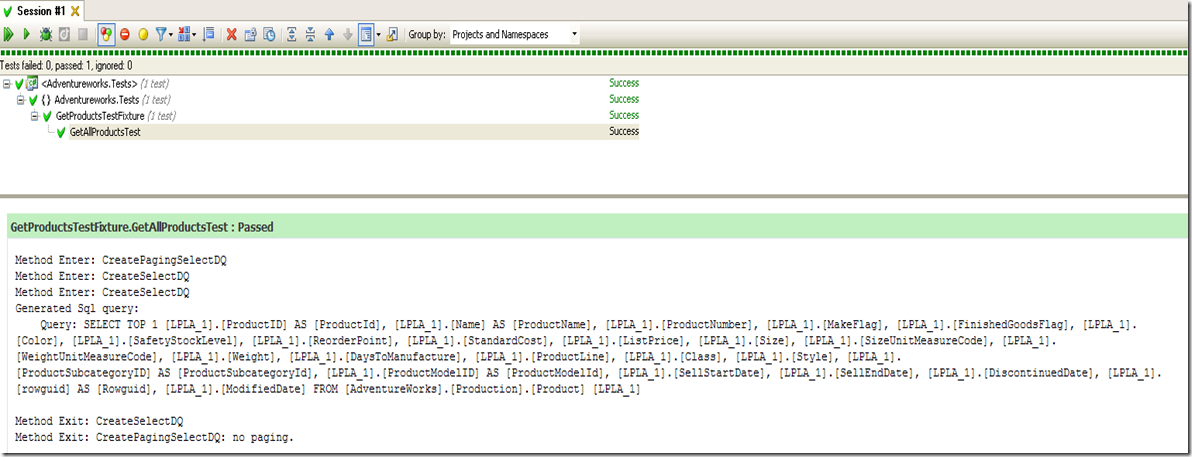
And you can successfully run the test case. My next question is how do I check the SQL generated?
6. Debugging and catalog name overwrites
Debugging:
It is a good practice to look at the SQL query generated to make sure you are getting your Linq statement correctly until you gain handle over it. Even though Linq is part of the language, universal across objects, xml and database entities it doesn’t mean that the constructs supported in Linq to objects are supported in Linq to database. And after all each 3rd party linq provider has their own SQL query generation engine.
LLBLGenPro has support for various databases. For SQL Server and Oracle, you can check the SQL generated by adding the following diagnostics under system.diagnostics tab in your App.Config of the test project. Make sure you rebuild the projects for the changes to be copied to the output directory.
<?xml version="1.0"?>
<configuration>
<system.diagnostics>
<switches>
<add name="SqlServerDQE" value="4" />
</switches>
<!--<switches>
<add name="OracleDQE" value="4"/>
</switches>-->
</system.diagnostics>
</configuration>
I am using Resharper plug-in for Visual Studio to run my rest cases, and you can see the query being generated. Nice :)
Catalog name overwrites:
Before delving into catalog name overwrites, lets me show you how to read the connection string for Adventureworks database using the App.config file
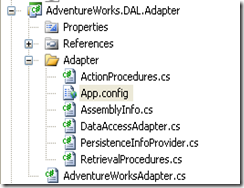
Step 1: Create a custom Adapter which reads the connection string from Configuration file.
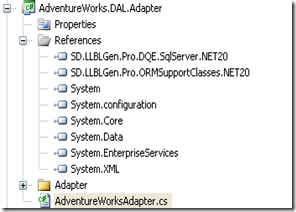
Step 2: Add AdventureWorksAdapter.cs to the AdventureWorks.DAL.Adapter.
Step 3: Fill the AdventureWorksAdapter.cs
using System.Configuration;
namespace AdventureWorks.DAL.Adapter
{
public class AdventureWorksAdapter : DataAccessAdapter
{
public AdventureWorksAdapter(string connectionString)
: base(connectionString)
{
}
public static AdventureWorksAdapter GetAdapter()
{
ConnectionStringSettings connection =
new ConnectionStringSettings("Adventureworks",
ConfigurationManager.AppSettings["Adventureworks.ConnectionString"]);
return new AdventureWorksAdapter(connection.ConnectionString);
}
}
}
Step 4: Update the App.Config file
<?xml version="1.0"?>
<configuration>
<appSettings>
<add key="Adventureworks.ConnectionString" value="data source=.;initial catalog=AdventureWorks;integrated security=SSPI;persist security info=False;packet size=4096"/>
</appSettings>
Step 5: Update the test method to use the AdventureWorksAdapter.cs
[Test]
public void Get_First_Product_Test()
{
//DataAccessAdapter adapter = new DataAccessAdapter();
AdventureWorksAdapter adapter =AdventureWorksAdapter.GetAdapter();
var linq = new LinqMetaData(adapter);
var productQeury = (from p in linq.Product
select p);
var product = productQeury.FirstOrDefault();
Assert.AreNotEqual(product, null);
Assert.AreNotEqual(product.ProductName,null);
}
Now, lets run the test method, it successfully completes. Lets not jump, we have a gotcha here.
If you change your connection string in the App.Config to reference another instance of Adventureworks database, lets call it Test Server, and run the test case. Open the SQL Server Profiler on your Test database, you will not notice any activity from your client.
LLBLGenPro caches the Connection string used to generate the project file, even though your App.Config is pointing to your Test Server.
To suppress the cached connection string you need to overwrite the catalog names.
Catalog Name Overwrites:
Step 6: Update your App.Config with catalog overwrites.
Open your App.Config in AdventureWorks.DAL.Adapter and check the name of your initial catalog
Step 7: Overwrite the initial catalog.
Add config sections for sqlServerCatalogNameOverwrites and it’s values. I am also including commented Oracle catalog name overwrites
Find the complete App.Config below.
<?xml version="1.0"?>
<configuration>
<configSections>
<section name="sqlServerCatalogNameOverwrites" type="System.Configuration.NameValueSectionHandler" />
<!--<section name="oracleSchemaNameOverwrites" type="System.Configuration.NameValueSectionHandler" />-->
</configSections>
<appSettings>
<add key="Adventureworks.ConnectionString" value="data source=.;initial catalog=AdventureWorks;integrated security=SSPI;persist security info=False;packet size=4096"/>
</appSettings>
<system.diagnostics>
<switches>
<add name="SqlServerDQE" value="4" />
</switches>
<!--<switches>
<add name="OracleDQE" value="4"/>
</switches>-->
</system.diagnostics>
<sqlServerCatalogNameOverwrites>
<add key="AdventureWorks" value="" />
</sqlServerCatalogNameOverwrites>
<!--<oracleSchemaNameOverwrites>
<add key="MySchema" value ="" />
</oracleSchemaNameOverwrites>-->
</configuration>
Step 8:
Run the test case again and check the profiler on your Test database, and you will see the query.
7. Conclusion
This shall help you in getting started, starting from using the editor to generate the code –> writing your first test case. In my next post I will cover how to write some complex Linq queries, prefetch data and using stored procedures.
Happy programming.


