Bind Check Boxes to a Collection in MVC
In my last two blog posts I showed you how to use the bootstrap ‘btn-group’ class to create check boxes that are a little nicer looking and easier to use on a mobile device. In addition I showed you how to bind check boxes to individual properties on an entity class. In this blog post you will learn how to create a set of check boxes from a collection of entity classes. You will also learn how to retrieve which check boxes were checked by the user and update the appropriate entity class in the collection with these values.
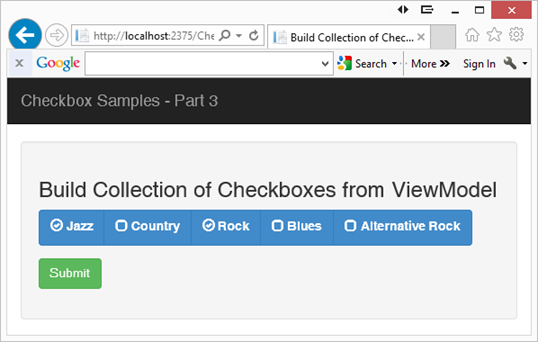
Figure 1: Create checkboxes from a collection of entity classes
Music Genre Class
Create a class for each music genre you wish to display in the check boxes shown in Figure 1. For each genre of music you need a unique id, the string to display and a boolean value for whether or not it was selected. The MusiGener class, shown below contains the appropriate properties along with a constructor to create a MusicGenre instance from values passed to the constructor.
public class MusicGenre
{
public int GenreId { get; set; }
public string Genre {get;set;}
public bool IsSelected { get; set; }
// Constructor to create new MusicGenre object
public MusicGenre(int id, string genre)
{
GenreId = id;
Genre = genre;
IsSelected = false;
}
}
Create View Model Class
Using a View Model class from your controller is an excellent way to get reusability across different UI technologies. A view model is usable from Web Forms, WPF, Windows Phone and even Windows Forms applications. You can also unit test view model classes easily. Create a view model class that builds a collection of musical genres from a database table (or any other data store). Create an instance of this view model in your controller and use this instance as the @model in your .cshtml file.
public class MusicGenreViewModel
{
public MusicGenreViewModel()
{
LoadGenresMock();
}
public List<MusicGenre> Genres { get; set; }
public void LoadGenresMock()
{
// Create mock list of data
// Normally you would load this data from a database
Genres = new List<MusicGenre>();
Genres.Add(new MusicGenre(1, "Jazz"));
Genres.Add(new MusicGenre(2, "Country"));
Genres.Add(new MusicGenre(3, "Rock"));
Genres.Add(new MusicGenre(4, "Blues"));
Genres.Add(new MusicGenre(5, "Alternative Rock"));
}
}
In the view model class, named MusicGenreViewModel, I created a method called LoadGenresMock(). Normally you would call your data layer to get this list of musical genres from a database table, but for this example, I just needed some data to build my list of check boxes, so I hard-coded the values.
Bind to Collection of Musical Genres
Once you have your collection of musical genres loaded into your view model, create an instance of the view model class in your controller. You can optionally set the IsSelected property of any specific genres to true in order to have those check boxes “checked” when the screen first displays. Pass the view model to your View, named CollectionTest, as shown in the code below.
public ActionResult CollectionTest()
{
MusicGenreViewModel vm = new MusicGenreViewModel();
vm.Genres.Find(g => g.Genre == "Jazz").IsSelected = true;
vm.Genres.Find(g => g.Genre == "Rock").IsSelected = true;
return View(vm);
}
View for Collection of Check Boxes
Create a new view in an MVC project, named CollectionTest, and add the @model to use the view model class. To build the list of check boxes you will need to loop through the Genres collection. Each time through the loop is where you need to create each check box from the MusicGenre class. However, since you can’t have two @model statements in a view, create a partial view that you can pass each instance of the MusicGenre class to. The code for the CollectionTest view is shown below:
@model BootstrapCheckBoxes3.MusicGenreViewModel
@using (Html.BeginForm())
{
<div class="well">
<h3>Checkboxes Built from a Collection</h3>
<div class="row">
<div class="col-md-8">
<div class="btn-group" data-toggle="buttons">
@foreach (var item in @Model.Genres)
{
Html.RenderPartial("_CollectionTestGenre", item);
}
</div>
</div>
</div>
<div class="row">
<div class="col-md-12">
<button class="btn btn-success"
type="submit">Submit
</button>
</div>
</div>
</div>
}
Partial View
The partial view, called _CollectionTestGenre, is where you create each check box. Notice that you have a @model in this partial view that is the instance passed in of the MusicGenre class from the main view. In this partial view is where you use the CheckBoxFor() helper method to create the check box. Notice that you will set the ‘value’ attribute of each check box to the GenreId. You will use this value when the data is posted back.
@model BootstrapCheckBoxes2.MusicGenre
<label class="pdsa-checkbox-group btn btn-primary">
<span class="glyphicon glyphicon-unchecked"></span>
@Html.CheckBoxFor(m => m.IsSelected,
new { value = @Model.GenreId })
@Html.LabelFor(x => x.Genre, Model.Genre)
</label>
Posting Collection Back to Controller
Once you have checked and unchecked any of the check boxes, click on the Submit button to post back the form data. As mentioned earlier the ‘value’ attribute of each check box is set to the GenreId. When you check a check box on the form, the value attribute is what is posted back for that check box. All unchecked check boxes will have the value ‘false’ posted back.
The name of each check box is set to IsSelected, so if you call Request.Form[“IsSelected”] you will get back a comma-delimited list of all check boxes that have been selected and not selected. If you check 3 of the check boxes, you get back a string that looks like the following: "1,false,2,false,3,false,false,false". All you have to do is convert this comma-delimited list to an array and find all the numeric values. Take each numeric value and place into an integer array. From this integer array set the appropriate Genre’s IsSelected property to true if the integer value is the same as the GenreId.
As you will most likely be using different check boxes on different web pages, create a generic method to perform this conversion from a string to an integer array. I created a WebCommon class and created a method called RequestSelectionToList(). This method, shown below, uses the Split() method of the string class to separate each value from the comma-delimited list and create an array. The array is then converted to a generic list of string values using the ToList() method. It then loops through this list of string values looking for integer values. For each integer value it finds, it adds that value to a generic integer list.
public class WebCommon
{
public static List<int> RequestSelectionToList(
string values)
{
List<int> ret = new List<int>();
List<string> selected = values.Split(',').ToList();
int value = 0;
// Loop through selected items looking for integer values
foreach (string item in selected)
{
if (int.TryParse(item, out value))
{
ret.Add(value);
}
}
return ret;
}
}
Once you have this class created and this method to extract the list of integer values from the Request.Form[“IsSelected”], you can now use it in the controller. Create a method in your controller to respond to the HttpPost. Write the following code in your controller to set the appropriate IsSelected properties in the Genres collection.
[HttpPost]
public ActionResult CollectionTest(MusicGenreViewModel vm)
{
List<int> selected = WebCommon.
RequestSelectionToList(Request.Form["IsSelected"]);
// Loop through selected items looking for integer values
foreach (int item in selected)
{
// Set the IsSelected property on the appropriate GenreId
vm.Genres.Find(g => g.GenreId == item).IsSelected = true;
}
return View(vm);
}
Summary
Working with check boxes in a collection takes a little more work than just setting individual boolean values in a simple entity class. If you set the ‘value’ attribute to the unique id for each of your check boxes, you will be able to retrieve the unique id from the Request.Form collection. From this you can set your appropriate boolean property to true for each check box selected by your user.
Past Blog Content
Blog Archive
-
2015
-
2014 (18)
-
2013 (11)
-
2012 (19)
-
2011 (29)
-
2010 (19)
-
2009 (28)
-
2008 (0)
-
2007 (14)
-
2006 (6)