Debugging XML Transforms (XSLT) with Visual Studio
XSLT stands for Extensible Stylesheet Language Transformations.
[Update/Note] This post describes the XSLT debugger which is only available in the Professional and Team System versions of Visual Studio.
There is so much to learn in our technical world… and so little time….and for some of us, even fewer brain cells. Alas, such is the life of a nerd/dweeb/geek.
The latest technology I spent brain cells on is XML Transforms. You've probably seen those mysterious little files with the XSLT extensions that do magically wondrous things to XML files.
For traditional developers, XSLT is weird because it's not a traditional procedural language: "Do A, if successful then do B". XSLT uses "templates" with XPATH to select a group of nodes and then formats the selected nodes in the template body. To delve deeper into the document, XSLT uses sub-templates in a recursive tree-like fashion. However, these sub-templates are disjointed hunks of text in the XSLT document so it's difficult to visually comprehend what is going on…at least to an untrained eye.
This post isn't going to explain how XSLT transforms work—it's going to explain how to run them under the Visual Studio Debugger and watch them do their magic. FYI: I only tried this with VS 2008.
For more information on XSLT, go to the WC3 website here.
Here is the XML input file we are going to work with:
<?xml version="1.0" standalone="yes"?>
<Golfers>
<Golfer >
<ID>1</ID>
<Name>Bobby Jones</Name>
<Birthday>1902-03-17</Birthday>
</Golfer>
<Golfer>
<ID>2</ID>
<Name>Sam Snead</Name>
<Birthday>1912-05-27</Birthday>
</Golfer>
<Golfer>
<ID>3</ID>
<Name>Tiger Woods</Name>
<Birthday>1975-12-30</Birthday>
</Golfer>
</Golfers>
Here is the XSLT file we are going to transform it with:
<?xml version="1.0" encoding="UTF-8"?>
<xsl:stylesheet xmlns:xsl="http://www.w3.org/1999/XSL/Transform" version="1.0">
<xsl:output method="xml" indent="yes"/>
<xsl:template match="/Golfers">
<Golfers>
<xsl:apply-templates select="Golfer"/>
</Golfers>
</xsl:template>
<xsl:template match="Golfer">
<xsl:element name="Golfer">
<xsl:attribute name="ID" >
<xsl:value-of select="ID"/>
</xsl:attribute>
<xsl:attribute name="Name" >
<xsl:value-of select="Name"/>
</xsl:attribute>
<xsl:attribute name="Birthday" >
<xsl:value-of select="Birthday"/>
</xsl:attribute>
</xsl:element>
</xsl:template>
</xsl:stylesheet>
The transform file will turn the XML elements into attributes. Why do this? Because the .Net DataSet and DataTable classes seems to prefer XML attributes when reading XML files. And, because after studying XML for a long time, I've come to prefer sub-elements when there is a one-to-many relationship and to prefer attributes when there one-to-one relationship between the elements.
To start, first open up the XSLT file in Visual Studio:
The XML tool bar should appear:

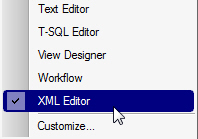
If it doesn't appear, right click on the toolbar area and turn it on:
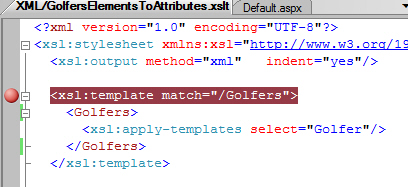
Put a breakpoint in the XSLT file (F9 or use the mouse or use the Debug menu):
Click the Debug XSLT button:

The first time you run it, an open file dialog will prompt you: "Choose Input XML Document."
Note: Subsequently when you run it, the input file will open automatically*.
The standard Debug toolbar will appear. With the toolbar you can start stepping through the transform code. Two synchronized windows will be open:

In the image above, I've clicked 'step' several times. You can see in the right window that the second XML node is being processed.
If you go to the Debug menu and select Locals, you can get more information about what is happening:
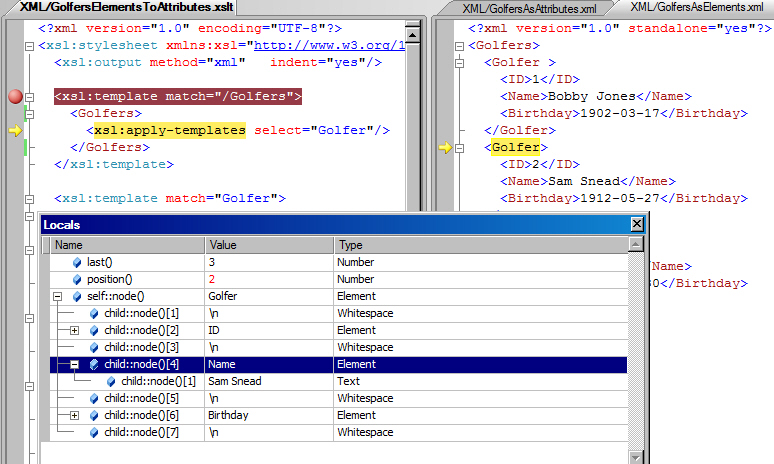
You can do watches and other debugging things while the code is paused. You can see the output file being built in the window behind the input XML window.
When it's all done the new XML file will look like this:
<?xml version="1.0" encoding="utf-8"?>
<Golfers>
<Golfer ID="1" Name="Bobby Jones" Birthday="1902-03-17" />
<Golfer ID="2" Name="Sam Snead" Birthday="1912-05-27" />
<Golfer ID="3" Name="Tiger Woods" Birthday="1975-12-30" />
</Golfers>
As my Canadian friends would say: "That's pretty cool, eh?"
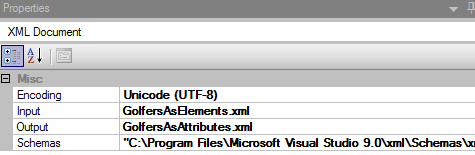
*To override the automatic opening of the XML input file, right click the XSLT file and select properties. You can edit the input and output file paths and names:
That's it. Who knew the Microsoft boys and girls would go to such depths to provide such a powerful tool. It was a pleasant discovery.
I hope someone finds this useful.
Steve Wellens