ASP.NET 3.5 Extensions History Control Tip
Originally introduced in the ASP.NET Futures package, the history control in the ASP.NET 3.5 Extensions preview comes with a few nice additions. One of the updates is the ability to change the page title when adding a history point. This is important because without updating the title, the history list isn't very much help after a few updates. To illustrate the problem, here is what the history list in IE could look like after adding a few history points:

Because all the entries are the same, the user is unable to distinguish between them, leaving the list to be pretty unhelpful.
Adding history from the server
To take advantage of this from the server, you simply include the page title for the new history entry in the AddHistoryPoint method. This will update the page title when you add a history point but it will NOT update it for you when the user clicks the browser Back or Forward buttons. To accommodate for this, you have to set the page title as well in the Navigate event. Here is both the HTML and code-behind for this example:
<asp:ScriptManager ID="TheScriptManager" runat="server" EnableHistory="true" EnableStateHash="false" OnNavigate="TheScriptManager_Navigated" /> <div> <asp:UpdatePanel ID="UpdatePanel1" runat="server"> <ContentTemplate> <asp:Button ID="Button1" runat="server" Text="Button1" OnCommand="Button_OnCommand" CommandArgument="1" /> <asp:Button ID="Button2" runat="server" Text="Button2" OnCommand="Button_OnCommand" CommandArgument="2" /> <asp:Button ID="Button3" runat="server" Text="Button3" OnCommand="Button_OnCommand" CommandArgument="3" /> <hr /> <asp:Label ID="Label1" runat="server" /> </ContentTemplate> </asp:UpdatePanel> </div>
protected void Button_OnCommand(object sender, CommandEventArgs e)
{
    string buttonState = e.CommandArgument.ToString();
    Label1.Text = buttonState;
    string title = "Browser History " + buttonState;
    TheScriptManager.AddHistoryPoint("buttonState", buttonState, title);
}

protected void TheScriptManager_Navigated(object sender, HistoryEventArgs e)
{
    string buttonState = e.State["buttonState"];
    Label1.Text = buttonState;
    Title = "Browser History " + buttonState;
}
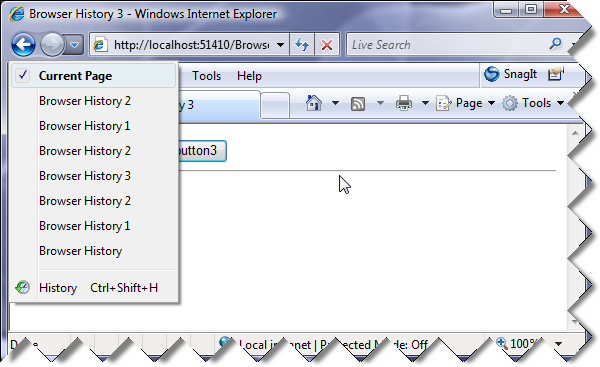
Now, the history list can be used more effectively and will look something like this:

Adding history from the client
The same steps apply to managing history on the client:
- Pass in the page title when adding a history point to update the list and title accordingly.
- Update the page title in the handler for the navigate event.
Here is the code for the client example:
<asp:ScriptManager ID="TheScriptManager" runat="server" EnableHistory="true" EnableStateHash="false" /> <div> <input type="button" value="button1" onclick="button_click(1);" /> <input type="button" value="button2" onclick="button_click(2);" /> <input type="button" value="button3" onclick="button_click(3);" /> <hr /> <span id="results" /> </div>
<script type="text/javascript">

    Sys.Application.add_navigate(onNavigate);

    function onNavigate(sender, args){
        var buttonNumber = args.get_state().pageState || "";
        $get("results").innerHTML = buttonNumber;
        document.title = "Browser History " +  buttonNumber;
    }

    function button_click(buttonNumber){
        $get("results").innerHTML = buttonNumber;
        var historyPoint = { pageState : buttonNumber };
        var title = "Browser History " + buttonNumber;
        Sys.Application.addHistoryPoint(historyPoint, title);
    }

</script>
Hope someone finds this interesting. :)