Creating Custom AngularJS Directives Part 2 – Isolate Scope

New to AngularJS? Check out the AngularJS in 60-ish Minutes video to get a jumpstart on using the framework to build Single Page Applications (SPAs). Also check out my AngularJS JumpStart and AngularJS Custom Directives video training courses.
|

|

|
Creating Custom AngularJS Directives Series
- The Fundamentals
- Isolate Scope
- Isolate Scope and Function Parameters
- Transclusion and Restriction
- The link() Function (coming soon)
- Using Controllers
- Creating a Unique Value Directive using $asyncValidators
In the first post in this series I introduced custom directives in AngularJS and showed a few simple examples of getting started. In this post we’re going to explore the topic of Isolate Scope and see how important it is when building directives.
What is Isolate Scope?
Directives have access to the parent scope by default in AngularJS applications. For example, the following directive relies on the parent scope to write out a customer object’s name and street properties:
angular.module('directivesModule').directive('mySharedScope', function () {
    return {
        template: 'Name: {{customer.name}} Street: {{customer.street}}'
    };
});
Although this code gets the job done, you have to know a lot about the parent scope in order to use the directive and could just as easily use ng-include and an HTML template to accomplish the same thing (this was discussed in the first post). If the parent scope changes at all the directive is no longer useful.
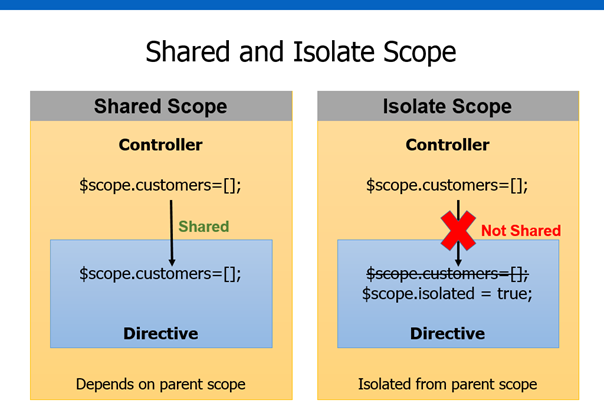
If you want to make a reuseable directive you can’t rely on the parent scope and must use something called Isolate Scope instead. Here’s a diagram that compares shared scope with isolate scope:
Looking at the diagram you can see that shared scope allows the parent scope to flow down into the directive. Isolate scope on the other hand doesn’t work that way. With isolate scope it’s as if you’re creating a wall around your directive that can’t be penetrated by the parent scope. Here’s a (silly) visual of that concept just in case you need further clarification:
Creating Isolate Scope in a Directive
Isolating the scope in a directive is a is a simple process. Start by adding a scope property into the directive as shown next. This automatically isolates the directive’s scope from any parent scope(s).
angular.module('directivesModule').directive('myIsolatedScope', function () {
    return {
        scope: {},
        template: 'Name: {{customer.name}} Street: {{customer.street}}'
    };
});
Now that the scope is isolated, the customer object from the parent scope will no longer be accessible. When the directive is used in a view it’ll result in the following output (notice that the customer name and street values aren’t rendered):
Name: Street:
Since the directive is now completely cut-off from the parent scope how do we pass data into the directive for data binding purposes? You use @, =, and & characters which seems a bit strange at first glance but isn’t too bad once you understand what the characters represent. Let’s take a look at how these characters can be used in directives.
Introducing Local Scope Properties
Directives that use isolate scope provide 3 different options to interact with the outside world (the world on the other side of the wall). The 3 options are referred to as Local Scope Properties and can be defined using the @, =, and & characters mentioned earlier. Here’s how they work.
@ Local Scope Property
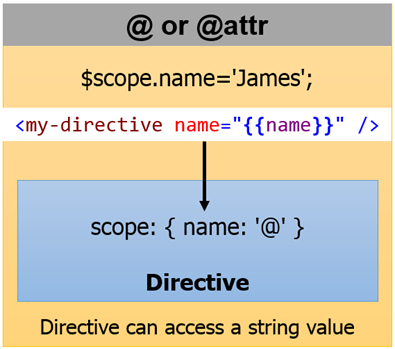
The @ local scope property is used to access string values that are defined outside the directive. For example, a controller may defined a name property on the $scope object and you need to get access to that property within the directive. To do that, you can use @ within the directive’s scope property. Here’s a high level example of that concept with a step-by-step explanation:
- A controller defines $scope.name.
- The $scope.name property value needs to be passed into the directive.
- The directive creates a custom local scope property within its isolate scope named name (note that the property can be named anything and doesn’t have to match with the $scope object’s property name). This is done using scope { name: ‘@’ }.
- The @ character tells the directive that the value passed into the new name property will be accessed as a string. If the outside value changes the name property in the directive’s isolate scope will automatically be updated.
- The template within the directive can now bind to the isolate scope’s name property.
Here’s an example of putting all of the steps together. Assume that the following controller is defined within an app:
var app = angular.module('directivesModule', []);

app.controller('CustomersController', ['$scope', function ($scope) {
    var counter = 0;
    $scope.customer = {
        name: 'David',
        street: '1234 Anywhere St.'
    };

    $scope.customers = [
        {
            name: 'David',
            street: '1234 Anywhere St.'
        },
        {
            name: 'Tina',
            street: '1800 Crest St.'
        },
        {
            name: 'Michelle',
            street: '890 Main St.'
        }
    ];

    $scope.addCustomer = function () {
        counter++;
        $scope.customers.push({
            name: 'New Customer' + counter,
            street: counter + ' Cedar Point St.'
        });
    };

    $scope.changeData = function () {
        counter++;
        $scope.customer = {
            name: 'James',
            street: counter + ' Cedar Point St.'
        };
    };
}]);
The directive code creates an isolate scope that allows a name property to be bound to a value that is passed in from the “outside world”:
angular.module('directivesModule').directive('myIsolatedScopeWithName', function () {
    return {
        scope: {
            name: '@'
        },
        template: 'Name: {{ name }}'
    };
});
The directive can be used in the following way:
<div my-isolated-scope-with-name name="{{ customer.name }}"></div>
Notice how the $scope.customer.name value from the controller is bound to the name property of the directive’s isolate scope. The content rendered by the directive is shown next:
Name: David
As mentioned earlier, if the $scope.customer.name value changes, the directive will automatically pick up the change. However, if the directive changes its name property, the outside value in $scope.customer.name will not change in this case. If you need to keep properties in-sync check out the = local scope property that’s covered next.
It’s important to note that if you want the local scope property name to be different from the property name used when the directive is defined in a view that you can use the following alternate syntax:
angular.module('directivesModule').directive('myIsolatedScopeWithName', function () {
    return {
        scope: {
            name: '@someOtherName'
        },
        template: 'Name: {{ name }}'
    };
});
In this case the name property will be used internally within the directive while someOtherName will be used by the consumer of the directive to pass data into it:
<div my-isolated-scope-with-name someOtherName="{{ customer.name }}"></div>
I prefer to keep local scope property names the same as the attributes defined on the directive in a view so I don’t typically use this approach. However, there may be situations where you need this flexibility. It’s available when using @, =, and & to define local scope properties.
= Local Scope Property
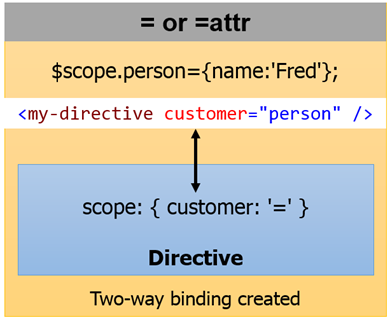
The @ character works well for accessing a string value that is passed into a directive as shown in the previous example. However, it won’t keep changes made in the directive in-sync with the external/outer scope. In cases where you need to create a two-way binding between the outer scope and the directive’s isolate scope you can use the = character. Here’s a high level example of that concept with a step-by-step explanation:
- A controller defines a $scope.person object.
- The $scope.person object needs to be passed into the directive in a way that creates a two-way binding.
- The directive creates a custom local scope property within its isolate scope named customer. This is done using scope { customer: ‘=’ }.
- The = character tells the directive that the object passed into the customer property should be bound using a two-way binding. If the outside property value changes then the directive’s customer property should automatically be updated. If the directive’s customer property changes then the object in the external scope should automatically be updated.
- The template within the directive can now bind to the isolate scope’s customer property.
Here’s an example of a directive that uses the = local scope property to define a property in the isolate scope.
angular.module('directivesModule').directive('myIsolatedScopeWithModel', function () {
    return {
        scope: {
            customer: '=' //Two-way data binding
        },
        template: '<ul><li ng-repeat="prop in customer">{{ prop }}</li></ul>'
    };
});
In this example the directive takes the object provided to the customer property and iterates through all of the properties in the object using ng-repeat. It then writes out the property values using <li> elements.
To pass data into the directive the following code can be used:
<div my-isolated-scope-with-model customer="customer"></div>
Notice that with the = local scope property you don’t pass {{ customer }} as with @. You instead pass the name of the property directly. In this example the customer object passed into the directive’s customer local scope property comes from the controller shown earlier. The directive iterates through all of the properties in the customer object using ng-repeat and writes them out. This yields the following output:
- David
- 1234 Anywhere St.
& Local Scope Property
At this point you’ve seen how to use local scope properties to pass values into a directive as strings (@) and how to bind to external objects using a two-way data binding technique (=). The final local scope property uses the & character and is used to bind to external functions.
The & local scope property allows the consumer of a directive to pass in a function that the directive can invoke. For example, let’s assume you’re writing a directive and as the end user clicks on a button that the directive emits you want to notify the controller. You can’t hard-code the click function to use in the directive since the controller would never know that anything happened. Raising an event could get the job done (using $emit or $broadcast) but the controller would have to know the specific event name to listen for which isn’t optimal either.
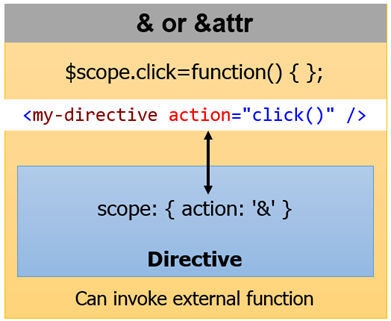
A better approach would be to let the consumer of the directive pass in a function that the directive can invoke as it needs. Whenever the directive does useful work (such as detecting when a user clicked on a button) it could then invoke the function that was passed into it. That way the consumer of the directive has 100% control over what happens and the directive simply delegates control to the function that was passed in. Here’s a high-level example of that concept with a step-by-step example:
- A controller defines a $scope.click function.
- The $scope.click function needs to be passed into the directive so that the directive can invoke it when a button is clicked.
- The directive creates a custom local scope property within its isolate scope named action. This is done using scope { action: ‘&’ }. In this example action is really just an alias for click. When action is invoked the click function that was passed in will be called.
- The & character is basically saying, “Hey, pass me a function that I can invoke when something happens inside of the directive!”.
- The template within the directive may contain a button. When the button is clicked the action (which is really a reference to the external function that was passed in) can then be invoked.
Here’s an example of the & local scope property in action:
angular.module('directivesModule').directive('myIsolatedScopeWithModelAndFunction', function () {
    return {
        scope: {
            datasource: '=',
            action: '&'
        },
        template: '<ul><li ng-repeat="prop in datasource">{{ prop }}</li></ul> ' +
                  '<button ng-click="action()">Change Data</button>'
    };
});
Notice that the following code from the directive’s template refers to the action local scope property and invokes it (since it’s simply a reference to a function) as the button is clicked. This delegates control to whatever function was passed to action.
<button ng-click="action()">Change Data</button>
Here’s an example of using the directive. I’d of course recommend picking a shorter name for your “real life” directives.
<div my-isolated-scope-with-model-and-function
     datasource="customer"
     action="changeData()">
</div>
The changeData() function passed into the action property is defined in the controller shown at the beginning of this post. It changes the name and address when invoked:
$scope.changeData = function () {
      counter++;
      $scope.customer = {
          name: 'James',
          street: counter + ' Cedar Point St.'
      };
};
Conclusion
At this point in the custom AngularJS directives series you’ve seen several of the key aspects available in directives such as templates, isolate scope, and local scope properties. As a review, isolate scope is created in a directive by using the scope property and assigning it an object literal. Three types of local scope properties can be added into isolate scope including:
- @ Used to pass a string value into the directive
- = Used to create a two-way binding to an object that is passed into the directive
- & Allows an external function to be passed into the directive and invoked
Subscribe to my Free FlipBoard Magazines: | ||||
 |  |  |  |  |

