Disabling Client Side Validation For Disabled Input Controls In ASP.NET MVC
Introduction:
Client side validation always saves a lot of time and bandwidth, because it take place on the client side and the user is immediately informed that they've gone wrong in filling out the form before the form is posted back to the server. ASP.NET includes a set of server validation controls for web form since it's first version. On the other hand in ASP.NET MVC 1 not have any built-in support for client side validation. ASP.NET MVC 2 fills this gap by supporting client side validation via Data Annotation. This work's very nicely. By default client side validation in ASP.NET MVC 2 validate all input controls including disabled controls. This may be good for some one but may be not good for some one else. Therefore in this article I just shows how to tell ASP.NET MVC 2 client library to not validate disabled controls.
Description:
By default ASP.NET MVC 2 framework uses MicrosoftMvcValidation.js script file to validate client inputs. To see how to set up client side validation in ASP.NET MVC 2 see this.
So let's create a new ASP.NET MVC 2 Project. After creating the project just add a new class Product.cs inside Model folder and add the following code.
04 | [StringLength(10, ErrorMessage = "Name max length is 10")] |
05 | public string Name { get; set; } |
07 | [Required(ErrorMessage = "Description is required")] |
08 | public string Description { get; set; } |
10 | [Required(ErrorMessage = "Unit Price is required")] |
11 | [RegularExpression(@"^\$?\d+(\.(\d{2}))?$", ErrorMessage = "Unit Price Format is wrong")] |
12 | public decimal UnitPrice { get; set; } |
This simply add a Product class with three properties and decorate these properties with Data Annotation validation attributes. Next, open your HomeController.cs and add action methods for Product which simply returns the Product view (note that I am not intended to show server validation here, but keep in mind that server validation is necessary).
1 | public ActionResult Product() |
6 | public ActionResult Product(Product a) |
And here is the Product's view
01 | <%@ Page Title="" Language="C#" MasterPageFile="~/Views/Shared/Site.Master" Inherits="System.Web.Mvc.ViewPage<Mvc.Models.Product>" %> |
03 | <asp:Content ID="Content1" ContentPlaceHolderID="TitleContent" runat="server"> |
07 | <asp:Content ID="Content2" ContentPlaceHolderID="MainContent" runat="server"> |
08 | <% Html.EnableClientValidation(); %> |
09 | <%using (Html.BeginForm()){ %> |
16 | <%=Html.TextBoxFor(a => a.Name)%> |
19 | <%=Html.ValidationMessageFor(a => a.Name)%> |
22 | <input type="checkbox" onclick="$get('Name').disabled=this.checked" /> |
30 | <%=Html.TextBoxFor(a => a.Description)%> |
33 | <%=Html.ValidationMessageFor(a => a.Description)%> |
36 | <input type="checkbox" onclick="$get('Description').disabled=this.checked" /> |
44 | <%=Html.TextBoxFor(a => a.UnitPrice)%> |
47 | <%=Html.ValidationMessageFor(a => a.UnitPrice)%> |
50 | <input type="checkbox" onclick="$get('UnitPrice').disabled=this.checked" /> |
55 | <td colspan="3" align="center"> |
56 | <input type="submit" name="A"/> |
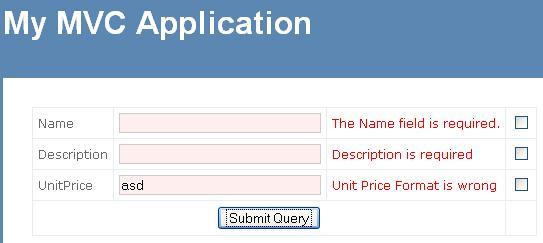
Product view simply enable client side validation and add the necessary controls needed to show the product data and thier validation as well as a checkbox for every input control to enable or disable their corresponding input control.
Note that all the script files needed to enable client side validation is added in Site.Master file. Now, when you run your application you will see that client side validation will always validate a input control whether you enable or disable this input control. To validate only enable controls just open MicrosoftMvcValidation.debug.js(I had referenced the debug version in Site.Master) and then replace the following text,
1 | if (!Sys.Mvc._validationUtil.stringIsNullOrEmpty(errorMessage)) { |
2 | Array.add(errors, errorMessage); |
with this,
1 | var inptEl = $get(context.fieldContext.elements[0].id); |
2 | if (!Sys.Mvc._validationUtil.stringIsNullOrEmpty(errorMessage) && !inptEl.disabled) { |
3 | Array.add(errors, errorMessage); |
6 | Sys.UI.DomElement.removeCssClass(inptEl, Sys.Mvc.FieldContext._inputElementErrorCss); |
It is not doing any thing special, just checking whether the control is disabled and if yes then removes the input-validation-error CSS class and not add current errorMessage into errors array.
Just save the script file and run your application again you will see that it only validate those input controls which are enabled.

and not validate those input controls which are disabled.

Summary:
There are lot of occasions in which developers allow the users to enable or disable input controls. In such situation there is a need to not validate those input controls which are disabled. In this article I just modified 2-3 lines of MicrosoftMvcValidation.debug.js script file to make it only validate enabled controls. I hope you may find this useful for some specific scenarios.

