Archives
-
Final Flower

Winter is on the horizon….
-
Remote Desktops MMC Snap-in on Windows 7
Windows Server 2008 has a nice MMC Snap-in called “Remote Desktops” which provides a tree view of all of the Remote Desktop Connections for the various servers that you manage and then allows you to switch between them easily by just clicking on one of them in the tree view. Windows 7 does not have this snap-in built-in by default but you can get it from the Remote Server Administration Tools update for Windows 7. Below are instructions on how to configure your Windows 7 computer to use the Remote Desktops MMC Snap-in.
Download and install the Remote Server Administration Tools for Windows 7 - http://www.microsoft.com/download/en/details.aspx?id=7887.
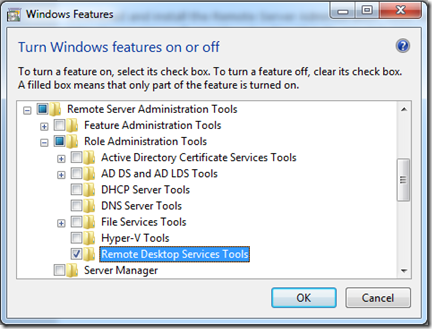
Browse to Control Panel > Programs > Turn Windows features on or off.
Scroll down to the “Remote Server Administration Tools” > “Role Administration Tools”.
Check the “Remote Desktop Services Tools” checkbox.
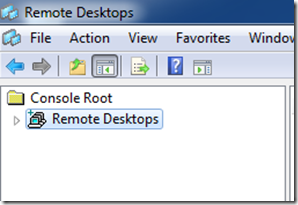
Now you will have the Remote Desktops Snap-in which allows you to have a tree view of the various Windows servers that you manage.
Start > Run > mmc.exe
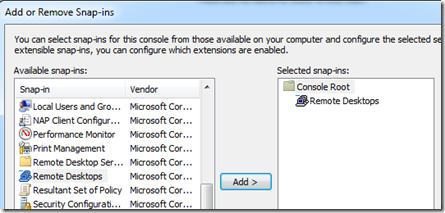
File > Add/Remove Snap-in…
And then add the Remote Desktops snap-in:
-
The configuration section 'system.web.extensions' cannot be read because it is missing a section declaration
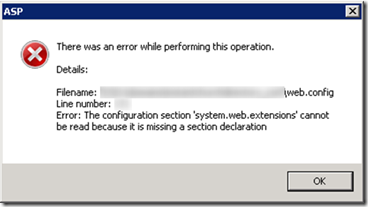
After upgrading an ASP.NET application from .NET Framework 3.5 to .NET Framework 4.0 I ran into the following error message dialog when trying to view any of the modules in IIS on the server.
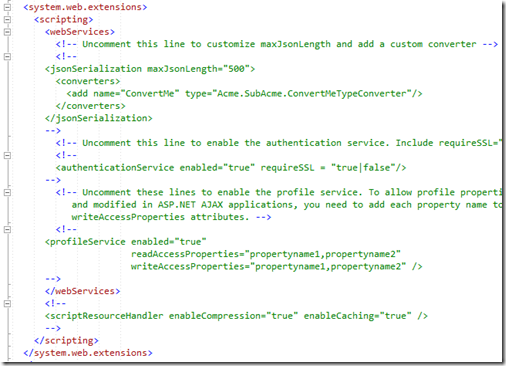
What happened is during the upgrade, the web.config file was automatically converted for .NET Framework 4.0. This left behind an empty system.web.extensions section:
It was an easy fix to resolve, just remove the unused system.web.extensions section.
ERROR DIALOG TEXT:
---------------------------
ASP
---------------------------
There was an error while performing this operation.
Details:
Filename: \\?\web.config
Line number: 171
Error: The configuration section 'system.web.extensions' cannot be read because it is missing a section declaration
---------------------------
OK
--------------------------- -
Interop type 'AssemblyName.ClassName' cannot be embedded
I recently upgraded some Visual Studio 2008 projects to Visual Studio 2010. Most everything went very smoothly but I did run into one issue with some COM assemblies that were part of the project.
At first the ASP.NET Web Application project built without issues, but then I ran into this error when visiting one of the pages:
Could not load file or assembly 'Interop.AssemblyName' or one of its dependencies. An attempt was made to load a program with an incorrect format.
Description: An unhandled exception occurred during the execution of the current web request. Please review the stack trace for more information about the error and where it originated in the code.
Exception Details: System.BadImageFormatException: Could not load file or assembly 'Interop.AssemblyName' or one of its dependencies. An attempt was made to load a program with an incorrect format.My solution to this issue was to remove the COM Assembly from the Visual Studio references and then to add it back in. (I am not sure this was the proper solution but it worked.)
But then when I added the COM assembly back into the project as a reference I could not build the project with errors such as:
Interop type 'AssemblyName.ClassName' cannot be embedded. Use the applicable interface instead.
And others indicating that the project was not seeing the reference to the COM assembly. Luckily this StackOverflow question (Interop type cannot be embedded) had the answer.
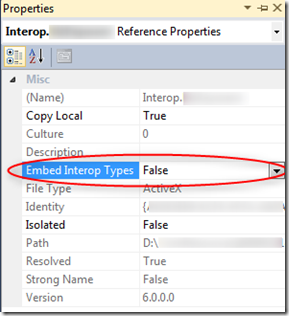
The solution is to change a property on the referenced COM assembly. To do this, in your Visual Studio 2010 project expand the References section and right-click on the COM assembly and select Properties. This will bring up the Properties dialog for the COM assembly reference.
Just change the “Embed Interop Types” property from True to False. Now just rebuild your project and everything will be working.
UPDATE (2011-12-13): The above solution to remove the assembly and then add it back and then set the Embed Interop Type to false does resolve the issue but the problem is that after a Visual Studio 2008 project is upgraded to Visual Studio 2010 there is not EmbedInteropTypes element in the COMReference node in the Visual Studio project XML. And also there is not a PlatformTarget node in the build configuration (see next item).
By default the Visual Studio Properties Dialog shows no value as false. The missing element is probably causing an issue elsewhere during the compilation. The easy fix, instead of removing and adding the COM Interop assemblies back in, is to just toggle the Embed Interop Types property from False to True and then back to False. This will put the element in the COMReference properties (as shown below in the screenshot) and then everything else will continue to work.
In addition I have found that you need to toggle the Platform Target:
Just change it to one of the other values and then change it right back to “Any CPU”. This will insert the appropriate PlatformTarget element in the project file (see screenshot below). Make sure you do this for all build configuration (and not just the debug).
