Looking Forward to Window Clippings 2.1

I haven’t been able to work on Window Clippings too much over the last month as I’ve been focusing on my day job as well as other projects such as a new column for MSDN Magazine starting next month. I am however planning the 2.1 release of Window Clippings and thought I’d quickly let you know what’s tentatively in store! As always your feedback is very much valued and helps drive the direction of this product.

This is mostly a minor release (as indicated by the version number) but there are a few new features/improvements that folks have requested. Check out the following screenshot illustrating the capture screen’s new context menu.

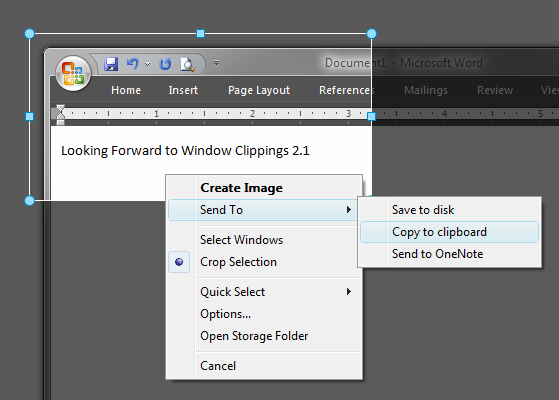
As you can see, I’ve added a few more convenience functions that folks have requested.

The new “Send To” submenu allows you to override the default action sequence and instead direct the captured image to a single “Send To” action. This is handy if you’re frequently needing to change the destination of your images and don’t want to reconfigure Window Clippings every time.

You should also notice the addition of “Open Storage Folder” that was previously only available from the notification icon’s context menu.

The selection mode is now persistent. So if you change the selection mode from “Select Windows” to “Crop Selection”, the next time you open the capture screen it will default to “Crop Selection”.

This release will also likely include a few more built-in add-ins. Currently I’m considering providing a built-in version of the “Add watermark” .NET add-in that I released as a sample add-in with source code. I’m also considering providing a “Send to Amazon S3” add-in that will automate the process of sending images to Amazon’s S3 storage service.

Other than those features and improvements it will include a variety of minor bug fixes and performance improvements that I have made along the way.

I look forward to hearing what you think of this upcoming release.

© 2007 Kenny Kerr

6 Comments

  • I encountered a problem at home the other day. Perhaps it is already catered for in some way, but if not you might consider some way to cater for this in the next release.

    I prefer to use a hotkey to initiate clipping and have configured Ctrl+PrtScn as my hotkey. This works fine on my computer at work but not so well on the one at home. The reason is that while I have a Microsoft Natural Ergonomic Keyboard 4000 at work I have an earlier Microsoft Natural Keyboard at home, and they differ in their handling of the PrtScn/ScrLk/Pause keys. These are the keyboards with the F-key values printed on the front faces of the keyboard allowing normal people to use them as traditional function keys while others (presumably there are some) use the functions (help, redo, undo, etc.) printed on the key tops. To get the traditional funtion key bahaviour the F Lock key needs to be engaged. The problem is that while the later keyboards have prevented the F Lock from affecting the PrtScn/ScrLk/Pause keys and the PrtScn key works regardless of its state, this is not true of the earlier keyboards. On the earlier keyboards the PrtScn key only registers when the F Lock key is off. As I always have it on this means I need to disengage the F Lock to make a clipping and then reengage it again. These extra key strokes negate the benefit of having a hotkey.

    One way I can see of getting around this would be to allow the user to choose any hotkey they wish but perhaps you have a better way of getting around the problem.

  • Steve: thanks for the feedback! Those older F-lock keyboards are a real pain. I now only use the Natural 4000 and it’s great.

    One solution for using an alternative hotkey is to create a shortcut to WindowClippings.exe on your desktop. Open the Properties window for the shortcut and set the hotkey on the Shortcut tab. You can then launch Window Clippings with whatever hotkey you wish.

  • Thanks Kenny, that sounds like a good workaround.

  • Max: thanks for the feedback. Saving the default selection mode is already in the upcoming 2.1 release. Freehand selection is also in the works.

  • Hi Kenny,
    I got Clippings v2.0.28 and its great. However, I've been trying to take a screenshot of the view you get in Visual Studio when you're drag-docking, say, Solution Explorer to a different area of the VS main window. Five 'icons' appear which you drag your cursor onto to auto dock the explorer window. Try as I mgith though with the various clippings options, I can't figure out how to get a capture with those five icons showing? Any tips?

    Thanks, dan

  • Dan Maharry: do you mean something like this?
    This takes advantage of a number of Window Clippings 2.0 features including some which require registration.
    First you need to set the “Delay before capture” option on the Image tab. This gives you a few seconds *after* you selected the desired windows to set up the “scene” appropriately. You then select both the Solution Explorer as well as Visual Studio’ main window using the Ctrl key to include them both. Then you begin the capture by double-clicking or right clicking and selecting “Create Image”. The countdown timer will begin and be visible at the bottom-right corner of your work area. This corresponds to the “Delay before capture” setting. Now hold down the mouse on the Solution Explorer title bar to activate the position icons in Visual Studio and wait for the timer to reach zero. At this point the image will be capture.
    Hope that helps.

Comments have been disabled for this content.