Using Window Clippings
As a first-time user, it may not be obvious how to get started or how to discover all the features that Window Clippings provides. This article presents an introduction to using Window Clippings 1.5 as well as a handy reference of all the settings that it provides for customizing its behavior and the resulting images it creates.
Tutorial
Window Clippings allows you to select any top-level window and capture an image of it. To begin, simply double-click the Window Clippings icon in the notification area (next to the Clock) or press the keyboard hot key that you configured using the Window Clippings options (discussed later in this article). At this point, the entire screen, or screens if you have multiple monitors, will appear to be blurred or under a shadow. On Windows Vista with the “Enable transparent glass” option enabled, the entire screen will appear as if you are looking through translucent glass. In other cases, it will simply appear darkened.
At this point, you are free to double click any top-level window and the window clipping will be created automatically based on your selection. Alternatively, you can single-click a window and the window will appear highlighted.
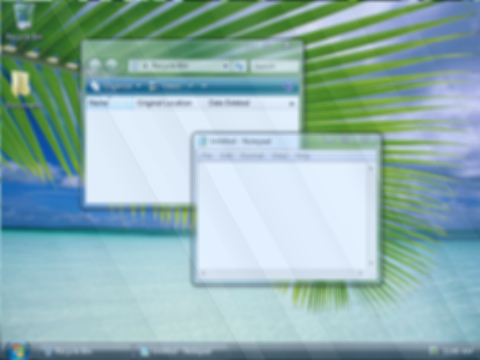
As you can see in the screen shot above, there are two windows on the screen but neither is especially clear. Now left-click one of the windows and you will notice that it is highlighted and appears perfectly clear:
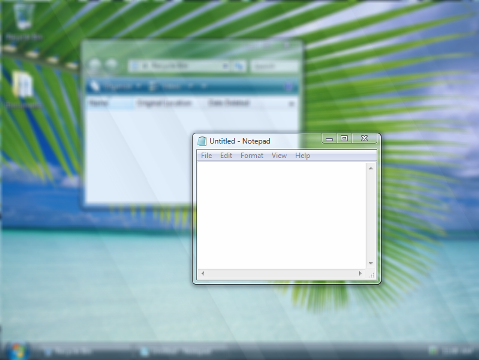
If you are happy that this is the window you would like to capture, go ahead and double click it. Alternatively, you can right-click the window and a context menu will appear providing options to override the default actions. If this is not the window you would like to capture then you are free to left-click another window and Window Clippings will bring it to the front and highlight it as shown here:

Notice how the new selection is now in the foreground and highlighted while the previous selection is now behind the “glass”. In this way, Window Clippings lets you pick just the right window to capture.
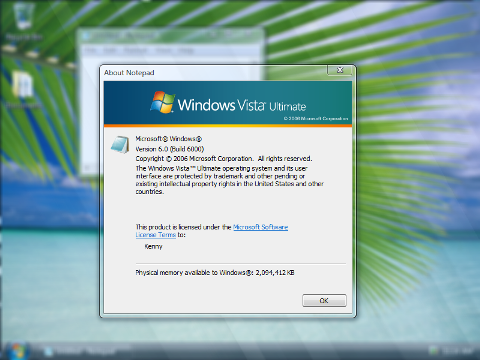
Another option that you can take advantage of is to include the parent window in a selection. Consider the following selection that has highlighted Notepad’s About box:
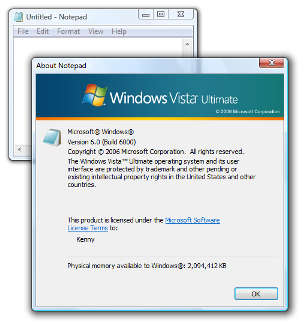
If you want to include the main Notepad window itself in the selection, you only need to hold the Shift key while clicking the window. Window Clippings will automatically determine the selected window’s parent and highlight it as well, as illustrated here:

Keep in mind that if you double-click the window to finally capture it you will also need to hold the Shift key while doing so otherwise the selection will revert back to just including the child window. Here is the result of including the parent window by holding the Shift key:
Main Context Menu
The Window Clippings main context menu can be displayed by right clicking the icon in the notification area.
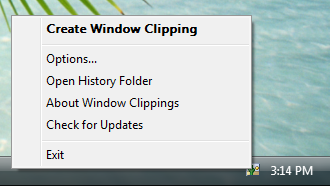
Create Window Clipping
This command starts the process of creating a new window clipping. Since this is the most common operation, it is highlighted in bold and is also available by simply double-clicking the icon in the notification area.
Options…
This command opens the Window Clippings Options window where all the settings can be configured.
Open History Folder
This command opens the file system folder where images are saved by default in Windows Explorer. This location can be changed using the Storage tab in the Options window.
About Window Clippings
This command opens the Window Clippings Options window to the About tab and can be used to display the exact version and build number of Window Clippings.
Check for Updates
This command checks whether any updates have been published. If an updated version of Window Clippings is available, it asks you whether you would like to upgrade and will take care of updating your copy of Window Clippings for you.
Exit
This command will close Window Clippings and you will have to restart the application before creating a new window clipping. Window Clippings does not consume a great deal of memory and performs absolutely no background tasks so feel free to leave it running.
General Options
The General tab of the Options window presents a few options that most users will want to customize in some way.
Keyboard Hot Key
You can optionally use a keyboard “hot key” to start the process of creating a new window clipping instead of having to use the mouse to double click the icon in the notification area. You can either override the Print Screen key or, if you wish to retain the use of the system’s Print Screen functionality, you can require that the Control or Shift key be pressed in combination with the Print Screen key.
Default Actions
The default actions represent what will happen to the image that is captured when you double-click your selection. You might for example like to save a copy to your hard drive but also copy it to the clipboard so that you can easily paste it into Word or another application.
Automatically run Window Clippings when I log on
As its name suggests, this option will ensure that Window Clippings automatically restarts whenever you log onto your computer, saving you the hassle of having to find the application executable or shortcut.
Image Options
Clear window background
This option will clear the window background such that any background windows or images are not included in the resulting image. This is particularly useful for Windows Vista where desktop composition blends the background with the non-client area of most windows. Although this may be visually appealing onscreen, it does not look good out of context when the image is displayed somewhere else such as in a publication.
Include window shadow on Windows Vista
This option includes any shadow that Windows may render around the window in the resulting image. This option is unavailable when desktop composition is disabled on Windows Vista and is unavailable on older versions of Windows. Window Clippings will also in most cases determine whether the selected windows have a shadow and only include the extra padding in the resulting image if a shadow is actually used for the particular window.
Background Color
The background color applies to non-transparent images. There are a few scenarios where Window Clippings cannot preserve the transparency in and around a window and in such cases the background color is used. Specifically, the bitmap copied to the clipboard does not include transparency and will include the background color as necessary. The PNG image format is also the only format to support transparency so any other format will include the background color as necessary. Finally, if Window Clippings fails to calculate the alpha channel for the resulting image, it will use the background color instead.
Storage Options
Window Clippings will by default simply save the image to the location you choose. You can however instruct it to prompt you for a file name and location every time a window clipping is created.
Four image formats are supported when saving to disk. Choose the format that is most appropriate for your needs.
The Bitmap image format is a widely recognized image format that is not compressed and is natively supported by Windows and many applications. The resulting bitmap file will be saved in 24-bit color.
The JPEG image format is widely used on the web and is highly compressed. The compression does however typically show up in screenshots with minor distortion and discoloration.
The PNG image format is the most popular format today as it supports compression without noticeable discoloration and more importantly supports transparency.
The TIFF image format is a popular choice for some desktop publishing companies.
OneNote Options
Window Clippings can send images directly to Microsoft OneNote 2003 or OneNote 2007 if either version is present.
Simply select the folder or section where images should be stored and Window Clippings will create a new page for each image.
You can also optionally instruct OneNote to open the new page that was created.