Defining Custom Item Templates in Web Projects with VS 2005
One of the cool new features in VS 2005 that I was playing with a little today is the ability to export and then re-use project item templates. This enables developers to easily define common templates that they can re-use over and over when adding new pages/classes/controls into web projects or class libraries, and avoid repetitively typing standard content or code.
Below is a simple tutorial on how you can use this with web projects to automate creating a standard page template that inherits from a common page base class (in this example: “ScottGu.Test.MyBasePage”), is defined within a common code namespace (in this example: "ScottGu.Test"), and which has a common CSS stylesheet and Javascript script reference pre-set (note: you should probably use the new ASP.NET 2.0 Masterpage feature for the common CSS and Javascript file – but I thought I’d show it here nonetheless).
Note: I’m pretty sure this didn’t work with Beta2 builds of VS 2005 – but it is supported with the final release and probably the more recent August CTP builds.
Step 1: Define the page you want to become a template
The below two files are a sample page I added into a web project. Note that the page derives from a base-page called “MyBasePage”, lives in the “ScottGu.Test” namespace, has two custom namespaces defined with using blocks in the code-behind, and has a stylesheet and client-side javascript file already added to it.
The only change I’ve made from the standard page markup is that I’ve replaced the class name of the code-behind file to have the marker name of “$safeitemname$”, and updated the Inherits attribute of the .aspx file to also point to the “$safeitemname$” class. VS 2005 will then use this marker to set an appropriate classname based on the filename selected in the Add New Item dialog below (if you don't set a marker, then VS 2005 will default to just using the same classname as what was defined in the template).
Default.aspx
------------------------------------------
<%@ Page Language="C#" AutoEventWireup="true" CodeFileBaseClass="ScottGu.Test.MyBasePage" CodeFile="Default.aspx.cs" Inherits="ScottGu.Test.$safeitemname$ " %>
<!DOCTYPE html PUBLIC "-//W3C//DTD XHTML 1.0 Transitional//EN" "http://www.w3.org/TR/xhtml1/DTD/xhtml1-transitional.dtd">
<html xmlns="http://www.w3.org/1999/xhtml" >
<head runat="server">
<title>My Sample Page</title>
<link href="Common.css" rel="stylesheet" type="text/css" />
<script src="ScriptLibrary/AtlasCore.js" type="text/javascript"></script>
</head>
<body>
<form id="form1" runat="server">
<div>
<h1>My Template Page</h1>
</div>
</form>
</body>
</html>
Default.cs.aspx
------------------------------------------
using System;
using System.Data;
using System.Configuration;
using System.Collections;
using System.Web;
using System.Web.Security;
using System.Web.UI;
using System.Web.UI.WebControls;
using System.Web.UI.WebControls.WebParts;
using System.Web.UI.HtmlControls;
using MyCustomNamespace;
using MyCustomNamespace2;
namespace ScottGu.Test
{
public partial class $safeitemname$: MyBasePage
{
protected void Page_Load(object sender, EventArgs e)
{
}
}
}
Step 2: Export the Page as a Template
To export and re-use the above page, go to the File menu in VS and select the “Export Template” menu item. This will then walk you through the below wizard, where you can choose which project and then which file in the project you want to use as a template:
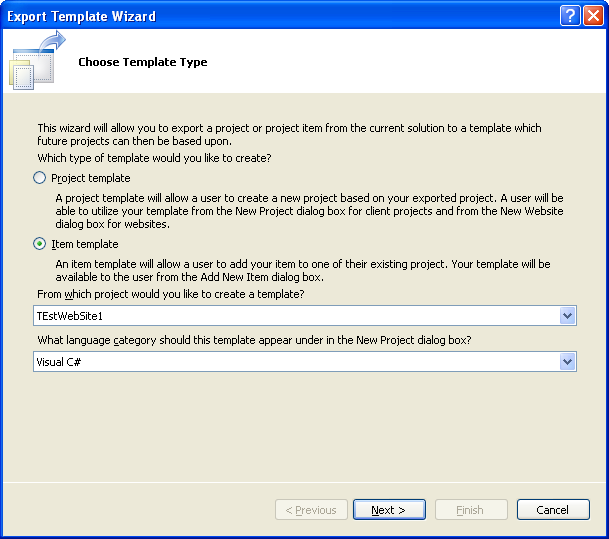
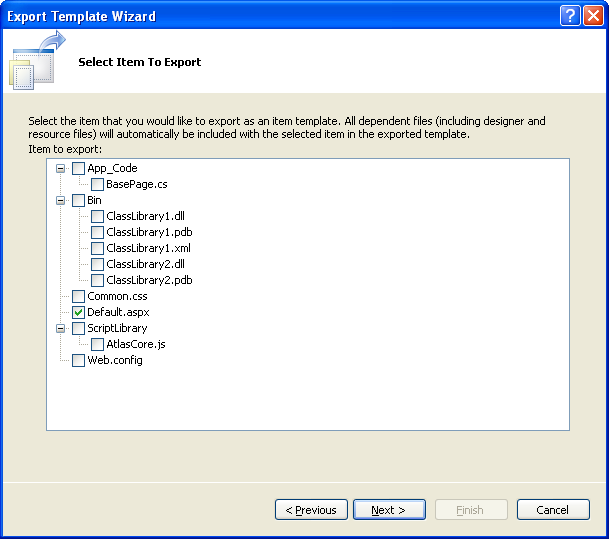
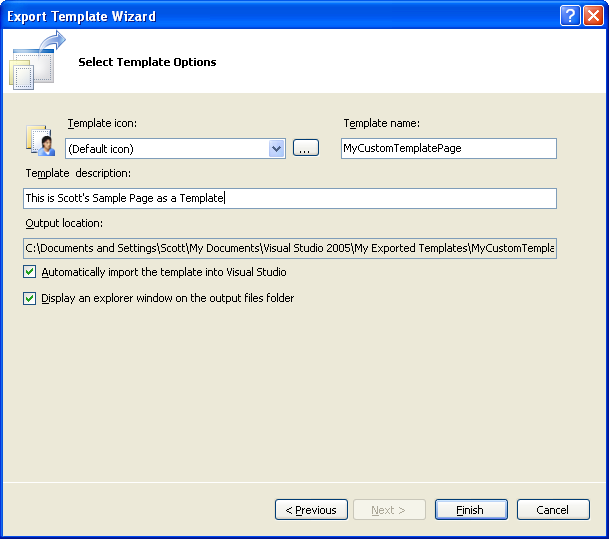
Once you select an item, you can then provide a name for what this template will show up as in the “Add New Item” dialog, an optional icon for the dialog, as well as a help text string. In this example I am going to create a new template I’ll call “MyCustomTemplatePage”.
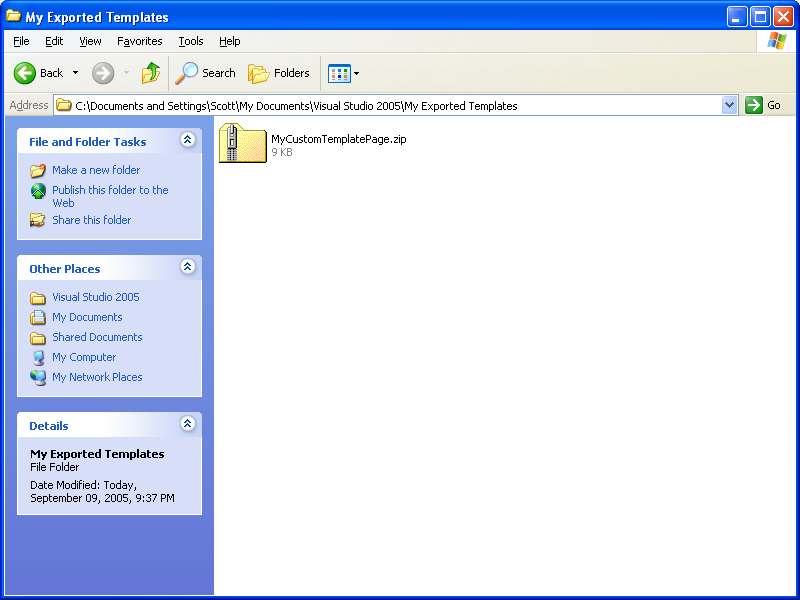
VS will then generate a .zip file containing the item you selected and optionally add it automatically to your current Add New Item dialog (note: this dialog is populated from the C:\Documents and Settings\UserName\My Documents\Visual Studio 2005\Templates\ItemTemplates directory):
Step 3: Create a new Page using the Template
You can now create new items in your project based on the template you defined (or which you picked up from someone else or downloaded online).
To-do this, just choose the usual New File or “Add New Item” menu item in your project to pull up the “Add New Item” dialog. This dialog will include all the standard VS 2005 file items provided by the particular project type you are working on, as well as expose a new “My Templates” section beneath the standard items. Included in the “My Templates” section are all the item templates you've either created yourself (see step 2 above) or imported from others.
For example, I can now select the “MyCustomTemplatePage” item, and name the page I want to create (based on the template) “UsingTheTemplate.aspx”.
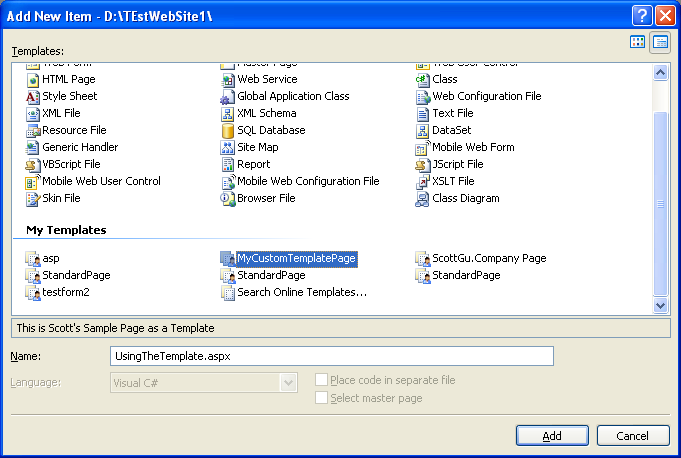
When I select OK, VS 2005 will then add two new files into my project – UsingTheTemplate.aspx and UsingTheTemplate.aspx.cs. These files are based on the template we defined earlier and look like this:
------------------------------------------
UsingTheTemplate.aspx
------------------------------------------
<%@ Page Language="C#" AutoEventWireup="true" CodeFileBaseClass="ScottGu.Test.MyBasePage" CodeFile="UsingTheTemplate.aspx.cs" Inherits="ScottGu.Test.UsingTheTemplate " %>
<!DOCTYPE html PUBLIC "-//W3C//DTD XHTML 1.0 Transitional//EN" "http://www.w3.org/TR/xhtml1/DTD/xhtml1-transitional.dtd">
<html xmlns="http://www.w3.org/1999/xhtml" >
<head runat="server">
<title>My Sample Page</title>
<link href="Common.css" rel="stylesheet" type="text/css" />
<script src="ScriptLibrary/AtlasCore.js" type="text/javascript"></script>
</head>
<body>
<form id="form1" runat="server">
<div>
<h1>My Template Page</h1>
</div>
</form>
</body>
</html>
------------------------------------------
UsingTheTemplate.aspx.cs
------------------------------------------
using System;
using System.Data;
using System.Configuration;
using System.Collections;
using System.Web;
using System.Web.Security;
using System.Web.UI;
using System.Web.UI.WebControls;
using System.Web.UI.WebControls.WebParts;
using System.Web.UI.HtmlControls;
using MyCustomNamespace;
using MyCustomNamespace2;
namespace ScottGu.Test
{
public partial class UsingTheTemplate : MyBasePage
{
protected void Page_Load(object sender, EventArgs e)
{
}
}
}
Note that they look just like my original template – the only difference is that the classname has been automatically set by VS 2005 to match the filename I entered in the Add New Item dialog, and the CodeFile attribute in the .aspx has automatically been updated to point to the new code-behind filename.
I can now quickly work on the page without the hassle of setting my common settings up.
Hope this proves useful and saves you some time,
Scott