Data Tutorial #2: Building our Master Page and Site Navigation Structure
June 22nd 2006 Update: We've now published a whole series of new data tutorials based on this origional post. You can read all about it here.
This past weekend I posted a step-by-step tutorial
on how to build a strongly-typed DAL (data access layer)
using Visual Web Developer
(which is free) and ASP.NET 2.0.
My plan over the next few weeks is to post many
follow-up samples that show various ways to use this DAL
to build common data scenarios using ASP.NET 2.0 (master
details, filtering, sorting, paging, 2-way data-binding,
editing, insertion, deletion, hierarchical data
browsing, hierarchical drill-down, optimistic
concurrency, and more).
Before doing that, I wanted to setup a common site
structure to help organize all of these samples. I wanted to make sure that all the samples in the site
shares a consistent look and feel, and that the site has
an easy to navigate site structure. Thankfully this is now very easy using the new ASP.NET
2.0 Master Page and Site Navigation
features (and can be done without having to write any
code).
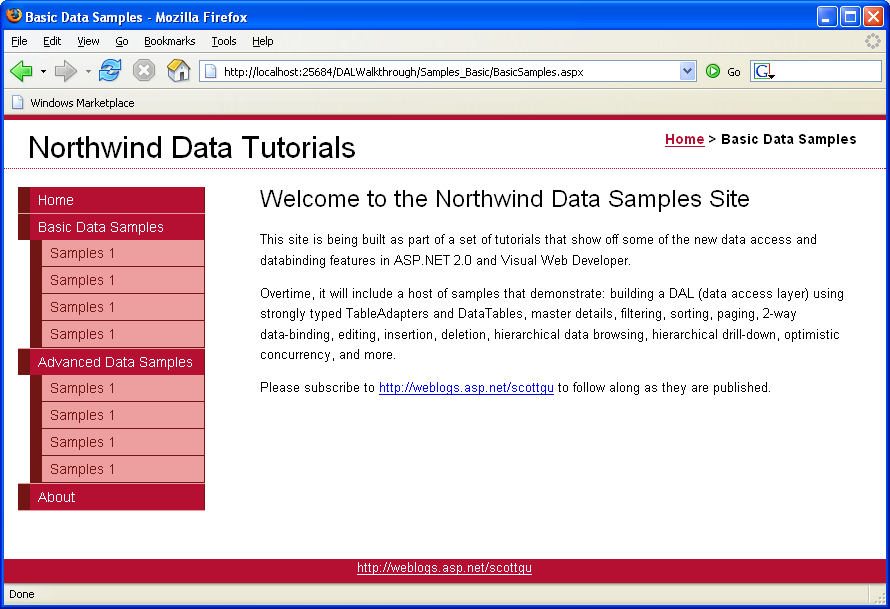
Here is a screen-shot of the sample site skeleton I put
together:
You can download the site sample here. The below set
of tutorials walks-through how I built it:
Step 1: Adding a master page
Below is the basic site structure we were left with
after building our data acess layer for the Northwinds
database in my previous blog post. It has a
strongly typed DAL that goes against the Northwinds
database:
What I want to-do now is add a Master Page to the
site. Master
Pages is a new feature in ASP.NET 2.0 that enables me to
define a common layout structure and look and feel that
I can easily apply to multiple (or all) pages across a
site/app.
To add a Master Page, right click on the project and
choose “Add New Item”. Pick the Master Page Template from the “Add New Item”
dialog and name it “Site.Master”:

I want my site to use a CSS based layout approach. As such, I am using <div> elements to organize
the structure (as opposed to <table>
elements). Here
is the HTML I added:
<%@
Master
Language="VB"
CodeFile="Site.master.vb"
Inherits="Site"
%>
<!DOCTYPE
html
PUBLIC
"-//W3C//DTD XHTML 1.0 Transitional//EN"
"http://www.w3.org/TR/xhtml1/DTD/xhtml1-transitional.dtd">
<html
xmlns="http://www.w3.org/1999/xhtml">
<head runat="server">
<title>Northwind Data
Samples</title>
<link
rel="stylesheet"
type="text/css"
href="stylesheet.css"
/>
</head>
<body>
<div
id="wrapper">
<form
id="Form1"
runat="server">
<div
id="header">
<span
class="title">Northwind
Data Tutorials</span>
<span
class="breadcrumb">Todo:
Breadcrumb will go here...</span>
</div>
<div
id="content">
<asp:ContentPlaceHolder
ID="MainContent"
runat="server">
</asp:ContentPlaceHolder>
</div>
<div
id="navigation">
Todo: Menu will go here...
</div>
</form>
</div>
<div
id="footer">
<a
href="http://weblogs.asp.net/scottgu">http://weblogs.asp.net/scottgu</a>
</div>
</body>
</html>
Notice the <asp:contentplaceholder> control that
is in the middle <div> element. This is a new ASP.NET 2.0 control that I can use to
define regions of the master template that can be
“filled-in” or replaced by pages that use this
master. You can
have any number of <asp:ContentPlaceHolder>
controls you want within a master-page – all you need
to-do is make sure that each has a unique “id”
value. For the
sample above I’ve added one
<asp:contentplaceholder> and named it
“MainContent” (since it will be where pages on the site
fill in their content).
I am also then using an external CSS stylesheet
(“stylesheet.css”) to define the CSS for the page. When in design-view the Master Page looks like
this:
Step 2: Create a Home Page based on the Master
Page
Now that I have my Master Page defined, I can go ahead
and build pages using it. To build one, right click on the Project and choose
“Add New Item”, and select the “Web Form” item:
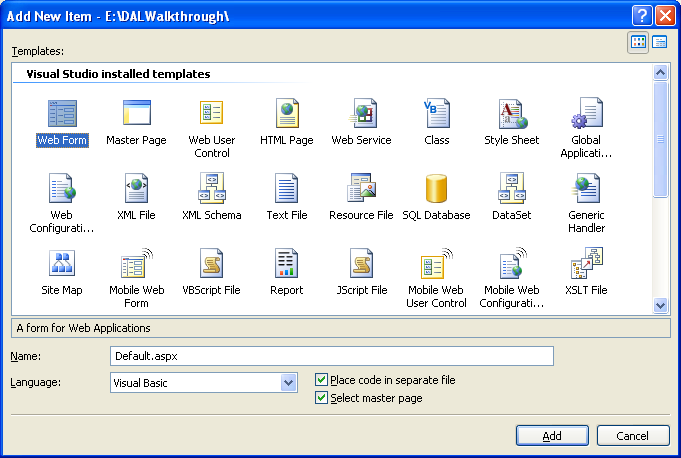
Notice that I’ve selected the “Select master page”
checkbox near the bottom of the dialog. This tells Visual Web Developer that you want to have
this new page use a Master Page. When you click the “add” button it will then ask you to
pick the Master Page to use:
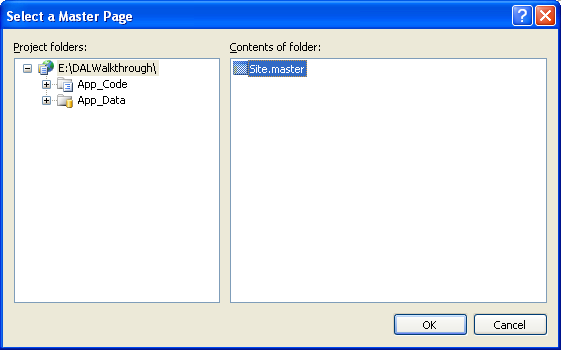
When I select the “Site.Master” file we defined above,
it will create a new Default.aspx file like so:
<%@
Page
Language="VB"
MasterPageFile="~/Site.master"
AutoEventWireup="false"
CodeFile="Default.aspx.vb"
Inherits="_Default"
title="Untitled Page"
%>
<asp:Content
ID="Content1"
ContentPlaceHolderID="MainContent"
Runat="Server">
</asp:Content>
Visual Web Developer has automatically added an
<asp:content> control for the “MainContent”
contentplaceholder we defined earlier (note the
“ContentPlaceHolderId attribute defines which
contentplaceholder we want to override). I can then fill this content region in with the unique
content I want to add to the page:
<%@
Page
Language="VB"
MasterPageFile="~/Site.master"
AutoEventWireup="false"
CodeFile="Default.aspx.vb"
Inherits="_Default"
title="Home"
%>
<asp:Content
ID="Content1"
ContentPlaceHolderID="MainContent"
Runat="Server">
<h1>Welcome to the
Northwind Data Samples Site</h1>
<p>This site is being
built as part of a set of tutorials that show off some of
the new data access
and
databinding features in ASP.NET 2.0 and Visual Web
Developer.</p>
<p>Overtime, it will
include a host of samples that demonstrate: building a DAL
(data access layer)
using strongly
typed TableAdapters and DataTables, master details,
filtering, sorting,
paging, 2-way
data-binding, editing, insertion, deletion, hierarchical
data browsing,
hierarchical
drill-down, optimistic concurrency, and more.
</p>
<p>Please subscribe to
<a
href="http://weblogs.asp.net/scottgu">http://weblogs.asp.net/scottgu</a>
to follow
along as they are published.</p>
</asp:Content>
Note that the page will automatically pick up the CSS
stylesheet from the master-page (ASP.NET will also
automatically “rebase” the CSS url when the .aspx page
is in a sub-directory – so you don’t have to worry about
fully qualifying the style-sheet or doing weird “../”
hacks).
Note also that I have set the “Title” attribute on the
<%@ Page %> directive to “Home”. This attribute allows me to declaratively provide the
page title, even though the <head> element is
defined within our Master Page.
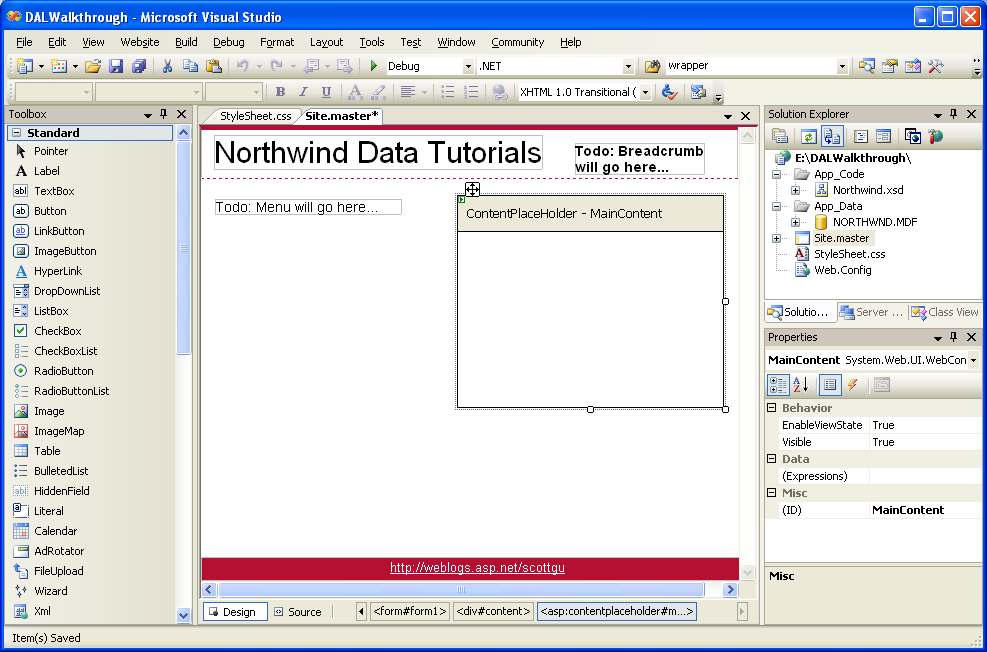
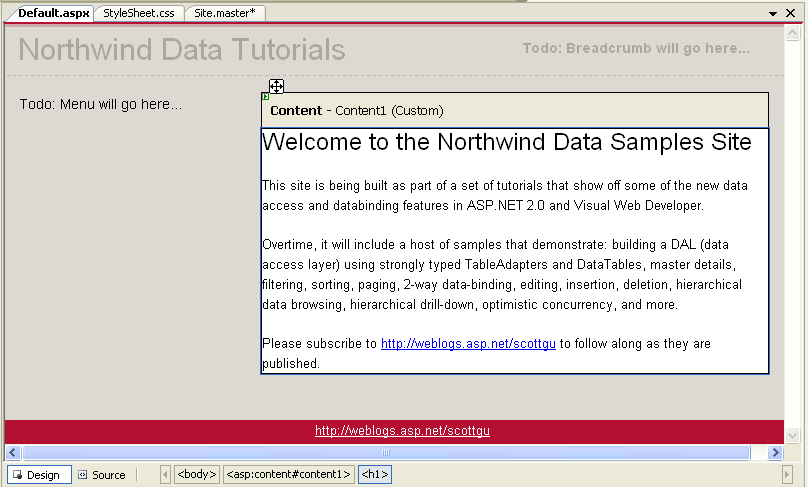
When I switch into design-view on the page, Visual Web
Developer will automatically show me a merged view of
the page that combines both the Master Page and deriving
Page:
ASP.NET will also merge the content together at runtime
– and send down a single html page when a browser
requests this page. The beauty of this model is that the Master Page layout
is defined in one single place – so if I need to make a
change I can update one file, and have every file that
is based on it within the site immediately update.
Step 3: Adding More Pages to the Site
I can use the Master Page to quickly build several more
pages for the site. Specifically, I decided to add two top level section
pages “Basic Data Scenarios” and “Advanced Data
Scenarios” that I think I might want to use to group
several samples around. I then built several stub sample pages in directories
that will live within them.
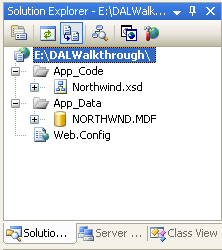
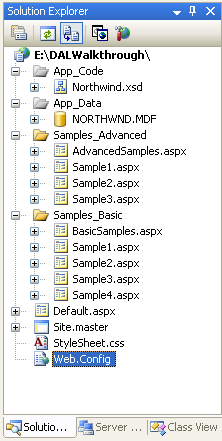
After adding many files to the project (all based on
the Master Page file), my directory structure looks like
this:
Step 4: Defining a Site Map for the Site
One challenge I am going to have as I build-out my site
is keeping the organizational structure of it in shape
(especially if I keep adding samples each week). I’m going to want to have some type of menu system that
helps users on the site navigate their way around. What I want to make sure I avoid is having to manually
build and then update this menu structure within HTML
every-time I make a change. Instead, what I want to-do is to define the site link
structure with a clean data-model that I can then
dynamically data-bind my UI against. The good news is that ASP.NET 2.0 makes this easy with
the new Site Navigation
system.
Using the Site Navigation system I can define the
logical “site map” structure of what my site looks like
– specifically how the site structure is logically laid
out (this can be different to how they are physically
organized on disk), and how the different pages are
organized in relation to each other. I can then access this structure at runtime using the
new “SiteMap” property on each ASP.NET page and
user-control. What is powerful about this API is that I can also use
it to keep track of where the current request is within
the site structure – as well as dynamically lookup a
request’s relation to other urls within the site (for
example: what is the “parent, “sibling” and “child”
nodes in the site-map relative to the current
request). Even fancier, I
can integrate the Site Map system with the new ASP.NET
2.0 Role Management security features – so that I can
view the structure through the “trimmed view” of what a
visiting user has permission to see (for example: pages
that are secured only for users in an admin role
wouldn’t show up in the Site Navigation model when a
guest is visiting the site). The combination of all these features makes it very
easy to quickly build menu navigation and bread-crumb
UI. You can also
use this module
to help your site integrate better with search engines
like Google.
To define our Site Navigation structure, I’m going to
use the built-in XML Site Map Provider that ships with
ASP.NET 2.0. Alternatively, if I wanted to store the site-map
structure in a database I could have configured my site
to use the cool new SQL Site Map Provider
(the beauty of the ASP.NET 2.0 provider model is that
all the code and data-binding logic to work against the
Site Navigation system stays the same regardless of
which provider implementation you have configured).
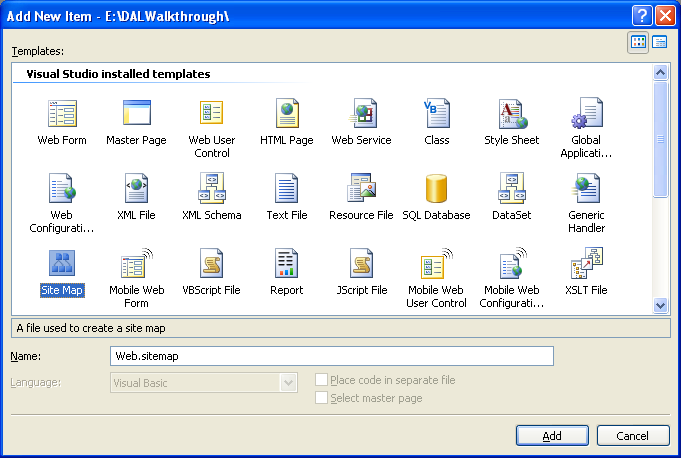
The XML-file based provider uses XML files that by
default have the name “Web.SiteMap” to define the site
hierarchy. To
create one of these files, right click on the project
and choose “Add New Item” and the “Site Map” item:
This will create an XML file with a default schema for
defining a site-layout. Note that Visual Web Developer provides automatic
intellisense for this XML structure.
For my particular sample, I choose to define the site
structure like so:
<?xml
version="1.0"
encoding="utf-8" ?>
<siteMap
xmlns="http://schemas.microsoft.com/AspNet/SiteMap-File-1.0" >
<siteMapNode
url="Default.aspx"
title="Home" description="Home">
<siteMapNode
url="Samples_Basic/BasicSamples.aspx" title="Basic Data Samples" description="Basic Data Samples">
<siteMapNode
url="Samples_Basic/Sample1.aspx" title="Samples 1" description="Samples 1" />
<siteMapNode
url="Samples_Basic/Sample2.aspx" title="Samples 1" description="Samples 2" />
<siteMapNode
url="Samples_Basic/Sample3.aspx" title="Samples 1" description="Samples 3" />
<siteMapNode
url="Samples_Basic/Sample4.aspx" title="Samples 1" description="Samples 4" />
</siteMapNode>
<siteMapNode
url="Samples_Advanced/AdvancedSamples.aspx" title="Advanced Data Samples" description="Advanced Data Samples">
<siteMapNode
url="Samples_Advanced/Sample1.aspx" title="Samples 1" description="Samples 1" />
<siteMapNode
url="Samples_Advanced/Sample2.aspx" title="Samples 1" description="Samples 2" />
<siteMapNode
url="Samples_Advanced/Sample3.aspx" title="Samples 1" description="Samples 3" />
<siteMapNode
url="Samples_Advanced/Sample4.aspx" title="Samples 1" description="Samples 4" />
</siteMapNode>
<siteMapNode
url="About.aspx"
title="About" description="About" />
</siteMapNode>
</siteMap>
It has a top-level node called “Home” – and then three
sub-nodes – “Basic Samples”, “Advanced Samples” and
“About”. The
“Basic Samples” and “Advanced Samples” then have several
sub-nodes beneath them.
Note that ASP.NET will automatically cache the Site
Maps’ XML file so that it doesn’t get read on each
request – instead it will only be parsed and processed
on the first request to the application, and then on
subsequent requests the cached version will be used
(note: this will automatically get re-generated anytime
the file changes).
I can then programmatically use the SiteMap.CurrentNode
property within an ASP.NET page at runtime to get back a
SiteMapNode object that represents where the current
request is within the above Site Map definition – as
well as what its parent, children, and sibling node urls
are (and what their friendly names are as well).
Step 5: Data-Building a Site Navigation Menu
Structure
ASP.NET 2.0 introduces a new concept called “data
source” controls – which are control objects that
provide a standard way to expose data that UI controls
can then bind against. The data source model is extensible, so you can easily
build your own Data Source controls to plug into the
system (this blog post
points to how to-do this). One of the built-in data-source controls that ASP.NET
2.0 ships with is the <asp:sitemapdatasource>
control – which makes it super easy to databind any UI
controls against the Site Navigation data model.
ASP.NET 2.0 ships with built-in <asp:treeview>
and <asp:menu> controls, which can be used to
create menu and tree-view structures based on the
site-map structure. To add and then data-bind the <asp:menu> control
to a <asp:sitemapdatasource> control on a page, I
could simple add this markup to the Site.Master file
(replacing the previous to-do menu comment):
<div
id="navigation">
<asp:Menu
ID="foo"
DataSourceID="SiteMapDataSource1"
runat="server">
</asp:Menu>
<asp:SiteMapDataSource
ID="SiteMapDataSource1"
ShowStartingNode="false"
runat="server"
/>
</div>
I would then have a fly-out menu for navigating around
the site.
Alternatively, if I want even greater control over the
HTML generated, I could use more basic (but also more
flexible) controls – like the ASP.NET Repeater
control.
For example, I could use the <asp:repeater> to
create an html <ul></ul> list like so:
<div
id="navigation">
<ul>
<li>
<a
href="default.aspx">Home</a>
</li>
<asp:Repeater
ID="foo"
DataSourceID="SiteMapDataSource1"
runat="server">
<ItemTemplate>
<li>
<a
href='<%#Eval("url")
%>'><%#Eval("Title")
%></a>
</li>
</ItemTemplate>
</asp:Repeater>
</ul>
</div>
<asp:SiteMapDataSource ID="SiteMapDataSource1" ShowStartingNode="false" runat="server" />
With our Web.SiteMap file defined like it is above,
this would then generate the below html at runtime:
<div
id="navigation">
<ul>
<li>
<a
href="default.aspx">Home</a>
</li>
<li>
<a
href='/DALWalkthrough/Samples_Basic/BasicSamples.aspx'>Basic Data Samples</a>
</li>
<li>
<a
href='/DALWalkthrough/Samples_Advanced/AdvancedSamples.aspx'>Advanced Data Samples</a>
</li>
<li>
<a
href='/DALWalkthrough/About.aspx'>About</a>
</li>
</ul>
</div>
If I wanted to show the next level of hierarchy in the
SiteMap as well, I could add another
<asp:repeater> within the first one to also
generate a sub-hierarchy of
<ul><li><ul> elements. For example:
<asp:Repeater
ID="foo"
DataSourceID="SiteMapDataSource1"
runat="server" enableviewstate="false">
<ItemTemplate>
<li>
<a
href='<%#Eval("url")
%>'><%#Eval("Title")
%></a>
<ul>
<asp:Repeater
ID="bar"
DataSource='<%#Container.DataItem.ChildNodes()
%>' runat="server">
<ItemTemplate>
<li><a
href='<%#Eval("url")
%>'><%#Eval("Title")
%></a></li>
</ItemTemplate>
</asp:Repeater>
</ul>
</li>
</ItemTemplate>
</asp:Repeater>
Note that VB allows me to write
Container.DataItem.ChildNodes() as a direct data-bound
expression. In
C# I would need to cast like so: ((SiteMapNode)
Container.DataItem).ChildNodes()
This would then generate the below HTML markup:
<div
id="navigation">
<ul>
<li><a
href="default.aspx">Home</a></li>
<li><a
href='/DALWalkthrough/Samples_Basic/BasicSamples.aspx'>Basic Data Samples</a>
<ul>
<li><a
href='/DALWalkthrough/Samples_Basic/Sample1.aspx'>Samples 1</a></li>
<li><a
href='/DALWalkthrough/Samples_Basic/Sample2.aspx'>Samples 1</a></li>
<li><a
href='/DALWalkthrough/Samples_Basic/Sample3.aspx'>Samples 1</a></li>
<li><a
href='/DALWalkthrough/Samples_Basic/Sample4.aspx'>Samples 1</a></li>
</ul>
</li>
<li><a
href='/DALWalkthrough/Samples_Advanced/AdvancedSamples.aspx'>Advanced Data Samples</a>
<ul>
<li><a
href='/DALWalkthrough/Samples_Advanced/Sample1.aspx'>Samples 1</a></li>
<li><a
href='/DALWalkthrough/Samples_Advanced/Sample2.aspx'>Samples 1</a></li>
<li><a
href='/DALWalkthrough/Samples_Advanced/Sample3.aspx'>Samples 1</a></li>
<li><a
href='/DALWalkthrough/Samples_Advanced/Sample4.aspx'>Samples 1</a></li>
</ul>
</li>
<li><a
href='/DALWalkthrough/About.aspx'>About</a>
</li>
</ul>
</div>
I
can then use a standard CSS styling approach to
customize the look and feel of this structure however I
want. Rachel Andrew
has a great book that I use called “The CSS Anthology: 101 Essential Tips, Tricks &
Hacks” that provides a really nice scenario based tutorial
approach to using CSS. I used a technique she came up with in chapter 4 to
make the markup above look like this when I add some CSS
to my StyleSheet.css file:
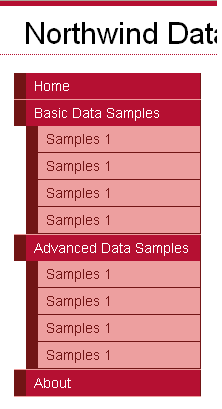
And now I have a nice looking menu for my site,
data-bound to the Site Navigation system, which is in
turn data-driven from my web.sitemap file.
Step 6: Adding a “Breadcrumb” navigation control to
the page
The last touch I want to add to my site is support for
a “bread-crumb” UI paradigm near the top of the page
that will help users easily figure out where they
currently are within the application. The good news is that this is super easy with ASP.NET
2.0 and the Site Navigation system.
All I need to-do is add the new <asp:SiteMapPath>
control to my “header” <div>:
<div
id="header">
<span
class="title">Northwind
Data Tutorials</span>
<span
class="breadcrumb">
<asp:SiteMapPath
ID="Breadcrumb" runat="server"></asp:SiteMapPath>
</span>
</div>
This will then output the site hierarchy of the current
node relative to the root node of the site map. For example, if I was on “Sample1” within the “Basic
Data Samples” section of the site, the above control
would automatically output this:

If I click on the “Basic Data Samples” hyperlink (which
is automatically generated by the breadcrumb – or I
could just use the menu link), it would adjust to:

No code is required.
Summary
I now have the basic site structure and layout defined
for the sample site I am going to use to build my data
samples. It has
a consistent, centralized, layout and look and feel
structure by using the new ASP.NET 2.0 Master Page
feature. And my
site and link structure is nicely encapsulated by the
ASP.NET 2.0 Site Navigation system, which I’m also using
to dynamically generate a navigation menu and breadcrumb
UI for the site:
Best of all, I didn’t need to write any code to enable
this, and I still get full WYSIWYG designer support
within Visual Web Developer.
Hope this helps. Lots of data samples are now going to follow…
Scott