CSS Control Adapter Toolkit for ASP.NET 2.0
Tired of having <table> elements rendered by the built-in ASP.NET server controls and wishing you could use a pure CSS solution instead? Read on...
Today we published the CSS Control Adapter Toolkit for ASP.NET. This toolkit provides information about how the ASP.NET 2.0 Control Adapter Architecture works, as well as a set of 5 sample control adapters (with full source that you can optionally tweak/modify) that provide CSS friendly adapters for 5 of the built-in ASP.NET controls (specifically: Menu, TreeView, DetailsView, FormView and DataList).
You can download this release for free from
here, and
immediately begin using it in your ASP.NET 2.0 sites
today.
What does a control adapter let me do?
A control adapter allows you to plug-into any ASP.NET
server control and override, modify and/or tweak the
rendering output logic of that control.
What is cool about control adapters is that they
do not
require a page developer to program against a new control,
or modify the control programming model semantics (you
still use the same control properties, methods, events and
templates you did before). Indeed – a page developer can be entirely oblivious that
a control adapter is being used (the control adapter model
makes it very clean to register and encapsulate this
support).
The CSS Control Adapter Toolkit includes a bunch of
pre-built control adapter samples that show how you can
use the control adapter architecture to emit 100% CSS
based rendering output (no tables or inline styles –
instead use external CSS stylesheets for everything).
Show me an example of how I use these control
adapters?
To see a simple example of control adapters being used,
you can download this self-encapsulated menu sample I
built
here.
Note that you
do not
need to install the CSS Adapter toolkit to run my sample
(the CSS Adapter Toolkit mainly includes samples and
documentation – you can directly embed adapters into any
ASP.NET application and doing so doesn’t require you to
install or update any system components).
The above menu sample contains a Web.SiteMap file that
defines the site navigation structure of an ASP.NET 2.0
Site (note: to learn more about the new ASP.NET 2.0 Site
Navigation features
read this past post). It then
contains two pages – menu1.aspx and menu2.aspx – that use
the standard ASP.NET 2.0 Menu control to databind against
the SiteMap.
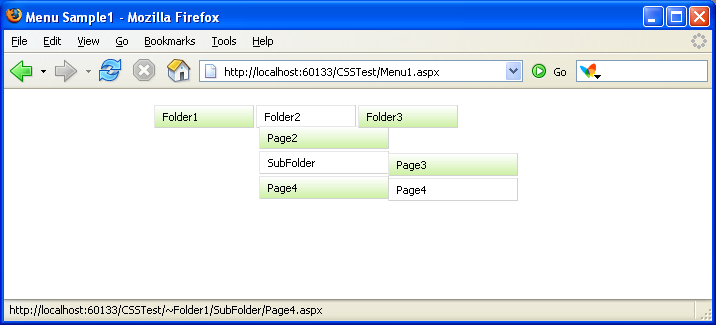
Menu1.aspx shows how to build a horizontal sub-menu
navigation system (note: below is all of the code and
markup – there is no code needed in the code-behind or on
other pages or classes):
<%@
Page
Language="C#"
AutoEventWireup="true" CodeFile="Menu1.aspx.cs"
Inherits="_Default"
%>
<!DOCTYPE
html
PUBLIC
"-//W3C//DTD XHTML 1.0 Transitional//EN"
"http://www.w3.org/TR/xhtml1/DTD/xhtml1-transitional.dtd">
<html
xmlns="http://www.w3.org/1999/xhtml"
>
<head
runat="server">
<title>Menu Sample1</title>
<link
href="StyleSheets/Menu.css"
rel="stylesheet"
type="text/css"
/>
<link
href="StyleSheets/MenuStyle.css"
rel="stylesheet"
type="text/css"
/>
</head>
<body>
<form
id="form1"
runat="server">
<div>
<asp:Menu
ID="Menu1"
runat="server"
Orientation="Horizontal"
CssSelectorClass="PrettyMenu"
EnableViewState="false"
DataSourceID="SiteMapDataSource1">
</asp:Menu>
<asp:SiteMapDataSource
ID="SiteMapDataSource1"
ShowStartingNode="false"
runat="server"
/>
</div>
</form>
</body>
</html>
It renders like this in FireFox:
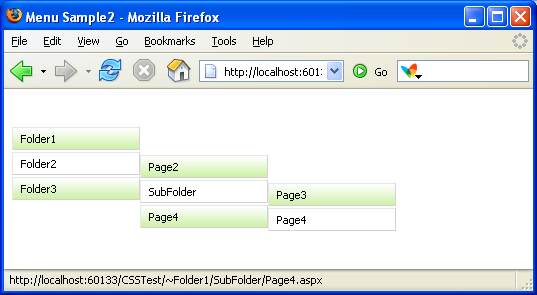
Menu2.aspx shows how to build a vertical sub-menu
navigation system:
<%@
Page
Language="C#"
AutoEventWireup="true"
CodeFile="Menu2.aspx.cs"
Inherits="Menu2"
%>
<!DOCTYPE
html
PUBLIC
"-//W3C//DTD XHTML 1.0 Transitional//EN"
"http://www.w3.org/TR/xhtml1/DTD/xhtml1-transitional.dtd">
<html
xmlns="http://www.w3.org/1999/xhtml"
>
<head
runat="server">
<title>Menu Sample2</title>
<link
href="Stylesheets/MenuStyle.css"
rel="stylesheet"
type="text/css"
/>
<link
href="Stylesheets/Menu.css"
rel="stylesheet"
type="text/css"
/>
</head>
<body>
<form
id="form1"
runat="server">
<div>
<asp:Menu
ID="Menu3"
runat="server"
CssSelectorClass="PrettyMenu"
EnableViewState="false"
DataSourceID="SiteMapDataSource1">
</asp:Menu>
<asp:SiteMapDataSource
ID="SiteMapDataSource1"
ShowStartingNode="false"
runat="server"
/>
</div>
</form>
</body>
</html>
It renders like this (also using FireFox):
Because I’ve registered the CSS Menu Adapter for my site,
the output from both menu controls are rendered using
<ul><li></ul> html elements instead of
tables. I am using
two CSS stylesheets within the site to stylize them. One is a stylesheet called “Menu.css” that comes with the
CSS Toolkit and contains the standard “behavioral” rules
for menu controls (for example: what elements are blocks
vs. inline, etc). The expectation is that developers don’t change these
often. The second
stylesheet is called “MenuStyle.css” and contains the site
specific style behavior (colors, fonts, sizes, location,
etc). I can either
work on this file directly myself, or pass it off to a
designer to use standard CSS styling techniques to
customize it.
Click here to see a diagram that is included with the CSS Toolkit Whitepaper to see the default styling rules used with the CSS Menu Adapter.
Note that if you
want to customize the rendering even further you can
easily tweak the CSS Menu Adapter to modify it however you
want (the source for each CSS adapter ships with both VB
and C# versions). Laurent has a good example of how he did that to stylize
Site Navigation node selection
here.
So how does someone create an ASP.NET control adapter
from scratch?
Creating a control adapter is fairly
straight-forward. Basically you do two things:
1) Create a class that derives from the
System.Web.UI.Adapters.ControlAdapter base class or one of
the built-in sub-classes of it (for example:
System.Web.UI.WebControls.Adapters.MenuAdapter or
System.Web.UI.WebControls.Adapters.DataBoundControlAdapter). Within the sub-class, you then override the appropriate
methods to customize the markup however you want.
For example, the below code-snippet shows a few snippets
from the CSSFriendly.MenuAdapter that ships with the CSS
Adapter Toolkit:
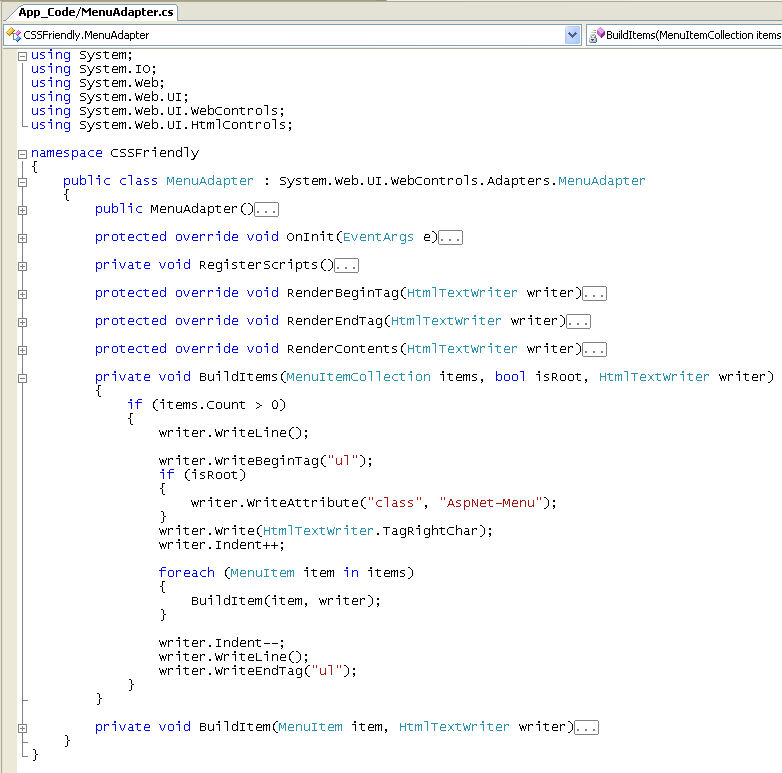
Note how the “BuildItems” method (which is called from
the “RenderContents” virtual method) is used to output
<ul> elements instead of tables for the Menu
output. Notice
also the built-in helper methods that can be used to
support indentation and HTML tag rendering.
The Control Adapter class that you create can be added
into your web project and compiled as part of the
project. Alternatively, for greater re-use you could add it to a
class library project and reference it from multiple
web-projects (allowing nice re-use and factoring).
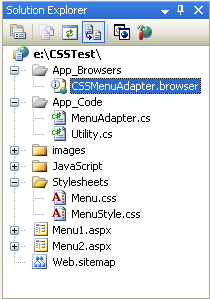
2) Once you have created a ControlAdapter class that
customizes the output however you want, you register it
within your ASP.NET 2.0 Web Application by adding a
.browser file within the /App_Browsers sub-directory
underneath the application root:
This .browser file can contain browser capability rules
(declared using XML) that allow you to customize whether a
control adapter is used – and optionally even configure a
separate one for each browser or input device. For example, if you wanted to only use the above Menu
control adapter for Versions 6-9 of IE (but fall back to
using tables with IE5), you would register it like so
within your .browser file:
<browsers>
<browser
refID="IE6to9">
<controlAdapters>
<adapter
controlType="System.Web.UI.WebControls.Menu"
adapterType="CSSFriendly.MenuAdapter" />
</controlAdapters>
</browser>
<browser
refID="MozillaFirefox">
<controlAdapters>
<adapter
controlType="System.Web.UI.WebControls.Menu"
adapterType="CSSFriendly.MenuAdapter" />
</controlAdapters>
</browser>
</browsers>
Once you’ve saved the above two rules you are all
set. When an IE
6->9 browser or FireFox browser hits the site now, all
Menu controls will render using CSS style-friendly output
(specifically <ul><li></ul>
elements). When an
IE browser hits the site, the Menu controls will render
using tables.
You
do not
need to modify any page code or code-behind code to use
this.
How to Get Started with the CSS Adapter Toolkit
You can learn more about the CSS Adapter Toolkit and
download it from
here. The first thing
you should read is the
CSS Adapter Toolkit Whitepaper
to understand better how it works, and understand the
default CSS rules that the CSS Adapters in the toolkit
output by default.
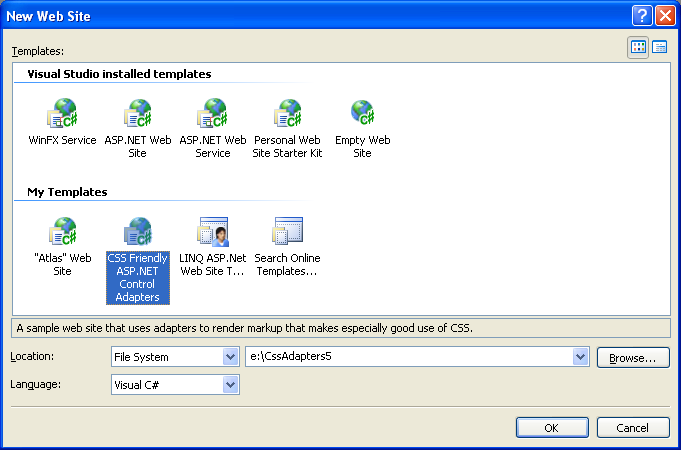
Once you’ve download and installed the CSS Adapter
Toolkit you can then choose “File->New Web Site” using
either VS 2005 or Visual Web Developer (which is free) and
select the CSS Adapter Toolkit Starter Kit:
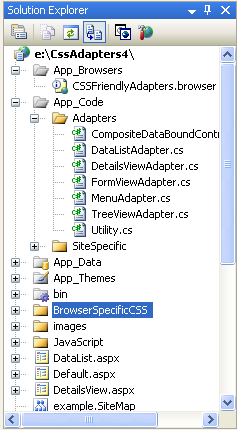
You can choose to create either a VB or C# version of
it. Once created
it will install the CSS Adapters, associated .browser
files, and a bunch of samples that use it:
Just select the default.aspx page and hit run to get
started. You can
then browse through the samples and step through the
adapter code to see how they work.
To re-use the adapters as-is, just copy the files in the
/app_code/adapters/ sub-directory into your applications,
along with the .browser file in /app_browsers. You will then also want to copy the appropriate static
CSS stylsheets and JavaScript files as well. And then you are good to go.
To ask questions about the adapters and/or ask questions,
please check out this forum
here.
Hope this helps,
Scott
P.P.S. The CSS Adapter Toolkit is released under a
permissive license that allows full re-use of the code for
both commercial and non-commercial applications. Feel free to re-use the adapter code however you want
(we’d also love you to post sample adapters that you
build!).
P.P.P.S. If you are looking for another really cool
extensibility download we’ve done recently, check out this
post about the source release of the
ASP.NET 2.0 Providers.