Using DLINQ with ASP.NET (Part 2 of my LINQ series)
Last month I wrote about
the new LINQ language features for VB and C#. My blog post introduced some of the core concepts
of LINQ, and demonstrated how you can use LINQ to
perform rich queries over standard .NET business
classes and object collections. I also showed how you could easily bind the results
of these queries against ASP.NET controls. You can read all about how to-do this here.
One of the really powerful aspects of LINQ is that
it can be used against any type of object or data
source, and provides a consistent programming model
for doing this. LINQ ships with implementations that support LINQ against
regular object collections, databases, entities, and
XML sources. Because LINQ supports rich extensibility,
developers can also easily integrate LINQ with other
data sources and providers as well.
In this blog post I’m going to provide a quick
overview of some of the key LINQ for databases
concepts (aka DLINQ), and then walk through a sample
that shows how you can start to use LINQ against a
database within an ASP.NET 2.0 application. You can
download the LINQ May CTP from here
and use the steps below with VS 2005 or the free
Visual Web Developers Express edition to follow
along (note: the LINQ May CTP runs in VS 2005 and
does not touch any existing binaries). You can also download the completed samples I build
below from here.
Reviewing some DLINQ concepts
DLinq provides a run-time framework for managing
relational data as objects. It does this by
translating LINQ queries into SQL for execution by
the database and then translates the tabular results
back into objects you define. Your application can
then manipulate these objects however you want
to. While
you do this DLinq will track any changes you make to
them, so that you can optionally submit changes back
to the database (for update, insert, and delete
operations).
DLINQ allows you to define the object model and
class structure that best represents your
application data. For example, if you have a Customers database table
with columns “CustomerId”, “City”, and
“CustomerName”, you could optionally create a
“Customer” class that represented it like so:
public
class
Customer
{
public
string
CustomerId;
public
string City;
public
string
CustomerName;
}
Note that you can use whatever naming pattern you want in your classes -- you aren't required to have the same names as in the database.
DLINQ allows you to map classes to a database
schema in two ways. The first option is by adding attributes to the
classes that indicate where and how they should be
stored in the database (this is called “Attribute
Based Mapping”). Alternatively you can specify the mapping using an
external XML file. The external XML file enables the underlying
database schema to be kept separate from the code,
and even allows runtime schema mapping changes on
the fly (meaning you do not need to recompile
an assembly using DLINQ to modify the database
storage schema being used). Developers can choose whichever mapping approach
works best for them and their projects.
In addition to supporting single table mappings, it
is also possible to easily define relationships
between tables using DLINQ. In a relational database this is typically modeled
using foreign-keys referring to primary keys in
other tables. DLINQ allows developers to define “Association
Relationships” between classes to express
relationships. This allows a developer, for example, to write
“Customer.Orders” to reference the collection of
orders for the customer instance.
Important: It
is not
necessary to manually define your table mappings or
relationships. The May CTP drop of DLINQ ships with both a
command-line utility and a Visual Studio data
designer to make defining these relationships and
mappings simple (it will take us less than 30
seconds to define a complete DLINQ mapping for the
Northwind database in our sample below).
Once data mappings and relationships are defined,
developers can then easily write LINQ code to
perform queries and updates against a database. For example, the below code uses the SQL Northwind
database to retrieve all customers from London, and
then prints out the Customer Name, as well as a
hierarchical sub-listing of each of the customer’s
orders to a page:
Northwind db =
new
Northwind(connectionString);
IEnumerable<Customer> customers = from cust
in db.Customers
where cust.City ==
"
select cust;
foreach
(Customer cust
in customers) {
Response.Write ("Customer = "
+ cust.CustomerName);
foreach (Order order
in cust.Orders) {
Response.Write("---- OrderID: "
+ order.OrderId);
}
}
Note how the Customer and Order classes are
strongly-typed, and how the Customer class has an
“Orders” association relationship that uses the
ForeignKey/PrimaryKey relationship between the
Customers and Orders tables in the database.
We can also then easily write code to retrieve an
individual Customer and simultaneously update both
its ContactName and add a new Order for it in the
system like so:
Northwind db =
new
Northwind(connectionString);
// Fetch a specific customer
Customer cust = db.Customers.Single(c =>
c.CustomerID ==
"ALFKI");
// Change the name of the contact
cust.ContactName =
"ScottGu";
// Create and add a new Order to the customer's
orders collection
Order order =
new Order();
order.OrderDate = DateTime.Now;
order.ShipCity =
"
cust.Orders.Add(order);
// Save all the changes to database
db.SubmitChanges();
We do not need to write any additional data
access code or define any SQL statements for the
above two samples to work. Instead, I can program and work with these objects
for my data access, and have DLINQ perform the
underlying data statements for me. The compiler will automatically perform syntax
checking against my queries/code and will give me
warnings/errors if I do things wrong (for example:
mistype a column name, misuse a double as an
integer, try to convert an inappropriate string to a
date, etc). I can use the debugger to inspect any value. And with the next release of VS I will get full
intellisense completion when writing these queries
and operations.
DLINQ supports Stored Procedures, Views, and
User-Defined Functions, and allows developers to
drop-down and add custom SQL where necessary. Developers can add additional, non-database based,
properties and methods to data classes to extend
their semantics, and can also add both property and
entity validation/business rules to them as well
(the partial class feature in VB and C# makes doing
this clean and easy). Transactions are also fully supported, including
two-phase commit transactions where the DLINQ
operations can be enlisted in a broader transaction
with multiple databases or storage providers.
In short – there is a lot of cool stuff there. There is a lot of documentation that comes with the May LINQ CTP that you can read to learn more.
What I’m
going to do below for the rest of this post is walk
through a few step-by-step instructions on how to
start using the May LINQ CTP with DLINQ in an
ASP.NET app.
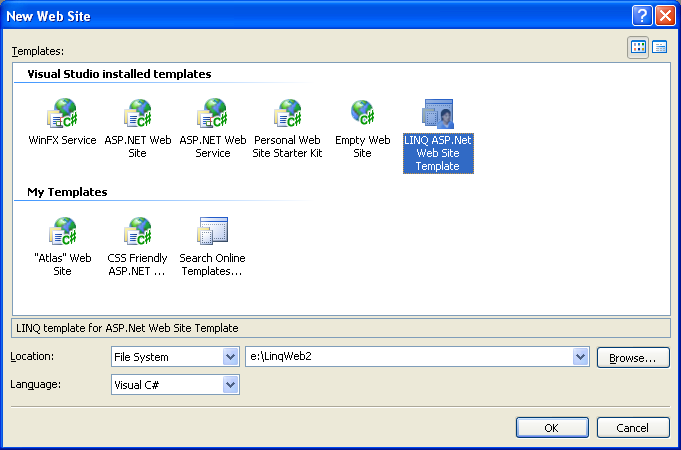
Step 1: Create an ASP.NET LINQ Project
To begin with, we’ll create a new LINQ-enabled
ASP.NET web site in VS 2005 or the free Visual Web
Developer Express tool. To-do this, make sure the May CTP build of LINQ is
installed, and then choose File->New Web Site and
select the “LINQ ASP.NET Web Site” template:
We now have a project created that references the
LINQ and DLINQ assemblies, and can use the C# or VB
LINQ-enabled compilers.
Step 2: Create a DLINQ enabled object model for
the Northwind database
We’ll use the “Northwind” database sample that
comes with SQL Server for our LINQ/DLINQ code
below.
We’ll start by creating an object model that maps
to the Northwind database. We can do this one of three ways:
1)
Write this by hand
2)
Use the new VS DLINQ designer to graphically define
the class organization and relationships
3)
Use the built-in “SQLMetal.exe” command-line
utility to create it for us
For this sample walkthrough I’m going to use
#3. To
create the mapping I simply need to type the below
statements in a command-prompt to create this for
the Northwind database on my local box:
>>
cd c:\Program Files\LINQ Preview\Bin
>>
sqlmetal /database:Northwind /pluralize
/namespace:Northwind /code:Northwind.cs
SqlMetal will infer the appropriate classes from
the database metadata, and by default add
appropriate validation constraint checks (NOT NULL,
Column Types and Size Limits, etc) to the object
model. Because I’ve specified the /pluralize parameter
option, it will use some default naming logic
conventions to create the property and table names –
for example creating a “Customer” class that maps to
the “Customers” table (obviously you can go in and
override these if you don’t like the defaults).
We could optionally also specify a /map:[filename]
parameter to control whether the database mappings
are stored using code attributes or in an XML
metadata file. We could also indicate that stored procedures,
functions and views should be mapped via the /views,
/sprocs, /functions parameter switches.
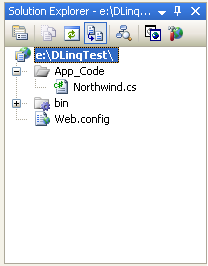
The result of the SQLMetal’s code generation will
be saved within the “Northwind.cs” file we specified
and scoped within the “Northwind” code namespace
above. We’ll
then want to copy this file under the “/app_code”
directory within our new ASP.NET project:
The last step we’ll then want to do is to add a
“<connectionStrings>” section within the
web.config of our application to configure our
database connection information:
<connectionStrings>
<add
name="Northwind"
connectionString="Data Source=(local);Initial
Catalog=Northwind;Integrated Security=True"
providerName="System.Data.SqlClient"/>
</connectionStrings>
This will allow us to easily change the database
deployment location later. With ASP.NET 2.0 we can also now optionally encrypt the web.config values for secure
deployment. ASP.NET
2.0 also installs a built-in admin extension to the
IIS admin tool that allows IT administrators easily
manage the connection strings during and after
deployment as well.
Once the above steps are done, we are ready to use
our newly created Northwind DLINQ data layer
anywhere within our application.
Step 3: Build a page that uses our DLINQ
layer
To start off with, we’ll create a new page within
our project called “Sample1.aspx”.
Within the Sample1.aspx file we’ll add a GridView
server control and explicitly define a few columns
to display:
<%@
Page
Language="C#"
CodeFile="Sample1.aspx.cs"
Inherits="Sample1"
%>
<html>
<body>
<form
id="form1"
runat="server">
<h1>Northwind
Customers</h1>
<asp:GridView
ID="GridView1"
AutoGenerateColumns="false"
runat="server">
<Columns>
<asp:BoundField
HeaderText="Customer ID"
DataField="CustomerID"
/>
<asp:BoundField
HeaderText="Name"
DataField="CompanyName"
/>
<asp:BoundField
HeaderText="City"
DataField="City"
/>
<asp:BoundField
HeaderText="State"
DataField="Region"
/>
</Columns>
</asp:GridView>
</form>
</body>
</html>
Within the Sample1.aspx.cs code-behind file we’ll add a “using System.Query” statement at the top of the file, and then add LINQ code within the Page_Load() event to retrieve all US customers from the Northwind database, sorted by CompanyName, and programmatically bind the results to the GridView control:
using
System;
using
System.Configuration;
using
System.Web.UI;
using
System.Query;
public
partial
class
Sample1 :
System.Web.UI.Page {
protected
void Page_Load()
{
string
connectionString =
ConfigurationManager.ConnectionStrings["Northwind"].ConnectionString;
Northwind.Northwind
db =
new Northwind.Northwind(connectionString);
GridView1.DataSource = from customer
in db.Customers
where customer.Country ==
"
orderby customer.CompanyName
select customer;
GridView1.DataBind();
}
}
When we save the page and access it from a browser
we’ll get this output:
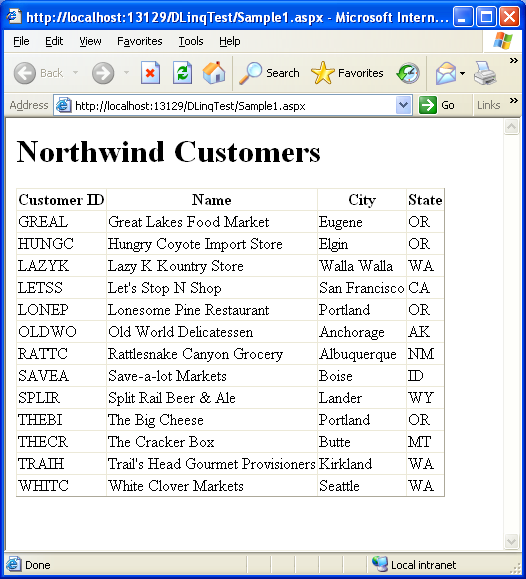
Disclaimer: I will leave it as an exercise to the
reader to write a nice CSS stylesheet to make it
look pretty – but hopefully you get the point of how
the functionality works. J
Step 4: Data Shaping and Projections
In the step above we queried the database for Customers and returned back a sequence of “Customer” objects. If you look at the underlying SQL statement executed (just attach the SQL Profiler tool while you run the app to inspect every data access statement), you’ll notice that it is returning all of the columns from the Customer table – including the ones we aren’t displaying. This makes sense given that our query above asked for a sequence of Customer objects, although it isn’t ideal for this particular page scenario since we only care about four of the Customer columns. In cases where you have columns containing a lot of data (for example: blobs of images, or large text strings, etc) this can lead to performance issues since you might end up pulling back more data than you really want/need.
One of the nice things about LINQ and DLINQ is that
we aren’t constrained to having to always return
fully populated entity objects. Instead we can shape and transform the data however
we want, without having to drop-down to write SQL
directly. LINQ and DLINQ use the new “anonymous type”
features in C# and VB to provide an elegant way to
express this (to learn more about anonymous types in
LINQ read my previous LINQ blog post).
For example, I could modify our query above like so
to just fetch the 4 columns we are going to display
like so:
GridView1.DataSource = from customer
in db.Customers
where customer.Country ==
"
orderby customer.CompanyName
select new {
CustomerID = customer.CustomerID,
CompanyName = customer.CompanyName,
City = customer.City,
Region = customer.Region
};
If you re-run the page now and look at the SQL
Profiler, you’ll notice that DLINQ has automatically
changed the SQL executed to a more optimized
statement that only returns the 4 column values we
need from the database:
SELECT [t0].[CustomerID], [t0].[CompanyName],
[t0].[City], [t0].[Region]
FROM [Customers] AS [t0]
WHERE [t0].[Country] = @p0
ORDER BY [t0].[CompanyName]',N'@p0
nvarchar(3)',@p0=N'USA'
We can also use this database shaping technique to
run aggregate functions and add computed values to
our result as well. For example, I could modify the query above to also
add the number of orders the customer has made, and
the most recent order date by writing it like
so:
GridView1.DataSource = from customer
in db.Customers
where customer.Country ==
"
orderby customer.CompanyName
select new {
CustomerID = customer.CustomerID,
CompanyName = customer.CompanyName,
City = customer.City,
Region = customer.Region,
NumOrders = customer.Orders.Count,
LastOrder = customer.Orders.Max(o =>
o.OrderDate)
};
Note that both of these new values are computed off
of the rows in the Orders table specific to the
referenced Customer (the Order table has a FK
relationship to Customers that SQLMetal
automatically detected and used to setup an
association). The above LINQ query will cause the below SQL
statement to execute in the database:
SELECT [t0].[CustomerID], [t0].[CompanyName],
[t0].[City], [t0].[Region], (
SELECT
COUNT(*)
FROM
[Orders] AS [t1]
WHERE
[t1].[CustomerID] = [t0].[CustomerID]
) AS
[NumOrders], (
SELECT
MAX([t2].[OrderDate])
FROM
[Orders] AS [t2]
WHERE
[t2].[CustomerID] = [t0].[CustomerID]
) AS
[LastOrder]
FROM [Customers] AS [t0]
WHERE [t0].[Country] = @p0
ORDER BY [t0].[CompanyName]',N'@p0
nvarchar(3)',@p0=N'USA'
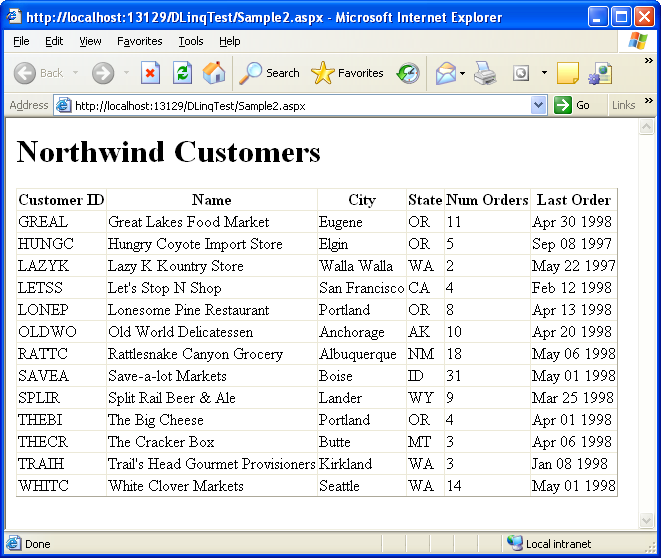
Notice how DLINQ automatically translated the count and Max date functions into the single SQL query to execute -- it did not need to pull down all of the records to compute it (making it very efficient).
And now when we run this page it will generate this
html output:
Step 5: Hierarchical Binding
Data shaping isn’t limited to adding only scalar
values to the anonymous classes we return. We can also return additional sub-collections of
objects as part of our LINQ query. For example, we could modify our query like so to
return a sub-collection of the most recent 5 orders
for each customer (note how the Take() LINQ
aggregate method can be used to return only 5
results from the database):
GridView1.DataSource = from customer
in db.Customers
where customer.Country ==
"
orderby customer.CompanyName
select new {
CustomerID = customer.CustomerID,
CompanyName = customer.CompanyName,
City = customer.City,
Region = customer.Region,
NumOrders = customer.Orders.Count,
LastOrder = customer.Orders.Max(o =>
o.OrderDate),
Orders = customer.Orders.OrderByDescending(o =>
o.OrderDate).Take(5)
};
This query returns a collection of anonymous
objects with each instance containing 7 properties –
one of which is a sub-collection of at most 5 Orders
associated with the customer.
I can then update my GridView like below to
hierarchically bind the Customer’s orders within a
templated column of the Grid to generate a bulleted
list of “Recent Orders”:
<asp:GridView
ID="GridView1"
AutoGenerateColumns="false"
runat="server">
<Columns>
<asp:BoundField
HeaderText="Customer ID"
DataField="CustomerID"
/>
<asp:BoundField
HeaderText="Name"
DataField="CompanyName"
/>
<asp:BoundField
HeaderText="City"
DataField="City"
/>
<asp:BoundField
HeaderText="State"
DataField="Region"
/>
<asp:BoundField
HeaderText="NumOrders"
DataField="NumOrders"
/>
<asp:TemplateField
HeaderText="Recent Orders">
<ItemTemplate>
<ul>
<asp:Repeater
datasource='<%# Eval("Orders")
%>'
runat="server">
<ItemTemplate>
<li>
<%# Eval("OrderID")
%>
(<%# Eval("OrderDate",
"{0:dd MMM yyyy}")%>)
</li>
</ItemTemplate>
</asp:Repeater>
</ul>
</ItemTemplate>
</asp:TemplateField>
</Columns>
</asp:GridView>
Which will cause this page to be output like
so:
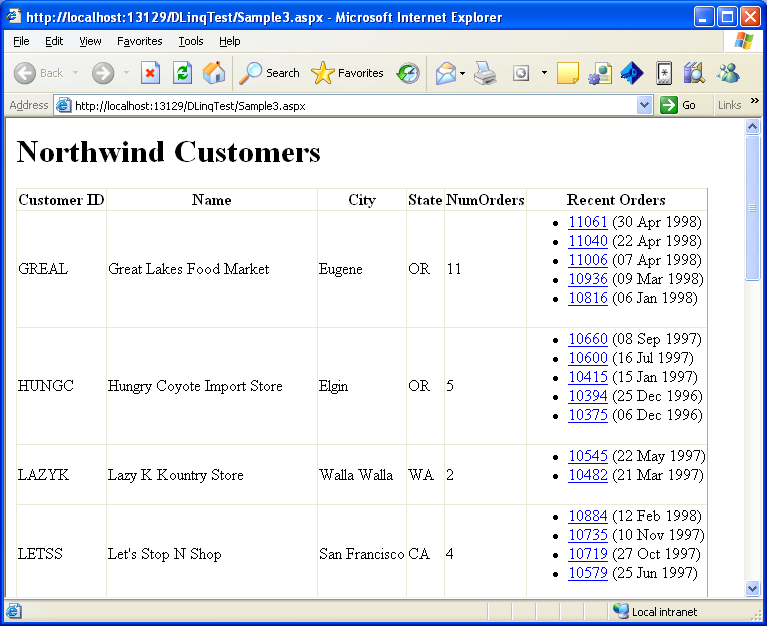
DLINQ in the sample above was smart and optimized
the data access to only hit the database twice –
once to retrieve the top-level customer data, and
then once to retrieve all of the needed orders for
our particular customers (DLINQ then split this
orders result and associated each order correctly
with the appropriate customer). This perf optimization avoided us having to hit the
database separately to populate and display each
individual customer order collection (note that we
could also have alternatively expressed to DLINQ to
lazy populate the Orders if we wanted this behavior
instead).
Step 6: Enable Basic Pagination
The previous step is nice because we can now see
the 5 most recent orders for each customer, but the
downside is that it has expanded the html height
quite a bit. To make the listing a little cleaner we’ll go ahead
and enable paging support on the GridView, set the
pagesize to 3 rows per page, and handle the
appropriate page event handler in our code-behind to
re-bind the Grid as appropriate when users click
on the new page index at the bottom of the grid.
For completeness, here is what the entire .aspx
file looks like with the Gridview with hierarchical
binding and paging enabled:
<%@
Page
Language="C#"
CodeFile="Sample4.aspx.cs"
Inherits="Sample4"
%>
<html>
<body>
<form
id="form1"
runat="server">
<h1>Northwind
Customers</h1>
<asp:GridView
ID="GridView1"
AllowPaging="true"
PageSize="3"
AutoGenerateColumns="false"
runat="server"
OnPageIndexChanging="GridView1_PageIndexChanging">
<Columns>
<asp:BoundField
HeaderText="Customer ID"
DataField="CustomerID"
/>
<asp:BoundField
HeaderText="Name"
DataField="CompanyName"
/>
<asp:BoundField
HeaderText="City"
DataField="City"
/>
<asp:BoundField
HeaderText="State"
DataField="Region"
/>
<asp:BoundField
HeaderText="NumOrders"
DataField="NumOrders"
/>
<asp:TemplateField
HeaderText="Recent Orders">
<ItemTemplate>
<ul>
<asp:Repeater
datasource='<%# Eval("Orders")
%>'
runat="server">
<ItemTemplate>
<li>
<a
href="todo"><%# Eval("OrderID")
%></a>
(<%# Eval("OrderDate",
"{0:dd MMM yyyy}")%>)
</li>
</ItemTemplate>
</asp:Repeater>
</ul>
</ItemTemplate>
</asp:TemplateField>
</Columns>
</asp:GridView>
</form>
</body>
</html>
And here is then the entire code-behind:
using
System;
using
System.Configuration;
using
System.Web.UI;
using
System.Web.UI.WebControls;
using
System.Query;
public
partial
class
Sample4 :
System.Web.UI.Page
{
void BindData()
{
string connStr =
ConfigurationManager.ConnectionStrings["Northwind"].ConnectionString;
Northwind.Northwind
db =
new Northwind.Northwind(connStr);
GridView1.DataSource = (from customer
in db.Customers
where customer.Country ==
"
orderby customer.CompanyName
select new {
CustomerID = customer.CustomerID,
CompanyName = customer.CompanyName,
City = customer.City,
Region = customer.Region,
NumOrders = customer.Orders.Count,
LastOrder = customer.Orders.Max(o =>
o.OrderDate),
Orders = customer.Orders.OrderByDescending(o =>
o.OrderDate).Take(5)
}).ToList();
GridView1.DataBind();
}
protected
void Page_Load()
{
if (Page.IsPostBack
== false)
BindData();
}
protected
void
GridView1_PageIndexChanging(object
sender,
GridViewPageEventArgs
e) {
GridView1.PageIndex = e.NewPageIndex;
BindData();
}
}
And now I have a pageable GridView, showing both
relational data and calculated aggregate data, both
in a tabular and hierarchical way:
Summary
The combination of LINQ and DLINQ provide a really
powerful way to-do data access. As you’ve seen above, it takes the grunge work out
of data access code, and leaves you with an elegant
way to easily perform data operations. You also get compiler type-checking, code
intellisense and debug support for everything (along
with a WYSIWYG designer for both DLINQ relationship
mapping and obviously ASP.NET pages). The combination of LINQ/DLINQ and the rich control
event model in ASP.NET provides a really productive
and clean way to quickly build data web apps that
also scale really well.
In my next few LINQ posts I’ll show how we will be able to build on top of the concepts I demonstrated above to easily add sorting, in-line editing, deleting, and selection support over our customer data – and also show how to easily Ajax enable it with Atlas.
Hope this helps,
Scott
P.S.
You can download the LINQ May CTP from
here
and use it with both VS 2005 and the free
Visual Web Developers Express edition. You can also download the completed samples I
built above here.