Migrating a Silverlight Application to Windows Phone 7–Part II
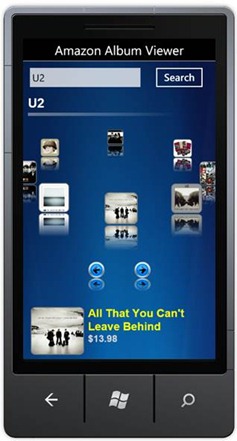
 In this post I'm going to walk through additional features that have been added to the album viewer application that I wrote about in a previous post. Topics that I’ll cover include using the Pivot control, navigating between screens using the NavigationService class and leveraging data binding along with the Model-View-ViewModel (MVVM) pattern. The image below shows the application discussed in my last post on the topic. The user can search for albums by artist and view a carousel containing album covers. From there they can move the carousel right or left using the arrow buttons and select an album to view more information.
The application discussed in this post will keep the initial album carousel screen shown above but add an alternate view for users to look at. It also adds an album details screen that shows the album cover, title, pricing and songs for a given album. Let's take a look at changes made to the initial screen to provide the user with more flexibility when viewing albums.
Using the Pivot Control
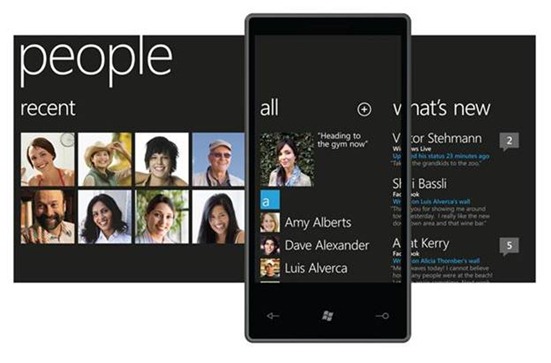
Windows Phone 7 provides controls that allow multiple screens to be displayed easily to end users. The first is the Panorama which allows users to navigate around a large virtual screen. As they view a section of the screen a small portion of what follows is shown to the right to let them know that there's more to look at. To understand how a Panorama works, imagine a 2 foot wide screen with a phone placed over it that can only view a small portion of the screen at once (the view port). As the user swipes left or right they can navigate around the "panorama" quickly and easily. An example of the Panorama control in action is shown next:
In addition to the Panorama control, the Pivot control also ships with Windows Phone 7 and provides a simple way for users to navigate between different screens by swiping. You can think of the Pivot control as being analogous to the TabControl found in Silverlight and other frameworks. However, instead of having actual tabs the Pivot control provides pivot items that display text. The user navigates between pivot items by swiping right or left.
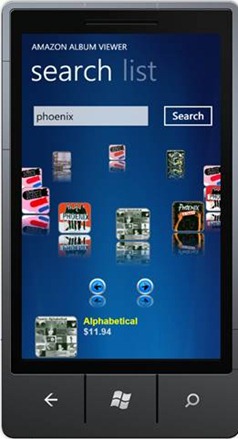
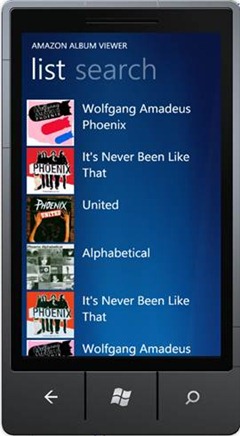
For the updated version of the Amazon Album Viewer application discussed in this post I decided to use the Pivot control since it provides an intuitive way to navigate between related screens. The first pivot item allows the user to search for artists and displays the album carousel once an artist is found. The second pivot item displays the albums in a standard list view. Why would I want two views of the same data? Although the album carousel is fun to play with, people are used to lists and will likely find what they're looking for faster scanning through albums from top to bottom. Here’s an example of the Pivot control in action:
The code shown next illustrates how the Pivot control is used in MainPage.xaml. Notice that it has two PivotItem elements defined with it each containing the screen that should be displayed. The first PivotItem references a user control named AlbumsContainer while the second has an embedded ListBox control.
<controls:Pivot Title="AMAZON ALBUM VIEWER">
    <controls:PivotItem Header="search">
        <my:AlbumsContainer  />
    </controls:PivotItem>
    <controls:PivotItem Header="list">
        <ListBox ItemsSource="{Binding Albums}"
            HorizontalAlignment="Stretch"
            SelectionChanged="AlbumList_SelectionChanged">
            <ListBox.ItemTemplate>
                <DataTemplate>
                    <Grid Margin="0,5,0,0">
                        <Grid.ColumnDefinitions>
                            <ColumnDefinition Width=".25*" />
                            <ColumnDefinition Width=".75*" />
                        </Grid.ColumnDefinitions>
                        <Image Source="{Binding BitmapImage}" />
                        <TextBlock Grid.Column="1" Margin="20,0,0,0"
                            Text="{Binding Title}" TextWrapping="Wrap"
                            FontSize="30" />
                    </Grid>
                </DataTemplate>
            </ListBox.ItemTemplate>
        </ListBox>
    </controls:PivotItem>
</controls:Pivot>
Navigating Between Screens
Although the Pivot and Panorama controls can be used to navigate between different screens there will be times when you need to load a different screen not associated with one of these controls. In the album viewer application I wanted to allow a user to click on the album at the bottom of the search pivot item or on an album in the list pivot item and be taken to an album details screen called AlbumDetails.xaml.
Navigating between different screens is accomplished using the NavigationService object which is available through the PhoneApplicationPage class. Both MainPage.xaml (where the Pivot control is used) and AlbumDetails.xaml derive from PhoneApplicationPage making NavigationService directly accessible. An example of using NavigationService to navigate to AlbumDetails.xaml is shown next:
NavigationService.Navigate(new Uri("/AlbumDetails.xaml", UriKind.Relative));
For the album viewer application I wanted to create a simple screen navigation service that could be re-used across the application. Doing this abstracts the code out of individual pages and places it into a single class allowing for simplified maintenance. To handle this I created a simple singleton class named ScreenNavigator. Because ScreenNavigator doesn't derive from PhoneApplicationPage I wasn't able to access NavigationService directly. However, you can get to it by going through Application.Current.RootVisual since the RootVisual of a standard Windows Phone 7 application is a PhoneApplicationFrame type. PhoneApplicationFrame derives from Frame which exposes the Navigate method used to navigate between screens. The following code shows the simple ScreenNavigator class that I created in the album viewer project. Although it only contains a single navigation method, additional methods could be added to handle navigating between multiple screens.
public class ScreenNavigator
{
    static ScreenNavigator _Instance = new ScreenNavigator
    {
        NavigationService = (PhoneApplicationFrame)Application.Current.RootVisual
    };

    public static ScreenNavigator Instance
    {
        get { return _Instance; }
    }

    private PhoneApplicationFrame NavigationService { get; set; }

    public void NavigateToAlbumDetails()
    {
        NavigationService.Navigate(new Uri("/AlbumDetails.xaml", UriKind.Relative));
    }
}
The following code shows how the ScreenNavigator class can be used to navigate to the AlbumDetails page:
ScreenNavigator.Instance.NavigateToAlbumDetails();
As a user selects an album the ScreenNavigator class is used to navigate to a screen that shows album details. They can get back to the search or list screens by clicking the phone's back button. The following image shows an example of the album details screen:
Following the MVVM Pattern
Windows Phone 7 pages provide code-beside files that can be used to retrieve data, manipulate XAML and perform other functions. The initial version of the album viewer application relied heavily on code-beside files which works fine but doesn't promote good code re-use, testing or simplified maintenance. Having built several Silverlight applications over the past few years I've come to rely on the Model-View-ViewModel pattern to keep projects modularized and to allow for better code re-use and consistency. I've written about the MVVM pattern in DevConnections Pro Magazine and blogged (see http://tinyurl.com/dwahlinMVVM) about different aspects of it as well so I won't go into the fundamentals of the pattern here. However, I do want to show how the initial version of the album viewer application was enhanced to support the pattern.
For the second iteration of the application I created a MainPageViewModel class to handle retrieving and storing data as a user searches for albums. The class implements INotifyPropertyChanged so that it can be used with data binding operations and exposes properties such as Albums, CurrentAlbum and ArtistText that views can bind to. As a user clicks the search button, MainPageViewModel accesses the artist text entered (through a TwoWay binding) and initiates a REST call to Amazon.com. The data that's returned is stored in the Albums property that is used to render the album carousel and the album list within the Pivot control discussed earlier. The following code shows the portion of the MainPageViewModel class that's responsible for retrieving and storing album data.
public class MainPageViewModel : ViewModelBase
{
    private readonly IAmazonSearcher _Searcher;

    public MainPageViewModel()
    {
        _Searcher = new AmazonRESTSearcher();
        _Searcher.SearchCompleted += searcher_SearchCompleted;
    }

    public void DoArtistSearch()
    {
        if (SearchInProgress || String.IsNullOrEmpty(ArtistText)) return;
        SendLoaderMessage(true, ArtistText);
        _Searcher.GetAlbumsAsync(ArtistText, "1");
        SearchInProgress = true;
    }

    private void searcher_SearchCompleted(object sender, SearchCompletedEventArgs e)
    {
        SearchInProgress = false;
        SendLoaderMessage(false, "");

        if (e.Error == null && e.Result != null)
        {
            Albums = e.Result;
            Messenger.Default.Send(Albums);
        }
    }

    private void SendLoaderMessage(bool startLoader, string artistText)
    {
        var msg = new LoaderMessage
        {
            ArtistText = artistText,
            StartLoader = startLoader
        };
        Messenger.Default.Send(msg);
    }
}
Looking through the code you can see that an AmazonRESTSearch object is created within the constructor and that this object is used to retrieve album data. A Messenger class available with MVVM Light (http://mvvmlight.codeplex.com) is also used to communicate between the ViewModel and one or more views as data is loaded. For example, the SendLoaderMessage method uses the Messenger class to send a message to a View that is responsible for rendering a loading image and associated animation.
MainPage.xaml binds to MainPageViewModel and relies on it to access album data. The Pivot code shown earlier demonstrates binding to the Albums property of MainPageViewModel. AlbumDetails.xaml also has a corresponding AlbumDetailsViewModel class that it binds to in order to render album details. The sample code available with this post (see the download link below) contains additional ViewModel locator code used to associate ViewModel classes with Views.
While there's still a lot of work that needs to be done on the album viewer application to make it ready for "prime time", the application demonstrates several different Windows Phone 7 features that can be applied in your own applications. In this post you've seen how to use the Pivot control to allow users to switch between screens quickly, how the NavigationService can be used to load different screens and how the MVVM pattern can be used with Windows Phone 7 applications. I'm still amazed at how easy and productive it is to develop fully functional Silverlight applications that run on a phone!
Download the Amazon Album Viewer Application
Subscribe to my Free FlipBoard Magazines: | ||||
 |  |  |  |  |

