Windows Vista for Developers – Part 3 – The Desktop Window Manager
Although Windows 95 (and Window NT 3.51) introduced Windows
developers to non-rectangular windows, through the ability
to set the window region for a given window using the
SetWindowRgn function, this did not provide transparency since the
window was still completely opaque and merely afforded the
developer some control over the window’s shape. Windows 2000
introduced layered windows by means of the
WS_EX_LAYERED
extended window style and developers were finally able to
control not only the shape but also the level of
transparency within the window region. Windows Vista
introduces yet another twist on the road away from
non-rectangular windows by allowing developers to apply
translucency to portions of a window.
In this
part 3 of the
Windows Vista for Developers
series, we are looking at the Desktop Window Manager (DWM)
API. The DWM is responsible for the composition of windows
on the desktop and the DWM API allows developers to control
how composition affects a particular window. As you will
see, the DWM is responsible for much more than just “glass”.
We will also look at the existing functionality for
transparency that Windows Vista inherited from Windows 2000
and see how it complements the new DWM functionality.
Terminology
When it comes to graphics, the terminology can
be confusing. Here are some common terms you should be
familiar with when working with transparency and
translucency in Windows.
Transparency – Refers to the ability to see through something clearly
and without obstruction. Think of it as clear glass. Some
applications and APIs use the term transparency to refer to
a scale that ranges from “completely” transparent to
“completely” opaque.
Translucency – People often use translucency and transparency
interchangeably but they actually mean very different
things. Translucency refers to the ability to see through
something where the background appears unclear whether it is
out-of-focus or simply blurry in some way. Windows Vista
refers to the glass effect as “transparent glass” when it
technically should be called translucent glass.
Opacity – Opacity refers to the state of being opaque and opaque
refers to something that is neither transparent nor
translucent. Some applications and APIs use the term opacity
to refer to a scale that ranges from completely opaque to
completely transparent.
Alpha Channel – An alpha channel provides additional information for each
pixel in an image that facilitates compositing images
together.
Window Regions – A window’s region determines the area within the window
where system permits painting. Although Windows 95 supported
window regions, it was not until Windows XP that the default
theme used regions to present windows with rounded corners.
Although the default Windows Vista theme also presents
windows with rounded corners, regions are no longer used
unless you resort to the Windows Vista Basic theme.
Glass – Glass is the catchy marketing terms that Windows Vista
uses to refer to translucency.
Blur – Some of the DWM APIs refer to blur and again this
indicates translucency. Presumably, the Windows developers
felt it was easier to spell and comprehend.
Desktop Composition – The DWM performs desktop composition, enabling visual
effects on the desktop such as glass, 3D window transitions,
etc.
RGB –
RGB is short for Red, Green and Blue. RGB values are
typically packed into a COLORREF (which is just a DWORD) as
follows: 0x00BBGGRR. As you can see, the first byte is
always zero and the remaining three bytes store the
individual red, green and blue values in reverse order. Each
color value ranges from zero through 255. If all three
values are zero then the result is black. If all three
values are 255 then the result is white. For example, to
represent red specify 0x000000FF. You can also use the RGB
macro as follows: RGB(255, 0, 0). As you can see, RGB does
not provide an alpha channel.
ARGB – ARGB is short for Alpha, Red, Green and Blue. ARGB values
are typically packed into an ARGB (which is just a DWORD) as
follows: 0xAARRGGBB. The first byte stores the alpha value
and the remaining three bytes store the red, green and blue
values. Note that the color values are stored in the
opposite order to RGB.
GDI – The Windows Graphics Device Interface (GDI) API is the
original graphics interface used for 2D drawing in Windows.
With the exception of a few newer functions, the GDI API
does not honor the alpha channel in images. GDI uses RGB
values to represent color.
GDI+ – GDI+ was introduced with Windows XP (and Windows Server
2003) to provide a more capable programming model for 2D
drawing, imaging and typography and fully supports alpha
blending. GDI+ uses ARGB values to represent color.
Incidentally, GDI+ powers the the System.Drawing library in
the .NET Framework.
Is Composition Enabled? With the terminology out of the way, we can now dive into
the guts of desktop composition. Of course, to take
advantage of it we need to make sure that it is actually
available at runtime. The user may have disabled desktop
composition for performance reasons. This can be done as
follows:
With the terminology out of the way, we can now dive into
the guts of desktop composition. Of course, to take
advantage of it we need to make sure that it is actually
available at runtime. The user may have disabled desktop
composition for performance reasons. This can be done as
follows:
1. Open the System Properties window
using the following command:
%windir%\system32\SystemPropertiesAdvanced.exe
2.
Click the Performance Settings button.
3. Either
check or clear the “Enabled desktop composition” check
box.
Keep in mind that desktop composition is
independent of “glass”. Although glass requires desktop
composition, you can use desktop composition while disabling
glass.
Windows Vista provides the
DwmIsCompositionEnabled function to determine whether composition is currently
enabled. Consider the following example:
BOOL enabled = FALSE;
HRESULT result =
::DwmIsCompositionEnabled(&enabled);
Of course, this is not especially useful if you are
targeting older platforms as your application will fail to
load since it will be linked to a library that is not
available. One solution is to use a blend of delay loading
and runtime dynamic linking. The DWM API is provided by the
dwmapi.dll library
and to ensure that your application will load on older
platforms you can use Visual C++’s Delay Load facility to
only load the DWM library if it is actually used. The first
step is to instruct the linker to delay load the DWM
library. This can be done as follows:
1. Open the
project’s property pages.
2. Navigate to the
Linker > Input section.
3. Add
dwmapi.dll to the
list of
Delay Load DLLs. You
should already have
dwmapi.lib in the
list of
Additional Dependencies
to allow the linker to find the various DWM API functions
that you make use of.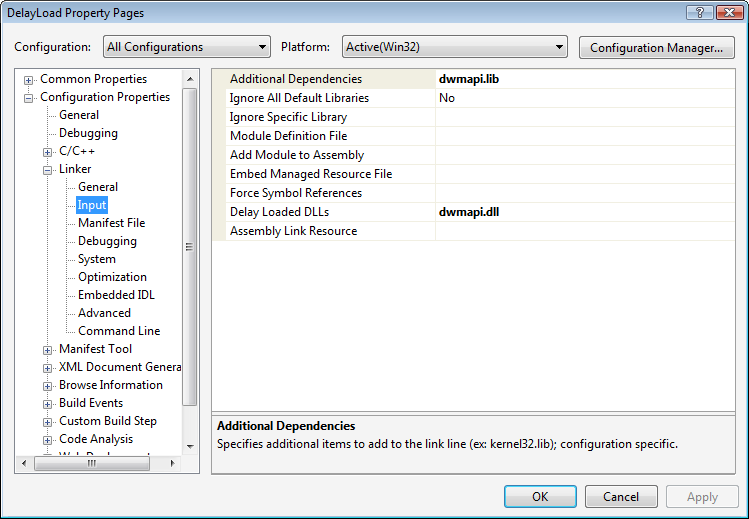
With this in place, the DWM library will only
be loaded the first time you call any of its functions, but
how do you know whether it is safe to do so? After all,
calling
DwmIsCompositionEnabled will attempt to load the DWM library and crash your
application on older versions of Windows. The solution is to
manually attempt to load the DWM library and for good
measure attempt to retrieve the address of a DWM function.
Consider the following wrapper function:
bool IsCompositionEnabled()
{
HMODULE
library = ::LoadLibrary(L"dwmapi.dll");
bool
result = false;
if (0 != library)
{
if (0 != ::GetProcAddress(library,
"DwmIsCompositionEnabled"))
{
BOOL enabled = FALSE;
result =
SUCCEEDED(::DwmIsCompositionEnabled(&enabled))
&& enabled;
}
VERIFY(::FreeLibrary(library));
}
return result;
}
The
IsCompositionEnabled function attempts to load the DWM library and retrieve the
address of the
DwmIsCompositionEnabled function. If this is successful, you can assume it is
running on Windows Vista or later. It then simply calls the
DwmIsCompositionEnabled function, which will actually load the DWM library, to
determine whether composition is enabled. Now you simply
have to ensure that you do not call any other DWM functions
if
IsCompositionEnabled returns false.
The other thing to keep in mind
is that since the user, and other applications for that
matter (more on this in a moment), can enable and disable
desktop composition at any time, your application needs to
be able to cope with changes in the availability of desktop
composition. The system will send your window the
WM_DWMCOMPOSITIONCHANGED
message to indicate that the availability of desktop
composition has changed. The
WPARAM and
LPARAM values are not
used so you must call the
DwmIsCompositionEnabled function again to determine the current state of desktop
composition.
As I hinted at, it is possible for
applications to temporarily disable desktop composition for
the lifetime of the application or for some subset thereof.
The
DwmEnableComposition function allows you to disable desktop composition for the
entire desktop. Desktop composition will be disabled until
you call
DwmEnableComposition again to enable it. If you fail to re-enable desktop
composition, the system will automatically enable it when
the application exits.
The following code
disables composition:
HRESULT result =
::DwmEnableComposition(DWM_EC_DISABLECOMPOSITION);
And the following code will enable it again:
HRESULT result =
::DwmEnableComposition(DWM_EC_ENABLECOMPOSITION);
Assuming you are using the default Windows Vista theme,
these calls will toggle between the new “Window Vista” and
“Windows Vista Basic” themes. Just remember, when you
application exits, composition will be reset regardless of
whether you re-enabled it.
Is Composition Translucent?
As I mentioned in the previous section, the
fact that desktop composition is enabled does not
necessarily mean that the “glass” is translucent. I took the
following two window clippings of the exact same window. The
one on the left was taken with translucent glass and the one
of the right with opaque glass. As you can see, the
translucent glass provides a hint of the desktop background
color as well as the recycle bin hiding underneath the
window whereas the opaque glass only offers the aurora
effect provided by the DWM.

Users can set the translucency as well as the composition
color, the color used for rendering glass, as follows:
1.
Right-click on the desktop and select the “Personalize”
command.
2. Click the “Window Color and
Appearance” link.
Applications can determine
whether composition is opaque or translucent as well as the
composition color by calling the
DwmGetColorizationColor function as follows:
Gdiplus::ARGB color = 0;
BOOL opaque = FALSE;
HRESULT
result = ::DwmGetColorizationColor(&color,
&opaque);
Since the user can change these settings at any time,
windows are notified of changes by means of the
WM_DWMCOLORIZATIONCOLORCHANGED
message. The
WPARAM provides the
new ARGB value and
LPARAM is zero if
composition is translucent and non-zero if composition is
opaque.
Blurring the Client Area
Assuming desktop composition is enabled, the
DWM will take care of rendering the non-client area of your
window with glass. The client area however is opaque by
default and applications must specifically request glass for
all or part of the client area. The
DwmEnableBlurBehindWindow function allows you to control the blur effect for a
window. The function accepts a handle to a window as well as
a pointer to a
DWM_BLURBEHIND
structure defined as follows:
struct DWM_BLURBEHIND
{
DWORD dwFlags;
BOOL fEnable;
HRGN hRgnBlur;
BOOL
fTransitionOnMaximized;
};
The following flags are defined and they indicate
which of the remaining fields the function should take note
of:
DWM_BB_ENABLE
DWM_BB_BLURREGION
DWM_BB_TRANSITIONONMAXIMIZED
The
DwmEnableBlurBehindWindow takes a bit of getting used to. Consider using the
following C++ wrapper function that simplifies its use
considerably:
HRESULT EnableBlurBehindWindow(HWND window,
bool enable = true,
HRGN region = 0,
bool
transitionOnMaximized = false)
{
DWM_BLURBEHIND blurBehind = { 0 };
blurBehind.dwFlags = DWM_BB_ENABLE |
DWM_BB_TRANSITIONONMAXIMIZED;
blurBehind.fEnable
= enable;
blurBehind.fTransitionOnMaximized =
transitionOnMaximized;
if (enable
&& 0 != region)
{
blurBehind.dwFlags |= DWM_BB_BLURREGION;
blurBehind.hRgnBlur = region;
}
return ::DwmEnableBlurBehindWindow(window,
&blurBehind);
}
Now enabling or disabling blur behind is straightforward.
Here are a few examples:
Enable blur behind
client area:
HRESULT result = EnableBlurBehindWindow(window);

Disable blur behind client area:
HRESULT result = EnableBlurBehindWindow(window,
false);
Blur a region of the window:
CRgn rgn;
rgn.CreateEllipticRgn(30, 30, 170,
170);
HRESULT result =
EnableBlurBehindWindow(window,
true,
rgn);
Render the blur behind as if the window were
maximized:
HRESULT result = EnableBlurBehindWindow(window,
true,
0,
true);
As you can see, the
DwmEnableBlurBehindWindow function provides a lot of functionality and with a little
help from C++ it becomes quite simple to make use of. The
ability to blur a region of the window is especially useful
when combined with layered windows.
Extending the Window Frame
You may have noticed in the window clippings in
the previous section that although the client area was
blurred, the client edge was still visible. If you want to
render glass seamlessly then you need to use a different
approach. Of course, if your window does not have a frame
then
DwmEnableBlurBehindWindow is good for the full extent of the window.
To
extend the frame into the window’s client area, you need to
use the aptly named
DwmExtendFrameIntoClientArea function. Unlike
DwmEnableBlurBehindWindow, the
DwmExtendFrameIntoClientArea function is very straightforward and you can simply use it
directly.
The
DwmExtendFrameIntoClientArea function accepts a window handle as well as a pointer to a
MARGINS structure.
The structure indicates how far into the client area the
frame should be extended. The following example extends the
bottom margin 20 pixels into the client area:
MARGINS margins = { 0 };
margins.cyBottomHeight =
20;
HRESULT result =
::DwmExtendFrameIntoClientArea(m_hWnd,
&margins);
To restore the frame margins simply set all
the margins to zero:
MARGINS margins = { 0 };
HRESULT result =
::DwmExtendFrameIntoClientArea(m_hWnd,
&margins);
The DwmExtendFrameIntoClientArea function
also has a little bonus feature that allows you to render
the entire client and non-client area as a seamless sheet of
glass. Just set any margin to -1:
MARGINS margins = { -1 };
HRESULT result =
::DwmExtendFrameIntoClientArea(m_hWnd,
&margins);
Painting
Up to this point, I have focused on the DWM functions for
control blurring. What I have not yet mentioned is the
secret sauce you need to get the blurring to kick in. Then
of course, there is the issue of what to do with all that
lovely glass. Presumably, you want to draw something on
it!
The trick with understanding how glass works
is having an understanding of the relationship between the
DWM functions and the contents of your window. The
DwmEnableBlurBehindWindow and
DwmExtendFrameIntoClientArea functions
promise to instruct the DWM to render as glass any portions
of your window that are painted with an alpha channel brush
that is not completely opaque. Consider the following window
clipping displaying a PNG image I created using
Photoshop:
The image painted on the window includes an
alpha channel so the DWM faithfully blurs the background
based on the transparency level of each individual pixel.
The catch is that virtually all of the GDI functions that
Windows developers have learnt to use do not actually have
any knowledge of alpha values in colors and do not perform
alpha blending. Therefore, if you are serious about
transparency and translucency on Windows you need to use
GDI+ (or some other graphics library). Before we look at
GDI+ however, let us see what can be done with good old
GDI.
It so happens that the bit pattern for RGB
black (0x00000000) is the same as the bit pattern for 100%
transparent ARGB so you can actually draw with “black” GDI
brush and assuming you’ve instructed the DWM to blur the
painted area, the result will be the desired glass effect.
Let us look at a simple example of this using ATL:
class SampleWindow :
public
CWindowImpl<SampleWindow, CWindow,
CFrameWinTraits>
{
public:
BEGIN_MSG_MAP(SampleWindow)
MSG_WM_ERASEBKGND(OnEraseBackground)
END_MSG_MAP()
SampleWindow()
{
VERIFY(Create(0, 0, L"Sample"));
const
MARGINS margins = { -1 };
COM_VERIFY(::DwmExtendFrameIntoClientArea(m_hWnd,
&margins));
}
private:
virtual void OnFinalMessage(HWND)
{
::PostQuitMessage(0);
}
bool
OnEraseBackground(CDCHandle dc)
{
CRect rect;
VERIFY(GetClientRect(&rect));
dc.FillSolidRect(&rect,
RGB(0, 0, 0));
return true; // Yes, I
erased the background.
}
};
Just after the window is created, the
DwmExtendFrameIntoClientArea function is
used to instruct the DWM to render the entire client area
seamlessly with glass. The window then handles the
WM_ERASEBKGND message and fills the client
area with “black” as needed. The results are as you might
expect:
The trouble with using this technique for
rendering glass is that anything you might want to draw on
your window better not use a black GDI brush otherwise it
will also appear translucent. Consider a dialog box with an
edit control:
If we apply the technique of using a black
GDI brush to this window, the results will be less the
desirable:
As you can see, since the control uses a
black brush to draw the text, the DWM is fooled into
thinking that this too should be rendered translucent. One
solution is to owner-draw the control. I don’t know about
you but I do not want to spend my time “owner drawing” all
my controls. I really like the way the system does it and I
would rather not have the responsibility of trying to
duplicate it.
A more pragmatic solution is to
make use of layered windows. Layered windows, first
introduced with Windows 2000, are intimately aware of alpha
blending, and thus ideally suited for rendering glass.
Layered windows offer two distinct programming models. You
can either use the
UpdateLayeredWindow function and provide a
device-independent bitmap to define the complete appearance
of a window on screen (the hard way) or you can use the
SetLayeredWindowAttributes function (the
easy way). Let us start with the easy way.
The
SetLayeredWindowAttributes function allows
you to specify an RGB color so that any pixels painted with
this color will be transparent. This frees the black brush
from performing double-duty and you can once again draw
controls using the regular black brush as needed. Assuming
your window has the WS_EX_LAYERED extended
window style, you can call
SetLayeredWindowAttributes as follows to
set the transparency color:
const COLORREF color = RGB(200, 201, 202);
VERIFY(::SetLayeredWindowAttributes(window,
color,
0,
LWA_COLORKEY));
Choosing an appropriate color is the hardest part. Ideally,
you should use a color that will blend well but it is
unlikely that you will know what color to blend with. Font
smoothing will also not be perfect, as it will be blending
with the transparency color instead of the actual
background. Nevertheless, it is an adequate solution in many
cases. It is also important that you specify a color that is
unlikely to be used by any controls drawn on your window.
The SetLayeredWindowAttributes function
also tries to provide some of the more advanced capabilities
of the UpdateLayeredWindow function for
those stuck in GDI land. One such feature is the ability to
create non-rectangular windows. This is somewhat off-topic
but I mention it here only because
SetLayeredWindowAttributes provides this
functionality only if you choose a transparency color with
the red, gren and blue values being equal. This does not mix
well with the DWM as the glass will appear translucent but
the user’s mouse will be directed to the window
underneath.
With that, here is a complete example
of using layered window translucency with a dialog box:
class SampleDialog :
public
CDialogImpl<SampleDialog>
{
public:
enum { IDD = IDD_SAMPLE };
BEGIN_MSG_MAP(MainWindow)
MSG_WM_INITDIALOG(OnInitDialog)
MSG_WM_ERASEBKGND(OnEraseBackground)
COMMAND_ID_HANDLER(IDCANCEL, OnCancel)
END_MSG_MAP()
SampleDialog() :
m_transparencyKey(RGB(200, 201, 202))
{
// Do nothing
}
private:
LRESULT OnInitDialog(HWND /*control*/,
LPARAM /*lParam*/)
{
SetWindowLong(GWL_EXSTYLE,
GetExStyle() | WS_EX_LAYERED);
VERIFY(::SetLayeredWindowAttributes(m_hWnd,
m_transparencyKey,
0,
LWA_COLORKEY));
const MARGINS margins =
{ -1 };
COM_VERIFY(::DwmExtendFrameIntoClientArea(m_hWnd,
&margins));
return TRUE; // Yes, go
ahead and set the keyboard focus.
}
bool OnEraseBackground(CDCHandle dc)
{
CRect rect;
VERIFY(GetClientRect(&rect));
dc.FillSolidRect(&rect,
m_transparencyKey);
return true; //
Yes, I erased the background.
}
LRESULT OnCancel(WORD /*notifyCode*/,
WORD identifier,
HWND /*window*/,
BOOL& /*handled*/)
{
VERIFY(EndDialog(identifier));
return 0;
}
const COLORREF
m_transparencyKey;
};
The results
are considerably better than before:
The main difference between the
SampleDialog class and the previous
SampleWindow class using a black GDI brush
is that in the SampleDialog example
SetLayeredWindowAttributes is used to set
the transparency color and the
WM_ERASEBKGND message handler fills the
client area with the transparency color instead of with
black. Considering how little work is involved, this is
certainly an attractive solution if you cannot afford to go
all out owner-drawing controls.
Advanced Layered Windows
The previous section covered the use of layered
windows by means of the
SetLayeredWindowAttributes function to
provide translucency without much work. For greater control,
you need to take it on yourself to prepare the layered
window’s off-screen bitmap yourself rather than relying on
the system to compose it for you. Although using GDI+ might
seem ideal, repeatedly drawing in a GDI+ bitmap and then
converting it to a screen-compatible bitmap can be
expensive. Fortunately, ATL provides the
CImage class that provides just enough
functionality so that you can avoid the overhead of GDI+
bitmaps while being able to take advantage of the drawing
power of GDI+. The resulting image can then be efficiently
copied to the screen sing the
UpdateLayeredWindow function. The beauty of
using UpdateLayeredWindow is that it honors
the entire alpha channel of the image and not just a single
transparency color. This allows you to use different levels
of transparency in your window quite simply.
Let
us walk through a simple example.
First, we will
use the CImage class to create an image
with an alpha channel and GDI+ to fill the image with a
gradient brush starting with transparent in the top-left
corner and ending with black in the bottom-right corner.
Start by creating the bitmap as follows:
CImage image;
VERIFY(image.Create(300, //
width
300, // height
32, // bits per pixel
CImage::createAlphaChannel));
This creates a device-independent bitmap (DIB) section 300
pixels square with an alpha channel. You can now use the
GDI+ Graphics class to draw to the bitmap.
CImage’s GetDC method is
used to pass the Graphics class a device
context in which to draw. Once the
Graphics class is destroyed,
CImage’s ReleaseDC method
must be called. The Graphics object can
then be used to do whatever drawing you require. The
following example fills the bitmap with a linear gradient
brush:
{
Gdiplus::Graphics graphics(image.GetDC());
GDIPLUS_VERIFY(graphics);
Gdiplus::Rect
rect(0,
0,
image.GetWidth(),
image.GetHeight());
Gdiplus::LinearGradientBrush brush(rect,
Gdiplus::Color(0, 0, 0, 0),
Gdiplus::Color(255, 0, 0, 0),
Gdiplus::LinearGradientModeForwardDiagonal);
GDIPLUS_VERIFY(graphics.FillRectangle(&brush,
rect));
}
image.ReleaseDC();
The braces are used simply to ensure that the
Graphics object is destroyed before calling
the ReleaseDC method on the
CImage object. The rest is just GDI+ code
that is beyond the scope of this article but should be
self-explanatory.
With the image prepared, it is
time to call UpdateLayeredWindow to update
the layered window based on the bitmap.
UpdateLayeredWindow requires a source DC to
copy from so we can once again use the
GetDC and ReleaseDC pair
of methods:
CPoint windowPosition(0, 0);
CPoint layerPosition(0,
0);
CSize size(image.GetWidth(),
image.GetHeight());
BLENDFUNCTION blendFunction
= { 0 };
blendFunction.BlendOp = AC_SRC_OVER;
blendFunction.BlendFlags
= 0;
blendFunction.SourceConstantAlpha = 255;
blendFunction.AlphaFormat
= AC_SRC_ALPHA;
VERIFY(::UpdateLayeredWindow(m_hWnd,
0, // obtain screen DC
0,
&size,
image.GetDC(),
&layerPosition,
0,
// no color key
&blendFunction,
ULW_ALPHA));
image.ReleaseDC();
The results are what you might expect:
With the layered window in place, it is time
to turn that transparency to translucency and achieve the
glass effect. This is simple matter of calling the
EnableBlurBehindWindow helper function described in the
section entitled “Blurring the Client Area” and you are
done:
The sample in the download for this article
provides a more complete example and allows you to load an
arbitrary PNG file to render in either a regular window or
in a layered window, with or without glass.
DWM Window Attributes
There are a handful of additional window
attributes that the DWM allows you to get or set using the
DwmSetWindowAttribute function. Some are
particularly interesting.
The
DWMWA_TRANSITIONS_FORCEDISABLED attribute
allows you to disable the animation that occurs when your
window transitions between the restored, maximized and
minimized states.
The
DWMWA_ALLOW_NCPAINT attribute allows you to
draw to the non-client area of the window, ensuring that
what you draw is visible once desktop composition is done
with it. Be very careful with this, as it is usually
glaringly obvious when the painting conflicts with the glass
resulting in an undesirable appearance. A good example of
this is the beta 2 build of Word 2007 where the non-client
area is poorly drawn (fortunately, this has been cleaned up
in subsequent builds of Word 2007).
The
DWMWA_FLIP3D_POLICY attribute allows you to
control how the Flip3D feature (Windows key + Tab) handles
your window. You can use the value
DWMFLIP3D_EXCLUDEBELOW attribute value to
instruct Flip3D to exclude your window from the animation
and instead display your window behind the stack of rotating
windows.
The sample in the download for this
article allows you to experiment with a number of the
DWM-provided window attributes.
Thumbnails
The final DWM feature I want to talk about is
the ability to host your own thumbnails. You may have
noticed the neat “thumbnail” feature provided by the Windows
Vista task bar. Hovering your mouse over an application item
in the taskbar results in a little thumbnail popping up
allowing you to get a peak at the window without having to
switch to it.
Did you know that the thumbnail is
actually live? If you do not know what I mean then try the
following experiment:
1. Right-client on the
date/time on the taskbar and select the “Adjust Date/Time”
command. A window should appear that includes wonderfully
rendered analog clock.
2. Hover your mouse over
the window’s task bar item and wait for the thumbnail to
appear.
If you look closely, you should see the
clock’s second hand moving in the thumbnail and as it turns
out, the DWM exposes this feature so that you can add live
thumbnails to your own applications!
The way
thumbnails works is that you “register” a source and
destination window with the DWM and as part of desktop
composition, it will take care of updating the destination
window to reflect the source window. It is amazingly
powerful considering how little code you need to write to
get it all working. Since registering a thumbnail results in
a handle that must be used with subsequent calls to the DWM
to update the thumbnail properties and ultimately unregister
the thumbnail, it makes sense to use a C++ class to provide
a light abstraction:
class Thumbnail
{
public:
explicit Thumbnail(HTHUMBNAIL handle = 0) :
m_handle(handle)
{
// Do nothing
}
~Thumbnail()
{
if
(0 != m_handle)
{
COM_VERIFY(Unregister());
}
}
bool IsRegistered() const
{
return 0
!= m_handle;
}
HRESULT
Register(HWND destination,
HWND
source)
{
ASSERT(0 == m_handle);
CSize reserved(0, 0);
return
::DwmRegisterThumbnail(destination,
source,
&reserved,
&m_handle);
}
HRESULT
Unregister()
{
ASSERT(0 !=
m_handle);
HRESULT result =
::DwmUnregisterThumbnail(m_handle);
m_handle
= 0;
return result;
}
HRESULT QuerySourceSize(CSize& size)
{
ASSERT(0 != m_handle);
return
::DwmQueryThumbnailSourceSize(m_handle,
&size);
}
HRESULT
UpdateProperties(const DWM_THUMBNAIL_PROPERTIES&
properties)
{
ASSERT(0 !=
m_handle);
return
::DwmUpdateThumbnailProperties(m_handle,
&properties);
}
private:
HTHUMBNAIL m_handle;
};
Registering and unregistering the thumbnail is
self-explanatory. The
QuerySourceSize method allows you to
determine the size of the source window so that you can
factor that into your thumbnail properties. The
UpdateProperties method must be called at
least once to instruct the DWM to begin updating the live
thumbnail. The
DWM_THUMBNAIL_PROPERTIES structure offers
some control over the behavior of the thumbnail.
struct DWM_THUMBNAIL_PROPERTIES
{
DWORD
dwFlags;
RECT rcDestination;
RECT
rcSource;
BYTE opacity;
BOOL
fVisible;
BOOL fSourceClientAreaOnly;
};
The dwFlags field indicates which
subsequent fields are populated.
The
rcDestination field indicates the bounds in
the client area of the destination window in which to render
the thumbnail. Include the
DWM_TNP_RECTDESTINATION flags to use this
field.
The rcSource field
indicates the bounds of the source window to include in the
thumbnail. This is used to display only a portion of the
source window in the thumbnail. Include the
DWM_TNP_RECTSOURCE flag to use this
field.
The opacity field
indicates the level of opacity to use when blending the
source with the destination window background. If the source
window is semi-transparent or translucent it will
automatically be alpha blended so this field just provides
an additional degree of control. Include the
DWM_TNP_OPACITY flag to use this field.
The
fVisible field allows you to turn the
thumbnail blending on or off temporarily without having to
unregister the thumbnail completely. Include the
DWM_TNP_VISIBLE flag to use this field.
Finally,
the fSourceClientAreaOnly field allows you
to limit the thumbnail to exclude the non-client area of the
source window. This is incidentally the way the task bar
displays thumbnails. Include the
DWM_TNP_SOURCECLIENTAREAONLY flag to use
this field.
The sample in the download for this
article demonstrates the use of a live thumbnail by
providing a resizable thumbnail window.
Sample
The sample project provided in the
download
for this article demonstrates much of the functionality
described in the article. Most of the controls affect the
image and thumbnail windows directly so you can play around
with the options and the windows will automatically
update.
That concludes my coverage of the
transparency and translucency features of Windows Vista.
Daniel Moth
also covered glass basics in C#
here.
Update: I have written another DWM article that talks about Controls and the Desktop Window Manager.
Read part 4 now:
User Account Control
© 2006 Kenny Kerr