Archives
-
Porting a C# Windows application to Linux
I own a Windows application. To expand our customer base, we need to create a Linux edition. In anticipating the demand, we previously decided to place the majority of logics in a few .net standard libraries and this is a big paid-off. However, there are still a few things we need to do so that the same code would work on both Windows and Linux.
- Path separator is different between Windows and Linux. Windows uses “\” as separator while Linux uses “/” as separator. The solution is to always use Path.Combine to concatenate paths. Similarly, use Path.GetDirectoryName and Path.GetFileName to split the paths.
- Linux file system is case sensitive. The solution is to be very consistent with path names and always use constants when a path is used in multiple places.
- In text files, Windows uses \r\n to end lines while Linux uses \r. The solution is to use TextReader.ReadLine and TextWriter.WriteLine. TextReader.ReadLine reads Windows text files correctly on Linux and vice versa. If we have to face line-ending characters explicitly, use Environment.NewLine.
- Different locations for program files and program data. Windows by defaults store programs in “c:\Program Files” folder and store program data in “c:\ProgramData”. The exact location can be determined from the %ProgramFile% and %ProgramData% environment variables. Linux, in contrast, has a different convention and one often install programs under /opt and write program data under /var. For complete reference, see: http://www.tldp.org/LDP/Linux-Filesystem-Hierarchy/html/. This is an area we have to branch the code and detect operating system using RuntimeInformation.IsOSPlatform.
- Lack of registry in Linux. The solution is to just use configuration files.
- Windows has services while Linux has daemon. The solution is to create a Windows Service application on Windows and create a console application on Linux. RedHat has a good article on creating Linux daemon in C#: https://developers.redhat.com/blog/2017/06/07/writing-a-linux-daemon-in-c/. For addition information on Systemd, also see: https://www.digitalocean.com/community/tutorials/understanding-systemd-units-and-unit-files.
- Packaging and distribution. Windows application are usually packaged as msi or Chocolatey package. Linux applications are usually packaged as rpm. This will be the subject of another blog post.
-
Building .net core on an unsupported Linux platform
Introduction
I need to a product that I own from Windows to Amazon Linux. However, Amazon Linux is not a supported platform for running .net core by Microsoft. Although there is a Amazon Linux 2 image with .net core 2.1 preinstalled and it is possible to install the CentOS version of .net core on Amazon Linux 1, I went on a journey to build and test .net core on Amazon Linux to have confidence that my product will not hit a wall.
.net core require LLVM 3.9 to build. However, we can only get LLVM 3.6.3 from the yum repository. So we have to build LLVM 3.9.LLVM 3.9 requires Cmake 3.11 or later, but we can only get Cmake 2.8.12 from the yum repository. So we have to start from building CMake.
Building CMake
The procedure to build CMake can be found in https://askubuntu.com/questions/355565/how-do-i-install-the-latest-version-of-cmake-from-the-command-line.
Here is what I did:
sudo yum groupinstall "Development Tools"
Sudo yum install swig python27-devel libedit-devel
version=3.11
build=1
mkdir ~/temp
cd ~/temp
wget https://cmake.org/files/v$version/cmake-$version.$build.tar.gz
tar -xzvf cmake-$version.$build.tar.gz
cd cmake-$version.$build/./bootstrap
make -j4
sudo make installBuilding CLang and LVVM
With CMake installed, we can build LLVM. My procedure of building Clang and LLVM is similar to the procedure in https://github.com/dotnet/coreclr/blob/master/Documentation/building/buildinglldb.md.
Please also refer to https://releases.llvm.org/3.9.1/docs/CMake.html for additional information.
cd $HOME
git clone http://llvm.org/git/llvm.git
cd $HOME/llvm
git checkout release_39
cd $HOME/llvm/tools
git clone http://llvm.org/git/clang.git
git clone http://llvm.org/git/lldb.git
cd $HOME/llvm/tools/clang
git checkout release_39
cd $HOME/llvm/tools/lldb
git checkout release_39Before we start building, we need to patch LLVM source code for Amazon Linux triplet.Otherwise LLVM cannot find the c++ compiler on Amazon Linux.
To patch, find file ./tools/clang/lib/Driver/ToolChains.cpp, find an array that looks like:
"x86_64-linux-gnu", "x86_64-unknown-linux-gnu", "x86_64-pc-linux-gnu",
"x86_64-redhat-linux6E", "x86_64-redhat-linux", "x86_64-suse-linux",
"x86_64-manbo-linux-gnu", "x86_64-linux-gnu", "x86_64-slackware-linux",
"x86_64-linux-android", "x86_64-unknown-linux"Append "x86_64-amazon-linux" to the last line.
Similar, append "i686-amazon-linux" to "i686-montavista-linux", "i686-linux-android", "i586-linux-gnu"
Now we can build:
mkdir -p $HOME/build/release
cd $HOME/build/release
cmake -DCMAKE_BUILD_TYPE=release $HOME/llvmmake –j4
sudo make install
Building CoreCLR and CoreFx
With Clang/LLVM 3.9 installed, we can now build CoreCLR and CoreFx.
https://github.com/dotnet/corefx/blob/master/Documentation/project-docs/developer-guide.mdWe need to install the prerequisites first:
sudo yum install lttng-ust-devel libunwind-devel gettext libicu-devel libcurl-devel openssl-devel krb5-devel libuuid-devel libcxx
sudo yum install redhat-lsb-core cppcheck sloccount
mkdir ~/git
git clone https://github.com/dotnet/coreclr.git
git clone https://github.com/dotnet/corefx.gitGo to each directory and check out a version, for eample:
git checkout tags/v2.0.7
Now just follow https://github.com/dotnet/coreclr/blob/master/Documentation/building/linux-instructions.md to the build.
./clean.sh -all
./build.sh -RuntimeOS=linux
./build-tests.shAlso look at: https://github.com/dotnet/corefx/blob/master/Documentation/project-docs/developer-guide.md and
https://github.com/dotnet/corefx/issues/22509
Conclusions
With the steps above, I was able to build and test .net core on Amazon Linux 1 and 2.
Note that .net core requires GLIBC_2.14 to run. To find the version of GLIBC on your version of Amazon Linux, run:
strings /lib64/libc.so.6 | grep GLIBC
If you don’t see 2.14 on the list, .net core will not run. try “sudo yum update” to see if you can update to a later version of GLIBC.
Additionally, since many newer programming languages were build on LLVM, this exercise also allow us to build other languages that require newer version of LLVM than the version in the yum repository.
-
Configure Open Live Writer to weblogs.asp.net
I have not blogged for a while. When I opened my Open Live Writer, I got error with https://weblogs.asp.net/lichen/xmlrpc.
I searched the web. Most blogs were still referencing the xmlrpc url which no longer exists.
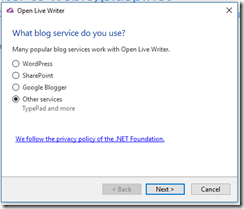
Fortunately, Fixing is easy. Just Add Account and select “Other services”
On the next screen, enter the url of the blog (without xmlrpc).
Open Live Writer and Orchard are smart enough to figure out the rest. This is certainly an improvement over the earlier versions.
If you are curious on how Open Live Writer figured out the post API endpoint, which view the source of your web page and you will see the following lines in the header:
<link href="https://weblogs.asp.net/lichen/XmlRpc/LiveWriter/Manifest" rel="wlwmanifest" type="application/wlwmanifest+xml" />
<link href="https://weblogs.asp.net/lichen/rsd" rel="EditURI" title="RSD" type="application/rsd+xml" />

