Take pain out of Windows Communication Foundation (WCF) configuration (1)
WCF is a very flexible technology. The flexibility comes with complexity; there are many configurable pieces. It is usually relative easier to start with an ASP.NET project and add WCF service to it. However, as we start changing things and deploying web service to production, many unexpected problem could occur. I have written many WCF web services in my life but I don’t spend high enough percentage of my time working WCF. So I went through the same struggle again each time when I work with WCF. So I thought I would start documenting the experience to stop the pain.
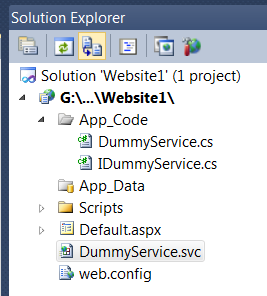
If I started with an empty website called website1 and add a WCF service called DummyService, Visual Studio will added the DummyService.svc as well as the associated interface and implementation in the App_Code directory.
The contents of the .svc file looks like:
Everything works fine and makes sense, but both the service interface and implementation class lives in the global namespace. Now supposing I like to put business logic in a library project, I add another library project with namespace DummyLib and move the interface and implementation into the library project. I add the reference to System.ServiceModel in my DummyLib project and add a project reference to DummyLib into my website. Now I need to change my .svc file. Obvious, I do not need the CodeBehind attribute any more as my code is compiled by my library project. How do I reference the class? According to MSDN, the Service attribute should point to "Service, ServiceNamespace". Unfortunately, that does not work. Fortunately, like any other place where a type is referenced, I can use a type name like “TypeName, AssemblyName, etc”. Look at the web.config file and look for a type attribute and you will know what I am talking about. So now I .svc file looks like:
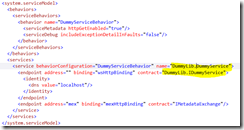
Is it enough? No. WCF actually stores very few information in the class and stores lots information in the web.config; that is how it could be configurable. So we need to modify the web.config to reference both the namespaced interface and namespaced class (two changes).
Now it is time to examine our web.config file. There is a serivce element that points to our implementation type. The service exposes 2 end points: one is our service end point; the “mex” endpoint if for retrieving meta data, in our case, WSDL. The web service end points to the wsHttpBinding and the mex endpoint poinsts to the mexHttpBinding. Finally, the service point to a behavior that is HttpEnabled and does not include Exception Details in fault. Confused? It is not easy to create configuration like this from scratch, but once the Visual Studio created this for us, we can feel our way to move around a bit. Fortunately, Windows SDK has a really nice tool called SvcConfigEditor. It is normally in C:\Program Files\Microsoft SDKs\Windows\v7.0A\Bin or C:\Program Files (x86)\Microsoft SDKs\Windows\v7.0A\Bin. If I open my web.config file with SvcConfigEditor, and look at the choice for end point binding:
There are lots of choices. If we work with SOAP, two common choices are basicHttpBinding and wsHttpBinding. basicHttpBinding supports an older standard of SOAP. It does not support message level security, but is very compatible with all kinds of clients. wsHttpBinding supports newer SOAP standard and many of the WS* extensions. Now supposing we have legacy clients so we need to use basicHttpBinding. We also want to use Https to secure us at the transport level. Let us see how many changes that we need to make.
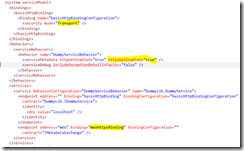
Firstly, basicHttpBinding does not support https by default. We need to create a basicHttpBindingConfiguration to change the default. So I click the Bindings node on the left and then add a binding configuration calls basicHttpBindingConfiguration. Then I can click the Security tab and then the Mode from “None” to “Transport”. Now I can return to the end point and the configuration I just created is available to select in the BindingConfiguration attribute. Next, we need to go to the behavior, and add HttpsGetEnabled=”True”. Lastly, we need to go to the “mex” endpoint to change binding from mexHttpBinding to mexHttpsBinding. So to change from http to https, we need to make 3 modifications and our web.config now looks like:
In the next part, I will talk about WCF tracing and message logging. It really makes trouble shooting easier.


