Archives
-
Declarative helpers in Razor
ASP.NET Web Pages Beta 1 have support for Helpers, which are methods written in C# or Visual Basic, and returns IHtmlString. They can return HTML that is displayed on the page. If you choose to create helpers that way, you would need to have your HTML in an assembly, which makes it different to modify. Because of that, the new version of Razor supports declarative Helpers that you can create directly on the page. They work in both ASP.NET MVC 3 Beta and ASP.NET Web Pages Beta 2, which is included in WebMatrix.
-
Unobtrusive validation in ASP.NET MVC 3
In ASP.NET MVC 2 we got support for client validation of the model. When we activate it, a JavaScript is generated and added to the rendered view. It contains all validation rules we set up for the model, and are used to generate error massages without reloading the page.
-
Introducing NuPack
When you install ASP.NET MVC 3 Beta or WebMatrix Beta 2, a new product called ”NuPack” is installed with it. NuPack makes it possible to quickly add references to third party products like Ninject, jQuery and so on. All necessary files (dll, js etc) are automatically added to the project, and necessary modifications in web.config are automatically added.
-
What's new in ASP.NET MVC 3 Beta & WebMatrix Beta 2
Microsoft just released ASP.NET MVC 3 Beta, which came with some news. Among other things, we now have a new project dialog box, an updated version of Razor, support for helpers from ASP.NET Web Pages, new interfaces for Dependency Injection, unobtrusive jQuery validation and more. A new beta of WebMatrix has also been released.
-
New Internet Explorer 9 APIs
Internet Explorer 9 Beta 1 introduces some new APIs to make it possible to integrate with the jump lists and icons on the taskbar. To make it easier to use them, I created an even simpler API.
-
Get started with HTML5 – Canvas
Playing games on the internet using Silverlight or Flash is getting really popular, which you can see if you are using Facebook (Farmville, anyone?). To play these games you need to install a plugin to your browser, or you won’t be able to play them. On some devices you can´t install plugins like these, which make it impossible to play them. Instead you will have to create separate applications for each device, but then you will have to maintain several versions of your application.
-
Introduction to HTML5
HTML5 is the next version of the HTML standard and is developed by W3C and WHATWG. After HTML 4.01 was released W3C started to work with XHTML 1.0, which have the same elements as HTML 4.01 but gives us a XML compatible syntax. They continued with XHTML 2.0, which should have many new elements, and wouldn´t be compatible with XHTML 1.x at all. Meanwhile a new group called WHATWG (Web Hypertext Technology Working Group) started to work on a new separate standard called Web Applications 1.0, which should be a natural next step of HTML 4.01.
-
Kom igång med HTML5 – Canvas
Att spela spel på internet genom Silverlight- eller Flash-baserade gränssnitt blir alltmer populärt, vilket man kan se om man är flitig användare av Facebook. Dessa spel kräver att man har rätt komponent installerad för att kunna köra dem över huvud taget. På vissa enheter som till exempel mobiltelefoner händer det ofta att man inte kan installera dessa plugins, och då måste man lösa det på ett annat sätt. Det skulle t.ex. kunna lösas genom att man skriver ett separat program som påminner om det man visade på sidan, men även det kan ge problem då man har flera olika applikationer att underhålla.
-
Introduktion till HTML5
HTML5 är nästa version av HTML-standarden och tas fram av W3C tillsammans med WHATWG. Efter att HTML 4.01 släpptes så började W3C arbetet med XHTML 1.0, vilket har exakt samma element som HTML 4.01, men ger en syntax mer lik XML. De fortsatte sedan med XHTML 2.0, vilket skulle ha helt nya element, och då inte alls bakåtkompatibelt med XHTML 1.0. Under tiden började en ny grupp kallad WHATWG (Web Hypertext Technology Working Group) med en separat standard kallad Web Applications 1.0, vilket skulle bli en fortsättning på HTML 4.01.
-
Use HTML5 forms in ASP.NET MVC
With the release of ASP.NET MVC 2 we got support for DisplayTemplates and EditorTemplates, which make it possible to create custom forms for the edit views. With this feature, we can easily take advantage of the new input fields in HTML5 such as date, color, email etc.
-
Generate CSS Sprites in ASP.NET
Something that is very common on websites is small images that is used to make links and other things look better. These small images is either added as a background image for the link, or as a separate image. When you load these images, they are requested and downloaded separate. Since the browser only make a small number of requests at once, it can take a while before all images is loaded on the page. To solve this, you can use CSS Sprites.
-
Use Razor for T4 Templates
Razor, the new ASP.NET MVC View Engine from Microsoft, makes it possible to write much cleaner views for our ASP.NET MVC sites. But since the code is so clean, why not use it in other places? Gustavo Machado have written a great blog post where he uses the open APIs to write a console application that can compile Razor views without the need of IIS.
-
Add namespaces with Razor
When you are using ASP.NET with WebFormViewEngine and wants to call a method in a separate namespace, you can add a reference to the namespace in web.config to get a cleaner view.
-
Introducing ASP.NET MVC 3
In march, ASP.NET MVC 2 was released. It contains many new features such as data annotations, areas, validation and other things. These functions makes it easier to create larger projects where we easily can set annotations for the models, and also split the projects into different sections.
There are though some things that we want to change, and we often have to repeat ourselves, like when using ActionFilter for all controls and action methods We could solve this using ASP.NET MVC 2, but that requires extra work from us since there isn´t any kind of built-in support for that.
The solution for these and many other problems exists in ASP.NET MVC 3, which is released as a preview.
So, what are the biggest new features and changes in this firs preview of ASP.NET MVC 3?
- Razor, a new ViewEngine for ASP.NET MVC. Razor also works for ASP.NET Web Pages.
- ASP.NET MVC 3 requires .NET 4.0 and does not suport .NET 3.5 anymore.
- Global ActionFilters, which make it possible to register action filters for all controllers and method in one place.
- Dynamic View and ViewModel properties. In previous versions of ASP.NET we had to useViewData, which is a dictionary with strings and objects. Now we have dynamic properties instead.
- The possibility to choose View Engine when creating a new view.
- Support for injecting code using a built-in Service Locator.
- JsonValueProviderFactory which makes it possible to post Json directly to a page and retrieve it as a custom type.
- Support for new data annotations in .NET 4.0.
- Support for IValidateObject in our models, so we can use custom validation for the values directly from the model.
- New types of ActionResult.
I am going to talk about most of these new features here, and the other things will be published later in separate articles.
Create your first ASP.NET MVC 3 project
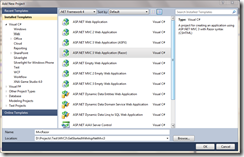
When ASP.NET MVC 3 is installed, we can see some new project types in Visual Studio 2010. When we choose to create a new project, it will look like this:
We can see three new project templates here: ”ASP.NET MVC 3 Web Application (ASPX)”, ”ASP.NET MVC 3 Web Application (Razor)” and ”ASP.NET MVC 3 Empty Web Application”. If we create a project using ASPX, we will get the same views as in earlier versions, which are using WebFormViewEngin, but if we choose to use Razor, we will use this new View Engines instead. In this case I choose to create a Razor project.
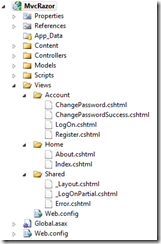
What we have now is an ordinary ASP.NET MVC project with folders for Models, Views and Controllers. There are some changes though, instead of aspx files in the views folder, we have cshtml files:
Cshtml is the file extension for views using the Razor vew engine. We can still use aspx files, but then the WebFormViewEngine will be used instead.
If we open View\Home\Index.cshtml we will see this:
@inherits System.Web.Mvc.WebViewPage
@{View.Title = "Home Page";
LayoutPage = "~/Views/Shared/_Layout.cshtml";
}
<h2>@View.Message</h2>
<p>
To learn more about ASP.NET MVC visit <a href="http://asp.net/mvc" title="ASP.NET MVC Website">http://asp.net/mvc</a>.
</p>
There is no intellisense or syntax highlighting for Razor in Preview 1, so if you want t use it, you will still havet o use aspx files until it´s there.
If we take a look at the code, we can find some interesting things. First, we have @inherits on the first line. We use that to declare which type the view uses. In ASP.NET MVC 2 we had ViewPage or ViewPage<T>, and with Razor we now have WebViewPage or WebViewPage<T>. If we use aspx files with ASP.NET MVC 3, they will still use ViewPage.
After that we have a code block with two lines of code. On the first line we set View.Title, and on the other we set LayoutPage. View is the dynamic type we use instead of ViewData, and LayoutPage is used to set the master page we want to use.
After the code block we display View.Message, wich is a ViewData object.
How come we set one View value, and then display another?
If we take a look at HomeController.cs, we can see this:
using System;using System.Collections.Generic;using System.Linq;using System.Web;using System.Web.Mvc;namespace MvcRazor.Controllers{public class HomeController : Controller
{public ActionResult Index(){ViewModel.Message = "Welcome to ASP.NET MVC!";return View();}
public ActionResult About(){return View();}
}
}
Here is ViewModel.Message set. ViewModel is exactly the same as View, which means we use it instead of ViewData. This is the value we use in the view.
But we also set View.Title without displaying the value in the view. What happens here is that the value is sent to the LayoutPage which looks like this:
@inherits System.Web.Mvc.WebViewPage
<!DOCTYPE html PUBLIC "-//W3C//DTD XHTML 1.0 Strict//EN" "http://www.w3.org/TR/xhtml1/DTD/xhtml1-strict.dtd">
<html xmlns="http://www.w3.org/1999/xhtml">
<head>
<title>@View.Title</title>
<link href="@Url.Content("~/Content/Site.css")" rel="stylesheet" type="text/css" />
</head>
<body>
<div class="page">
<div id="header">
<div id="title">
<h1>My MVC Application</h1>
</div>
<div id="logindisplay">
@Html.Partial("_LogOnPartial")</div>
<div id="menucontainer">
<ul id="menu">
<li>@Html.ActionLink("Home", "Index", "Home")</li>
<li>@Html.ActionLink("About", "About", "Home")</li>
</ul>
</div>
</div>
<div id="main">
@RenderBody()
<div id="footer">
</div>
</div>
</div>
</body>
</html>
Here are we reading the value from View.Title for the header in the page. The value have been sent from the view to the masterpage, just like we could do with a ContentPlaceHolder before.
In the LayoutPage we use standard helpers for ASP.NET MVC, just like we use to do before. There are some new things as well though, like the RenderBody() which is used to specify where the view should be rendered.
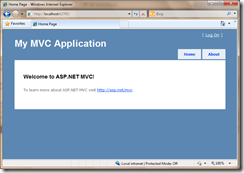
If we click on F5 to start the project, we will get this:
This site looks just like it dit in earlier versions of ASP.NET MVC, and we can now start buidling the page.
Create a guestbook
If we want to get feedback from our visitors, we could have a guestbook on the page. I am going to create a new guestbook from scratch, using ASP.NET MVC 3 with Razor, and store the values in a SQL Server Compact 4 database created with Entity Framework 4 CTP 4.
First we will need to create a model. We give the model the name GuestbookEntry and create it like this:
using System;using System.ComponentModel.DataAnnotations;namespace MvcRazor.Models{public class GuestbookEntry
{public int Id { get; set; }
[StringLength(25)]
[Required]
public string Name { get; set; }
[DataType(DataType.EmailAddress)]
[Required]
public string Email { get; set; }
[Required]
public string Message { get; set; }
public DateTime Posted { get; set; }}
}
To create a database I first create a new folder named Code, where I create a new class file with the name DataContext. I add the following code:
using System.Data.Entity;using MvcRazor.Models;namespace MvcRazor.Code{internal class DataContext : DbContext
{public DbSet<GuestbookEntry> Guestbook { get; set; }}
}
To use the new functions in Entity Framework 4 CTP 4, we need to add a reference to the dll for the CTP. Thanks to the new Code-First functionality, we will be able to use our model directly in our database without the need of writing custom SQL.
To create the database automatically if it´s not existing already, we will have to add this to Application_Start in global.asax:
Database.SetInitializer<DataContext>(new RecreateDatabaseIfModelChanges<DataContext>());The database will now be recreated everytime we change the model.
The last thing we need before using the model is to add a key in web.config with the connection string to the database.
<add name="DataContext" connectionString="Data Source=|DataDirectory|DataContext.sdf" providerName="System.Data.SqlServerCe.4.0" />
Since the database doesn´t exist yet, it will be created the first time we run the application.
How you can use DataContext to work with the database
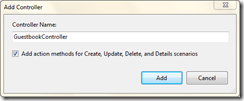
To work with the database we need to create controllers which sends the data between our database and views. I am now going to create a new GuestbookController where I check the box for creating additional action methods:
Since we don´t have all the functionality in our guestbook, I will remove unnecessary methods, and get this:
using System.Web.Mvc;using MvcRazor.Code;using MvcRazor.Models;namespace MvcRazor.Controllers{public class GuestbookController : Controller
{DataContext _ctx = new DataContext();// GET: /Guestbook/public ActionResult Index(){return View();}
// GET: /Guestbook/Createpublic ActionResult Create(){return View();}
// POST: /Guestbook/Create[HttpPost]
public ActionResult Create(GuestbookEntry entry){try{return RedirectToAction("Index");
}
catch{return View();}
}
}
}
Outside of the methods, I create a new instance of DataContext, which will be used by the different methods to work with the data.
In the index method we will have a list with all entries in the guestbook. Since we have a reference to an ObjectContext (in this case it´s DataContext), it will be really easy to accomplish this The index method will look like this:
public ActionResult Index(){return View(_ctx.Guestbook.ToList());}
We also updates the Create method so we can save new entries:
// POST: /Guestbook/Create[HttpPost]
public ActionResult Create(GuestbookEntry entry){try{entry.Posted = DateTime.Now;
_ctx.Guestbook.Add(entry);
_ctx.SaveChanges();
return RedirectToAction("Index");
}
catch{return View();}
}
It´s really easy to work with the data using our DataContext, and now we have everything we need to list and create entries in our guestbook.
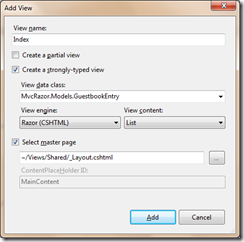
The next step is to create the views, so we start with the index view. It´s a generic view (GuestbookEntry), and it is going to list the entries using the Razor view engine. Right-click inside of the Index method and choose Add View. If you are familiar with ASP.NET MVC 2 or the previous version, you will see some changes here:
The new feature here is the ability to choose which view engine to use, and automatically use the corresponding T4 template to render it. If we click on Add, the view will be generated. There are though some properties we don´t want to show here, such the links and Id, so we delete them. The result is:
@inherits System.Web.Mvc.WebViewPage<IEnumerable<MvcRazor.Models.GuestbookEntry>>
@{View.Title = "Guestbook";
LayoutPage = "~/Views/Shared/_Layout.cshtml";
}
<h2>Index</h2>
<table>
<tr>
<th>
Name
</th>
<th>
Email
</th>
<th>
Message
</th>
<th>
Posted
</th>
</tr>
@foreach (var item in Model) {<tr>
<td>
@item.Name
</td>
<td>
@item.Email
</td>
<td>
@item.Message
</td>
<td>
@String.Format("{0:g}", item.Posted)</td>
</tr>
}
</table>
<p>
@Html.ActionLink("Create New", "Create")</p>
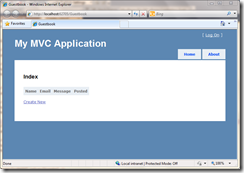
The view looks like the start page, but now we have a model, which we can see on the first line. We also use Razor instead of the old code blocks (<%%>).
We will now create a view for adding entries, so we choose Create instead of List for the new view.
We will remove the Id and Date fields for this new view, so it looks like this:
@inherits System.Web.Mvc.WebViewPage<MvcRazor.Models.GuestbookEntry>
@{View.Title = "Create";
LayoutPage = "~/Views/Shared/_Layout.cshtml";
}
<h2>Create</h2>
@using (Html.BeginForm()) {@Html.ValidationSummary(true)
<fieldset>
<legend>Fields</legend>
<div class="editor-label">
@Html.LabelFor(model => model.Name)</div>
<div class="editor-field">
@Html.TextBoxFor(model => model.Name)@Html.ValidationMessageFor(model => model.Name)</div>
<div class="editor-label">
@Html.LabelFor(model => model.Email)</div>
<div class="editor-field">
@Html.TextBoxFor(model => model.Email)@Html.ValidationMessageFor(model => model.Email)</div>
<div class="editor-label">
@Html.LabelFor(model => model.Message)</div>
<div class="editor-field">
@Html.TextBoxFor(model => model.Message)@Html.ValidationMessageFor(model => model.Message)</div>
<p>
<input type="submit" value="Create" />
</p>
</fieldset>
}
If we press F5, we will see this:
We have now created a very simple guestbook where the visitors can create new entries. The database is auto-generated, so we will not have to think about that.
If we go to the create view and posts the form without the correct values, we can see that we also got validation based on our data annotations for the model.
-
Code-First with Entity Framework 4 and ASP.NET Web Pages
Scott Guthrie and Scott Hanselman have written great blog posts about how to use the new Code-First functionality in the latest Entity Framework CTP. But what about ASP.NET Web Pages?
-
Routes with ASP.NET Web Pages
Det här finns att läsa på svenska här:
-
SQL Server Compact 4 Preview is released
When you install WebMatrix, SQL Server Compact 4 is automatically installed with it. If you only want to download just the database, you can do so here:
-
Change settings for you web site in WebMatrix
When we create new sites in WebMatrix, they are automatically being used by IIS Express for rendering them. To modify how IIS Express is used, we can use the Settings page in WebMatrix.
-
Run code automatically in ASP.NET Web Pages
Artikeln på svenska:
-
Show logs in Web Matrix
A very interesting feature in Web Matrix is the possibility to show logs. When we visit a page through IIS Express, Web Matrix stores the requests which makes it possible to see them afterwards.
-
Show server information with ASP.NET Web Pages
Post in swedish:
-
Use caching in ASP.NET Web Pages
Artikeln finns på svenska här:
http://www.aspsidan.se/default.asp?page=readarticle&artId=709 -
Introduction to ASP.NET Web Pages
When .NET Framework 1.0 was released you could create web sites using Web Forms, which looks a lot like how you used to create applications with Visual Basic and similar. The idea was to have an event driven way to create web pages, and that you should not have to take care of how it rendered the HTML. It became an success and many went from classic ASP and other languages to this new framework.
-
I´m going to blog in english
Yepp, it´s true. I have decided to blog in english. I have got a lot of comments from tweeples, other bloggers, friends and others who would like to read this blog without using
Google TranslateBing Translate all the time. -
Generera kod med T4-templates
Något som har funnits med ett tag, men som inte har använts särskilt mycket förrän när ASP.NET MVC introducerades är T4-templates. T4 är en akronym för ”Text Template Transformation Toolkit”, och gör det möjligt att skapa upp en mall som sedan kan användas för att generera färdig kod.
-
Skapa en egen ViewEngine
När man skapar nya vyer i ASP.NET MVC så skapas en aspx-fil upp, vilken påminner en del om klassisk ASP. När man sedan går in på sidan så kan man se att kodblocken är utbytta mot HTML. Den här transformeringen sker i vad som kallas en View Engine. Som standard i ASP.NET MVC används en View Engine vid namn WebFormViewEngine. WebFormViewEngine ärver klassen VirtualPathProviderViewEngine, som i sin tur implementerar IViewEngine.
-
Använd POCO-stödet i Entity Framework 4
I första versionen av Entity Framework som kom i .NET 3.5 SP 1 fanns till största delen grundläggande funktionalitet för att kunna koppla sig mot en databas snabbt och enkelt och utföra operationer. Dock saknades väldigt mycket, och på grund av en mängd beroenden bland de klasser som genererades så blev det svårt att enkelt separera på logiken. I .NET 4.0 introducerades en mängd funktioner för att lösa detta, och det är bland annat det jag kommer att använda mig utav här.
-
Använd Route Constraints i ASP.NET MVC
För att kunna skicka värden till våra action-metoder tvid vanliga GET-anrop så kan vi använda route-värden. Som standard i ett ASP.NET MVC-projekt finns ett sådant värde i routen vid namn ”id”. I global.asax ser det ut så här:
-
Anpassa cachen i ASP.NET 4.0
När ASP.NET 2.0 kom följde en del providers med för Membership, Personalization och annat. Sedan har det stått stilla på den fronten fram tills nu. I ASP.NET 4.0 introduceras OutputCacheProvider som ger oss möjligheten att enkelt anpassa output-cachen i ASP.NET. Tack vare detta kan vi antingen skriva helt anpassade providers för cachen, eller använda oss utav till exempel AppFabric Cache.
-
Skapa en egen ControllerFactory
När vi skapar nya projekt i ASP.NET MVC så får vi med två Controllers, HomeController och AccountController. Vi kan även enkelt skapa egna Controllers, vilka alltid måste ha suffixet Controller, samt ligga i mappen ”Controllers”.
-
Vad har ActionResult för funktion i ASP.NET MVC?
När vi skapar ett projekt i ASP.NET MVC så får vi med två standard-controllers i projektet (AccountController och HomeController). I dessa finns det sedan metoder som används för att ta emot de requests som görs. Metoderna som tar hand om dessa kallas ofta ”action-metoder” och är av typen ActionResult som standard. Men vad är egentligen ActionResult?
-
Lösningen på codec-problemen heter VP8!
Idag har jag varit i Umeå (tidigare även Sundsvall och Stockholm) för att tillsammans med Danwei Tran hålla ett föredrag om bland annat ASP.NET och webbstandarder.
-
Skydda dig mot XSS
Gång på gång hör man om webbsajter som på olika sätt blir hackade. Som tur är så kan vi faktiskt skydda oss väldigt lätt mot de flesta attacker.
-
Ladda in vyerna i ASP.NET MVC asynkront
Med hjälp av lite Ajax så kan vi göra det möjligt att ladda in alla vyer i ASP.NET MVC asynkront. För att göra det möjligt så kommer jag att använda mig utav jQuery samt ett plugin som håller reda på webbläsarhistoriken.
-
Tips & Trix för VS2010 – Högerklicka i projektlistan
Det finns en feature i Visual Studio 2010 som är enkel, men fantastiskt bra. På startskärmen som kommer när man startar programmet så kan man högerklicka på projekten i listan. Man kan sedan öppna projektet som vanligt, men utöver det även öppna mappen som projektet finns i på hårddisken, samt ta bort projektet från listan.
-
Kortkommandon i Visual Studio 2010
I Visual Studio 2010 som släpps imorgon (äntligen!) så kommer det en del nya kortkommandon till följd av ny funktionalitet. Det finns en bra lista på dessa kommandon här:
-
Analysera dina OData-tjänster
När man skapar referenser till OData-tjänster så kan man utforska dem genom att till exempel skapa en proxyklass för dem och sedan se vad man får ut av det, eller kanske surfa direkt till tjänsten för att utforska datan.
-
Få intellisense för HTML 5 i VS 2010
Microsoft har tidigare lagt upp filer som kan ge intellisense för HTML 5 i Visual Studio 2008:
-
En första titt på Internet Explorer 9
Microsoft har äntligen släppt en förhandsversion av sitt efterlängtade Internet Explorer 9. Webben har utvecklats i en väldigt snabb takt de senaste åren tack vare den konkurrens som finns bland webbläsarna.
-
ASP.NET MVC Futures – Gör applikationen dynamisk
Det är inte mycket som är klart angående ASP.NET MVC 3, men en sak som de har gått ut med är att det kommer att kräva .NET 4.0. För oss utvecklare så betyder det att så fort det handlar om ett ASP.NET MVC 3-projekt så kommer vi att kunna använda oss utav funktioner som dynamic, optional/named parameters, ASP.NET Charting, nya koblocket för HtmlEncode och mycket annat.
-
ASP.NET MVC Futures – Templates
Då det här gäller ASP.NET MVC Futures så innebär det att innehållet nedan kan komma att försvinna helt i framtiden. Det är möjligt att använda det nu, men använd det inte till skarpa projekt då det kan försvinna framöver.
-
Vilken version av ASP.NET MVC kör du?
Då Microsoft har släppt ett flertal previews, betor och fulla versioner samt Futures av ASP.NET MVC så kan det vara svårt att veta exakt vilken version som körs på din site, eller server. För att göra det lättare att se vilken version som körs så har Microsoft i ASP.NET MVC 2 RTM Futures med en fil vid namn MvcDiagnostics.aspx, och som innehåller versionsnumren för alla previews av ASP.NET MVC och Futures. När man sedan går in på sidan så ser man vilken som används på den aktuella sidan.
-
ASP.NET MVC 2 släppt!
Idag släppte Microsoft äntligen ASP.NET MVC 2. Med tanke på hur ofta de släpper releaser av det så blir man nästan lite bortskämd, men nu är det alltså RTM som finns ute, vilket gör att ni kan använda det skarpt direkt i era projekt.
-
Visual Studio 2010 RC har släppts
Nu på morgonen så släpptes Visual Studio 2010 RC samt .NET 4.0 RC på MSDN. De som inte har en MSDN Subscription får vänta med nedladdningen tills imorgon.
-
AutoMapper med ASP.NET MVC
Ett vanligt problem när man utvecklar är att man gång på gång måste skriva funktionalitet för att mappa en klass till en annan. När man arbetar med ASP.NET MVC så händer det ofta att man har en modell som är anpassad för en viss vy, men datan man tar emot kan innehålla samma rådata, men med ett helt annat upplägg. Det vi får göra då är att mappa om det mottagna objektet till det som vi sedan skall använda till vyn.
-
Kom igång med ASP.NET, del 3 - Bygg ut projektet
Trots att vi fortfarande inte har skrivit en enda rad kod än så länge så har vi en webbsajt med medlemshantering. Den ser dock lite trist ut, och har inte så mycket funktionalitet, så det ska vi ta och ändra på nu.
-
Kom igång med ASP.NET, del 2 - Första projektet
När vi nu har installerat verktygen så är det dags att skapa första projektet. Det vi kommer att skapa är ett ASP.NET MVC-projekt. Det finns två olika typer av ASP.NET-projekt, Web Forms och MVC. Web Forms är den första varianten som kom med .NET 1.0, och MVC är den nyare som kom efter .NET 3.5 SP 1. Skillnaden i dessa ligger i hur man jobbar med presentationen, men då de båda bygger på .NET så är det inte svårt att lära sig det andra när man har lärt sig det ena.
-
Kom igång med ASP.NET, del 1 - Verktygen
När man utvecklar så har verktygen en väldigt stor roll i hur effektivt man arbetar. När man skriver ASP.NET-sidor så kan man använda vilken texteditor som helst, inklusive det gamla hederliga Notepad, då det är ren text. För att man skall bli produktiv i sitt utvecklande så kan det dock vara bra att ha kompetenta verktyg som underlättar arbetet.
-
ASP.NET MVC 2.0 & .NET 4.0 – Tuple
Jag tog tidigare upp ett exempel som visar hur man kan använda dynamic och det nya objektet ExpandoObject för att skicka dynamiska variabler från controllern till vyn (http://weblogs.asp.net/mikaelsoderstrom/archive/2010/01/08/asp-net-mvc-2-0-amp-net-4-0-expandoobject.aspx). En nackdel med det kan vara att man t.ex. inte får någon intellisense, vilket man annars får när man använder statiska objekt.
-
ASP.NET MVC 2.0 & .NET 4.0 – ExpandoObject
Jag har tidigare skrivit om ett nytt objekt i .NET 4.0, kallat ExpandoObject (http://weblogs.asp.net/mikaelsoderstrom/archive/2009/10/06/skapa-objekt-med-data-dynamiskt-med-expandoobject.aspx). Det är ett objekt som finns under System.Dynamic och som låter utvecklaren själv sätta egenskaper och metoder direkt på det istället för att skapa upp en separat klass.
-
Jag är en ASP.NET MVP!
Jag fick ett mail tidigare idag där det stod att jag har blivit utnämnd till ASP.NET MVP. Det känns fantastiskt kul att ha blivit utnämnd till det. Wow! :-)
