Creating WinPE with Integration Services for Hyper-V
At ORCS Web, we’re using System Center Configuration Manager (SCCM) with Microsoft Deployment Toolkit (MDT) and have it set to deploy new images to physical or virtual hardware.
Most everything works great, but the one thing I’ve wanted to get working is to add the Hyper-V Integration services to the Boot Image (WinPE in this case) so that 1) the regular Network Adapter (not the Legacy adapter) works and 2) there is mouse support right from the beginning. Once the boot image is created, the Hyper-V virtual machine can have the .ISO image mounted as bootable media.
Note that PXE boot with Hyper-V still requires the legacy network adapter (as far as I’ve been able to determine anyway). The better way to go is to use bootable media that can be mounted to the VM as a virtual CD/DVD drive. I’ll set out to cover how to do that here.
The following three links got me going in the right direction. However, it appears that the vmguest.iso file changed from when they wrote their blog posts until now, so I used different files then they did:
- http://blogs.technet.com/mniehaus/archive/2008/09/13/using-the-hyper-v-integration-components-with-mdt-2008-update-1-lite-touch.aspx
- http://blogs.technet.com/deploymentguys/archive/2008/06/12/adding-hyper-v-integration-components-to-winpe-using-mdt-2008.aspx
- http://blogs.msdn.com/mikester/archive/2008/05/30/using-the-hyper-v-integration-components-in-winpe.aspx
Here are the key steps:
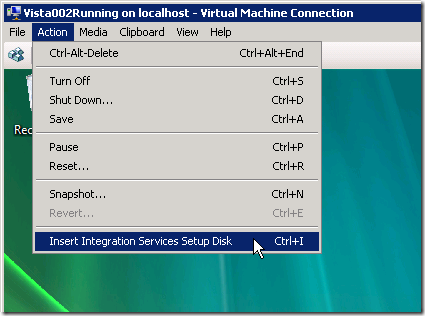
- Go to an existing Hyper-V VM and insert the Integration Services Setup Disk. This is easiest with a server which you have already installed the Integration Services on so that you will have your mouse for the remaining steps.

- Don’t run the installation now. Instead, use Windows Explorer and navigate to the new drive and the Support folder. There are 2 subfolders: amd64 and x86. To create your 32-bit image, use the x86 folder. To create your 64-bit image, use the amd64 folder (even if it’s Intel 64-bit). I created two folders on my SCCM server. One for x86 and one for x64.
- Simply double click on the .cab file to view the contents. The file will be named Windows6.0-HyperVIntegrationServices-x64.cab or Windows6.0-HyperVIntegrationServices-x86.cab.
- Copy the contents of that cab file to your SCCM server. I do it over a UNC network path, but you can use whatever means of copying that you prefer. You don’t need all of the files in the cab, but it’s a small cab and easiest just to copy everything over.
Note: Now that you have the drivers, add them to your boot image. You can use whatever method that you use for your boot image, but I’ll include instructions for SCCM here. - Fire up Configuration Manager Console (ConfigMgr Console).
- Expand Site Database (your instance) / Computer Management / Operation System Deployment.
- Right-click on Drivers and click Import. The Import New Driver Wizard appears.
- In the Locate Driver step, point to the folder where you copied the cab contents to. Run this twice, once for 32-bit and once for 64-bit.
- In the next step I imported all drivers even though I only use 4 on a later step. I figured that I may use them for something else in the future. So, leave everything checked.
- Assign a category that mentions the bitness of the drivers so that you can tell the difference later.
- In the Add Driver to Packages step, create a new package or assign to an existing package.
- Don’t do anything on the Add Driver to Boot Images step since we don’t want all of the drivers assigned to the boot images. Click Next.
- Click Next to finish the Driver import.
Now that the drivers are imported into SCCM, you need to add them to your boot image - In the Drivers section of SCCM, find and select the following drivers for either x86 or x64:
- Microsoft Virtual Machine Bus Network Adapter (for network support)
- Microsoft Virtual Machine Bus Input Device Miniport (for mouse support)
- Virtual Machine Bus (I’m not sure if this is needed, but I added it anyway)
- Right-click and click Add or Remove Drivers to Boot Images.
- Check the boot image that you want to add to and click Update distribution points when finished.
- Finally, recreate your boot media.
Now you will be able to install an OS on a Hyper-V VM using the regular network adapter and mouse support.
As a side, I hoped that I could use x64 boot media and install both x64 and x86 operating systems. That would save me from choosing between the images as long as the hardware supports x64. Unfortunately it didn’t appear to work. I ran into driver issues later in the install process. I’m not saying that someone else can’t get it figured. It may be possible to embed the x86 drivers into the x64 boot image, but I didn’t take it that far. What I did prove is that configuring the x86 and x64 images identically wouldn’t allow the x64 boot image to deploy an x86 OS.