IIS: Using Windows Authentication with Minimal Permissions Granted to Disk
I had a question asked me recently regarding Windows auth and NTFS permissions. Here’s the question:
When I run an IIS site using Windows Authentication, is there a way to let
the Application Pool account access files in disk instead of the logged in
user. Ideally, the developer, (or operations) can list the users in web.config only, without the need to add these users to the file permissions or add them to some AD group that has these permissions.
Unless you work with these permissions often, it may be difficult to understand the situation well, so let me explain this another way.
To have a properly secured server, you should use the principle of least privilege, which essentially says that you should grant only what is absolutely required to enable a service to work, and nothing more. If you do this properly then you should have a tight list of permissions on disk for your website.
The difficulty comes when you use Windows authentication—rather than anonymous authentication—to grant access to a website, or a part of a website. What if you want to use IIS’s URL Authorization to manage access rather than using NTFS to manage access.
Keep reading and I’ll explain further. First let’s gain more of an understanding on how IIS security works.
Basic permissions required for anonymous access
When you use anonymous access, a clean setup will implement the following settings:
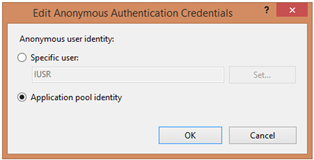
- Anonymous authentication for the website should be set to use the Application pool identity

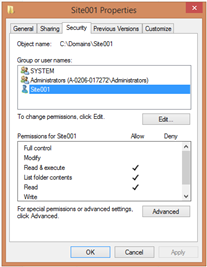
- Permissions on disk should be granted to:
If you can achieve this (and you should!), you will have a site which is accessible to only the one site, which minimizes the attack surface if another site on the same server is untrusted, or if it is exploited.
Basic permissions required for Windows authentication
However, what if you want to use Windows auth to grant or deny users access to your site based on their Windows’ accounts.
First, you would turn off anonymous authentication so that users are required to authenticate with a Windows account. 
There are now two options for the authorization part—which is to determine which Windows accounts are allowed and which are not:
- NTFS: Depend on the NTFS permissions (ACLs) on disk to determine which users have access (e.g. User1 is granted access but User2 isn’t). If you grant a user access on disk then they can access the site. If they do not have access then … well, they don’t have access.
- URL Authorization: Use IIS and/or ASP.NET’s URL Authorization. By default all users are granted access, but you can change this. Following is an example which has the default Allow All Users removed, and User1, User2, and the Administrators group granted access.

These settings are saved to the site’s web.config file, so you can set them manually too, and of course set them at the server level or other places in the IIS configuration hierarchy.
When using the URL Authorization method, you would need to grant access on disk to the Windows account (e.g. User1), basically meaning that option #1 and #2 are both used simultaneously.
Back to the original question
Let’s get back to the original question. What if you don’t want to have to grant the Windows accounts access on disk (#1 above) but you want to use URL Authorization (#2 above) to authorize Windows accounts access to your site?
Or, to word it another way, what if you want to use #2, without having to worry about #1 too.
Which users require access to disk?
This is possible, but let me step aside again and briefly explain how access to disk is determined.
The website accesses the disk by using the w3wp.exe worker process, which is essentially the application pool. The identity set for that app pool (e.g. IIS Apppool\Site001) is used in some situations on disk. In the anonymous access situation that was mentioned above, the site says to always use the application pool identity for anonymous users. So in that case you only need to grant the identity of the application pool to disk (SYSTEM and Administrators are beneficial for other usage, but not for actually running the site).
When using Windows authentication, the application pool identity (e.g. IIS Apppool\Site001) is used for some access but the Windows account (e.g. User1) is used for other access. It depends on the impersonation settings of your application or framework that you’re using. Therefore, you would generally need to grant access to the application pool identity, plus every Windows account (e.g. User1, User2, User99) which needs access to your site.
Back yet again to the original question
Let me try again to answer the original question, now that we’ve covered the aforementioned concepts.
What if you don’t want to have to maintain the disk permissions for each of the Windows users who you will add over time?
You have at least three options for this:
- You can be sloppy and just grant the Users or Everyone account access to disk. But please, please don’t do this on a production server. In fact even on your dev machine it’s not a good habit to get into.
- You can create a Windows group and whenever you have a new user who needs access to a site, you would add them to that group. This is a great solution and generally the best option. However, the original question above stated that they didn’t want to do this in their case, so that leads to #3.
- You can use the Connect As setting in IIS to have all disk access use a single account, regardless of the configuration. This means that you will not have to make any changes to Users or Groups, but instead you can make an IIS change to the list of allowed users and they will be granted access. If you are using IIS 7.0 or IIS 6.0 then you may need to consider this.
- In IIS 7.5, a new setting was introduced called authenticatedUserOverride. This enables you to say that you will use the application pool identity (Worker Process User) instead of the authenticated user’s identity. This is exactly what we’re looking for in this case.
The #4 option
Just like you can set the anonymous user to always run as the application pool identity, you can do the same for authenticated users. This was introduced in IIS 7.5. You can find the official documentation here.
You can change this using Configuration Editor, AppCmd or any of the APIs to update the settings, and you can set this at the server, site, or application level.
Here are the steps that are required to set the permissions for this requirement:
- Turn on Windows auth and turn off Anonymous auth:

- Using URL Authorization, grant only the users who should have access to the site:

- For the NTFS permissions, grant the following:
- SYSTEM: Full control
- Administrators: Full control
- Your application pool identity account (e.g. IIS AppPool/Site001): Read or Modify, depending on your requirements.
- Users required for FTP, web publishing or any other access to content on disk.

(Notice that I used the same images as I did previously … so far everything is the same.
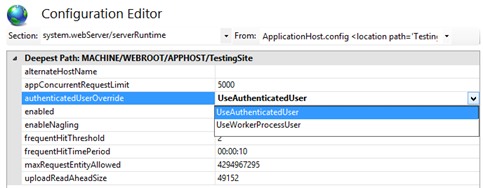
- Go to the site (or server or subfolder) in IIS Manager and open Configuration Editor.

- For the Section selection, choose “system.webServer/serverRuntime”
- Select UseWorkerProcessUser

- Click Apply
Alternately, for Steps 4-7 you can do the same with AppCmd using the following command. Make sure to replace the site name with your site name:
appcmd.exe set config "Site001" -section:system.webServer/serverRuntime /authenticatedUserOverride:"UseWorkerProcessUser" /commit:apphost
Viola! You have a minimalistic permission set on disk that supports Windows authentication without having to update your permissions on disk. Simply update URL Authorization whenever you need to grant or deny access to Windows users.
Note that this does not address non-disk access like integrated authentication for SQL Server or access to registry keys or other network resources. They will still use either the application pool identity or the Windows user account’s identity, depending on the impersonation settings that your application uses.
As you can see, there are multiple configurations that you can use for anonymous or Windows based authentication. You have a lot of flexibility to set this up the way that makes the most sense to you.
Just make sure that you don’t settle on a non-secure method. IIS provides a highly secure and manageable solution as long as you use it correctly. Hopefully this articles provides an understanding of the basic building blocks necessary to do so.